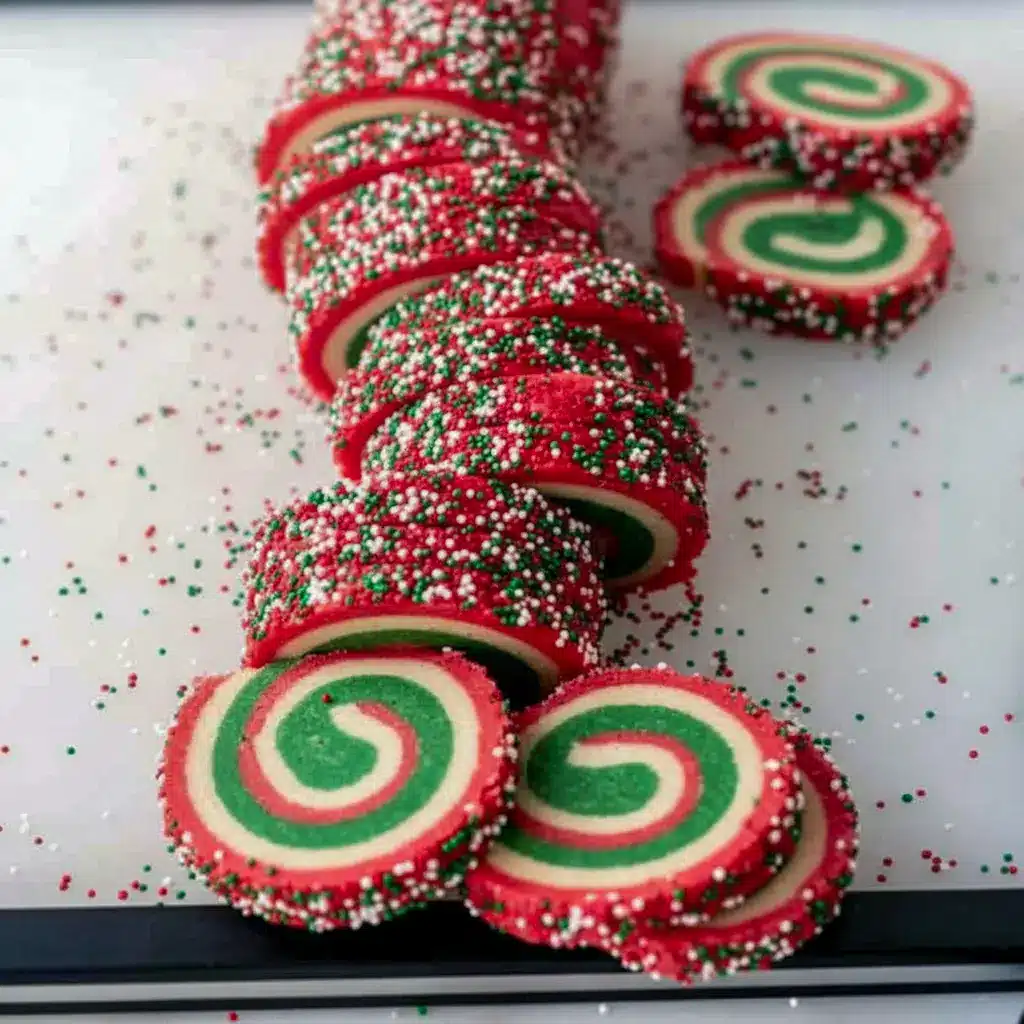
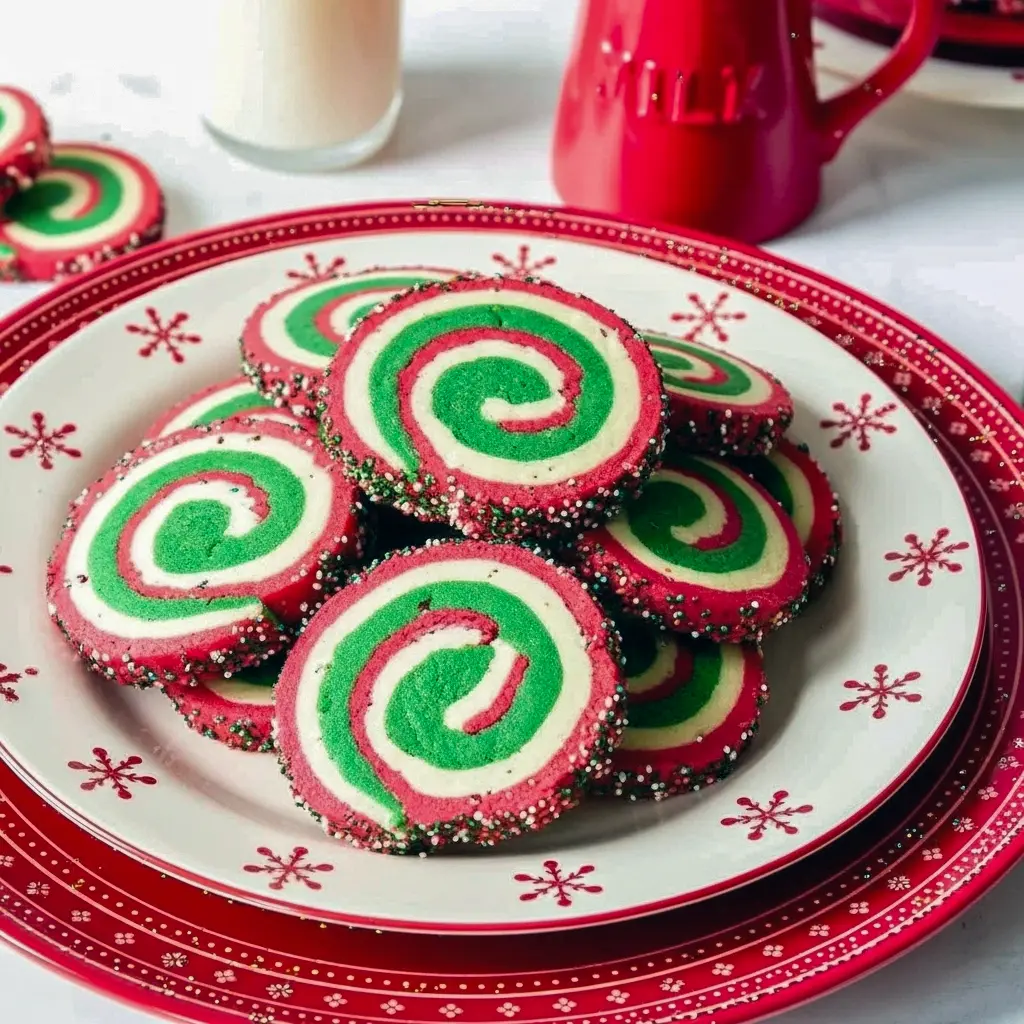
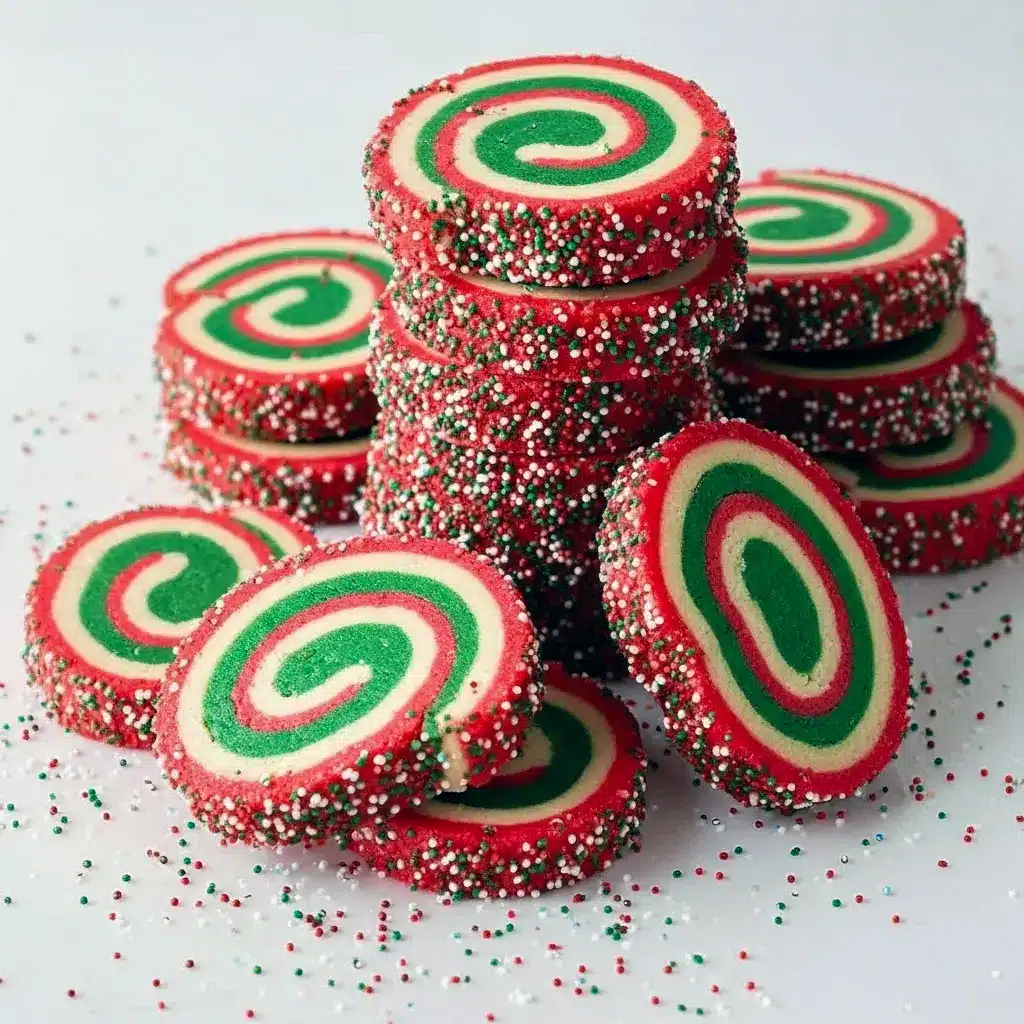
Christmas Sweets are the kind of treats that make people stop mid-conversation, reach for a second cookie, and then awkwardly pretend they weren’t just stealing the last bite. That’s exactly what happens with these dreamy Christmas pinwheel cookies — colorful, swoon-worthy, and absolutely vanishing from every tray they land on.
Brief introduction to the recipe
Pinwheel cookies look fancy, but they’re honestly doable. Think bright red and green swirls wrapped in buttery sugar cookie dough — festive, nostalgic, and perfectly at home on a platter of Pinwheel Cookies beside snowball cookies and red velvet bites. If you love Christmas Baking Recipes that actually get made (not just pinned), this one’s for you.
Why you’ll fall for these Christmas Pinwheel Cookies
Why do we love them? For starters: they’re a visual win. Those hypnotic spirals scream holiday cheer. They taste like a classic sugar cookie but with a little showmanship. And here’s the thing — they’re not rocket science. I used to be intimidated by rolling and assembling these, but after a few tries, you’ll find the rhythm. Now they’re a must on every plate — perfect for Christmas Cookie Boxes and as standout Christmas Sweets for parties.
The story behind the recipe
I first attempted pinwheels because I wanted a cookie that felt like a present. Fast forward a few attempts (and a few questionable-looking spirals), and I had a technique that makes the dough cooperate. These cookies became the ones family members request every year. They look professional enough for a bakery window but cozy enough to bake with kids and holiday music blaring. If you’ve been scrolling recipes and thinking, “That’s too fiddly,” give this a try — you’ll be surprised how forgiving they are.
Ingredients breakdown (short blurbs)
You won’t need a weird pantry item. Keep it simple and use good basics.
- All-purpose flour — the backbone. Use level scoops or a scale for consistent texture.
- Baking powder & salt — small quantities, big impact on rise and balance.
- Unsalted butter (room temp) — soft, pliable dough starts here. If you only have salted butter, reduce or skip added salt.
- Granulated sugar — for that classic sugar-cookie snap and sweetness.
- Egg (room temp) — binds the dough and gives structure.
- Vanilla extract (real) — don’t skip the good stuff; it lifts everything.
- Gel food coloring — for the brightest, truest reds and greens. Gel is concentrated and won’t water down the dough.
- Optional: almond or peppermint extract if you want a twist.
How to make them — Step-by-step “How to Make It”
Yes, you will roll. Yes, it’s worth it.
- Make the dough
Mix dry ingredients in one bowl (flour, baking powder, salt). In another bowl, cream together butter and sugar until light. Add the egg and vanilla, then stir in the dry mix until a soft dough forms. Don’t overwork it — you want tenderness, not toughness. - Divide and color
Split the dough into three equal portions. Weigh them if you have a scale — it makes a HUGE difference for even spirals. Leave one portion plain (white), and color the other two with gel food coloring: one red, one green. Use a hand mixer or sturdy spatula to incorporate the color evenly. Pro tip: start with a little color and add more; gel is potent. - Chill and flatten
Press each colored and uncolored dough portion into rough rectangles, wrap in plastic, and chill for at least an hour. Chilled dough rolls cleanly and holds shape better. - Roll each color into thin sheets
On parchment, roll the red, green, and white dough into even rectangles. Keep the thickness consistent (aim for about 1/8–1/4 inch). Chill briefly if the dough gets warm. - Layer and roll
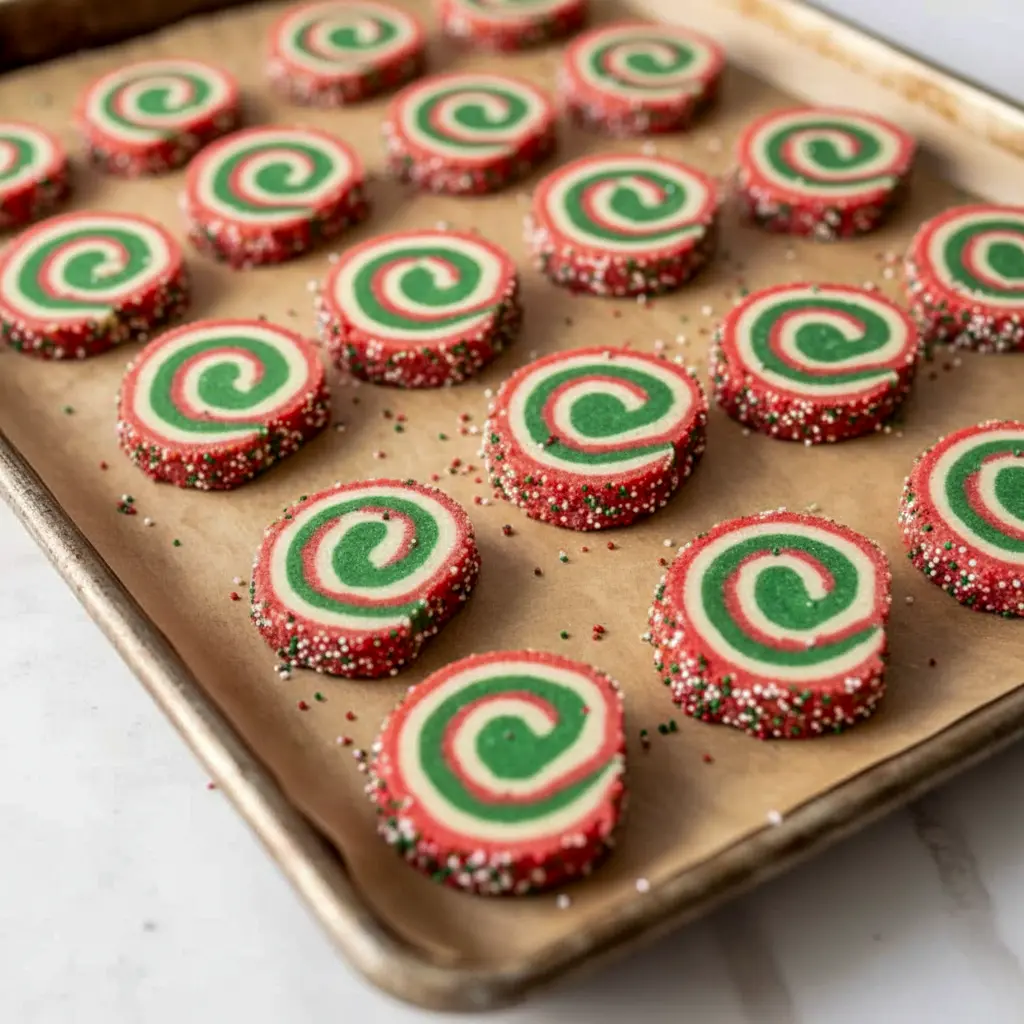
Stack the dough sheets: for example, white on the bottom, green in the middle, red on top — or whatever order you prefer. Press gently to adhere, then carefully roll the stack into a log, starting from the long side. Wrap the log tightly in plastic and chill again until firm. Cold log = clean slices. - Slice and bake
Use a sharp knife to cut the log into 1/4-inch rounds. Arrange them on parchment-lined baking sheets, leaving space to spread. Bake at 350°F (175°C) for 12–15 minutes, or until edges set and centers look firm. Let them cool a few minutes on the pan, then transfer to a wire rack. - Serve or store
Once cooled, pack into Christmas Cookie Box containers, layer with parchment, and gift away.
Pro tips for perfect pinwheels
- Weigh your dough portions. This is the fastest way to get neat, even spirals.
- Use gel food coloring for vivid, non-watery hues.
- Chill multiple times. Dough that stays cold slices cleanly and keeps the spiral intact.
- Flour lightly and often. Flour your rolling surface and parchment to prevent sticking, but don’t overdo it.
- Cut with a sharp knife. A dull blade mangles the swirl. Go slow and steady.
Variations to try
- Peppermint swirl: Add 1 tsp peppermint extract to the colored dough for a candy-cane feel — perfect for pairing with Candy Cane-shaped Cookies With Sprinkles on a tray.
- Chocolate pinwheels: Swap one color for cocoa dough for a chocolate-vanilla combo.
- Almond twist: Use almond extract in place of vanilla for a nutty aroma.
- Rainbow pinwheels: Use multiple colors for a playful kids’ batch.
Best ways to serve
- Arrange them on a platter with other Xmas Cookies for a showstopping display.
- Create themed assortments inside Christmas Cookie Boxes — pair pinwheels with snowballs, red velvet cookies, and tiny ginger snaps.
- Offer as Christmas Snacks at parties for kids and adults alike — they’re easy to bite and festive to look at.
Storage and make-ahead magic
- Store baked pinwheels in an airtight container at room temperature for up to 4–5 days.
- Make the dough and freeze: Roll into logs, wrap tightly, and freeze for up to 2 months. Thaw in the fridge, slice, and bake when needed. That’s secret Santa-level preparedness.
- Baked cookies freeze well too. Thaw gently at room temp.
FAQs — quick answers you’ll actually need
Can I make them without a scale?
Yes, but try to eyeball them evenly. A scale makes the rolls consistent, but you can manage with measuring cups and a steady hand.
My dough cracks while rolling. Help!
Let it warm slightly (but not melt). If it’s too cold, it’ll crack. If it’s too warm, it’ll smear. Find the sweet spot — pliable but cool.
Can I use liquid food coloring?
Technically, yes. But gel food coloring gives stronger color without changing dough consistency. If you use liquid, add less and expect paler hues.
What’s the best thickness for slicing?
Aim for 1/4-inch slices. Thinner slices bake crisper; thicker slices stay softer in the center.
Quick troubleshooting (so your spirals don’t spiral into chaos)
- If the log unrolls while slicing, pop it back in the fridge for 15–20 minutes.
- If slices flatten too much, your dough may have warmed too much. Chill longer next time.
- If colors bleed, reduce liquid and use gel coloring; also avoid overworking the dough.
Why these are perfect for gifting and swaps
Pinwheels are beautiful and compact — ideal for Christmas Cookie Box gifting. They stack neatly, look professional, and travel well. When people open a cookie tin and see those spirals? They smile. That’s the reaction you want.
Quick presentation ideas
- Pack 6–12 pinwheels in a small kraft box with tissue and a ribbon for a cute neighbor gift.
- Arrange them on a tiered cookie tower with sprigs of rosemary (it looks like pine) for a rustic holiday table.
- Mix with Candy Cane-shaped Cookies With Sprinkles and a few chewy classics for a varied platter that screams “holiday party.”
Final tips & parting thoughts
Pinwheel cookies take a tiny bit of patience and a lot of reward. Use gel coloring, chill often, and weigh your dough if you like clean, bakery-style spirals. Want to be less formal? Go rogue with colors and make rainbow versions for a holiday cookie mashup. FYI, people love a little chaos in a cookie tin — it makes for better stories.
So, are you ready to roll? Put on your favorite holiday playlist, pour a cup of something warm, and commit to one log. I promise — by the time you slice the first cookie, you’ll be grinning like a kid with a brand-new ornament. These pinwheels are a small showstopper: easy enough to bake with friends, pretty enough to gift, and tasty enough to eat by the dozen.
Follow me on Pinterest for daily new recipes.
Dreamy Christmas Pinwheel Cookies — The Christmas Sweets That Vanish From The Platter
- Prep Time: 2 hours 45 minutes
- Cook Time: 15 minutes
- Total Time: 3 hours
- Yield: 16 cookies 1x
- Category: Dessert
Description
Bright, swirled pinwheel cookies that look fancy but are totally doable — perfect for holiday platters and cookie tins.
Ingredients
- 2 cups all-purpose flour, plus extra for dusting
- ½ teaspoon baking powder
- ¼ teaspoon salt
- 12 tablespoons (1½ sticks) unsalted butter, softened to room temperature
- ¾ cup granulated sugar
- 1 large egg (room temperature is best)
- 1 teaspoon pure vanilla extract
- Red food coloring, liquid or gel — start small, adjust to taste (about ½–1 teaspoon if using liquid)
- Green food coloring, liquid or gel — start small, adjust to taste (about ½–1 teaspoon if using liquid)
Instructions
- In a medium bowl whisk together the flour, baking powder and salt. Set this dry mix aside.
- In a larger bowl, cream the softened butter and sugar with a mixer on medium speed until the mixture becomes lighter in color and a bit fluffy (about 1–2 minutes).
- Beat in the egg and vanilla until evenly combined, scraping down the sides of the bowl as needed.
- Add the dry ingredients to the wet mixture in two parts, folding just until everything comes together. Avoid over-mixing.
- Divide the dough into three equal portions — eyeball it or use a kitchen scale for precision. Shape each portion into a ball.
- Put one portion back into a clean bowl, add the red coloring and mix until the hue is uniform. Wipe the beater clean. Repeat with the second portion and green coloring. Leave the third ball uncolored (white).
- Flatten each colored and uncolored ball into a rough square. Wrap each square tightly in cling film and chill in the refrigerator for about 1 hour, or until firm.
- Remove the chilled pieces. Working between two sheets of parchment, roll each square into a roughly 10-inch rectangle — keep the thickness consistent across all three. If the dough softens, pop it back in the fridge briefly.
- Peel away the top sheets of parchment. Stack the layers (for example: red, then white, then green), aligning the edges as best you can. Trim the long sides with a sharp knife or pizza cutter so the ends are straight.
- Starting from one trimmed edge, roll the layered dough tightly into a log. Use the parchment to help lift and guide the roll. Pinch the seam and any loose spots so the log holds together. Wrap the log in cling film and chill for another hour, or until firm.
- Preheat the oven to 350°F (175°C) and line baking sheets with parchment or a silicone mat.
- Unwrap the chilled log and slice it into rounds about ¼ inch thick using a very sharp knife. Discard the tapered end pieces (they usually don’t show a neat swirl). Place the slices on the prepared sheets, spacing them about 2 inches apart.
- Bake for 12–15 minutes, until the cookies set and just begin to color at the edges. Allow them to rest on the baking sheet for 4–5 minutes, then transfer to a wire rack to cool completely.
Notes
- If you only have salted butter, reduce the added salt in the dry mix or omit it entirely.
- Work with chilled dough — cold layers slice cleanly and keep the spiral intact.
- Use a sharp knife and slice slowly to prevent squashing the roll.
- For brighter, truer colors, prefer gel food coloring; you’ll need far less than with liquid dyes. If using liquid coloring, add it sparingly (start with ¼ teaspoon and increase until you like the shade).
- You can make the dough logs ahead: wrap and freeze for up to 2 months. Thaw in the fridge before slicing and baking.
Nutrition
- Serving Size: 1cookie
- Calories: 173kcal
- Sugar: 9g
- Sodium: 42mg
- Fat: 9g
- Saturated Fat: 6g
- Carbohydrates: 21g
- Fiber: 1g
- Protein: 2g
- Cholesterol: 33mg
Christmas Sweets, Pinwheel Cookies, Candy Cane-shaped Cookies With Sprinkles, Christmas Cookie Boxes, Christmas Cookie Box, Christmas Baking Recipes, Xmas Cookies, Christmas Cooking, Christmas Snacks