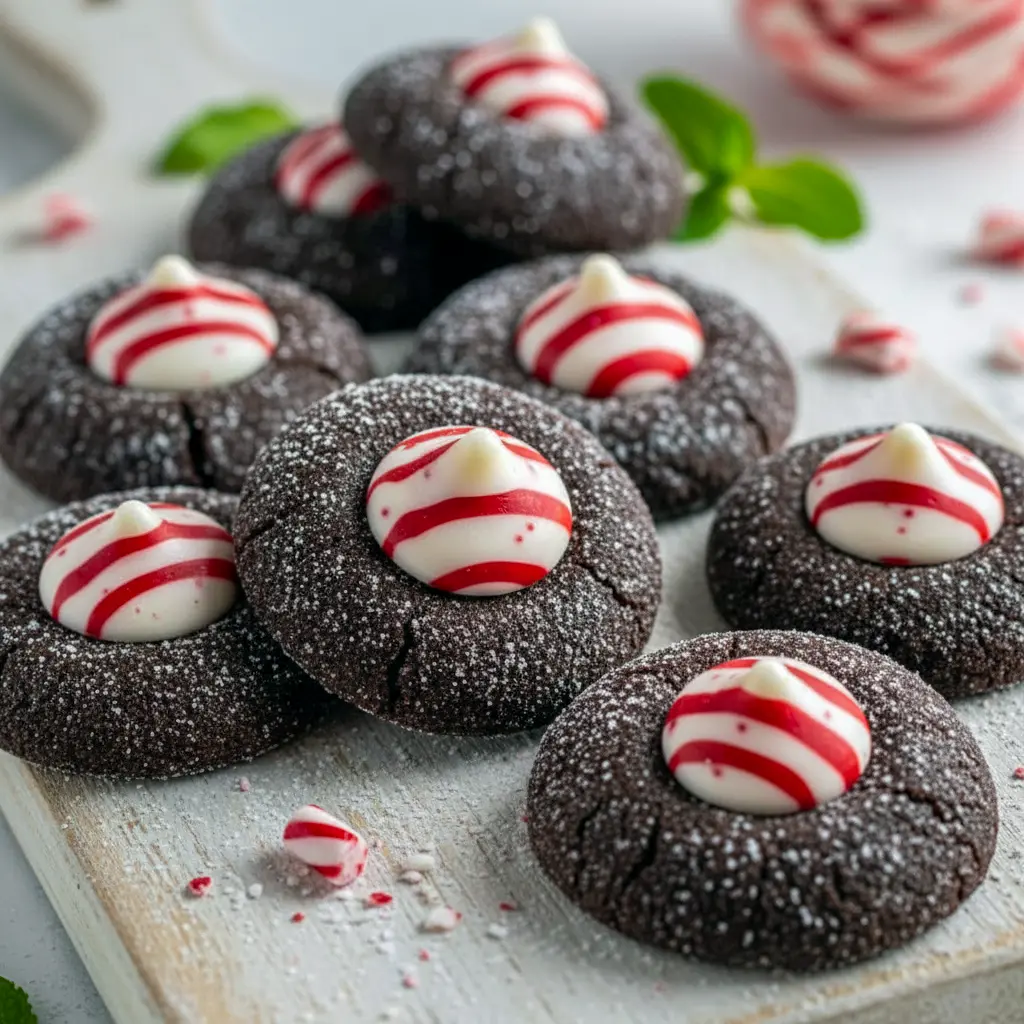
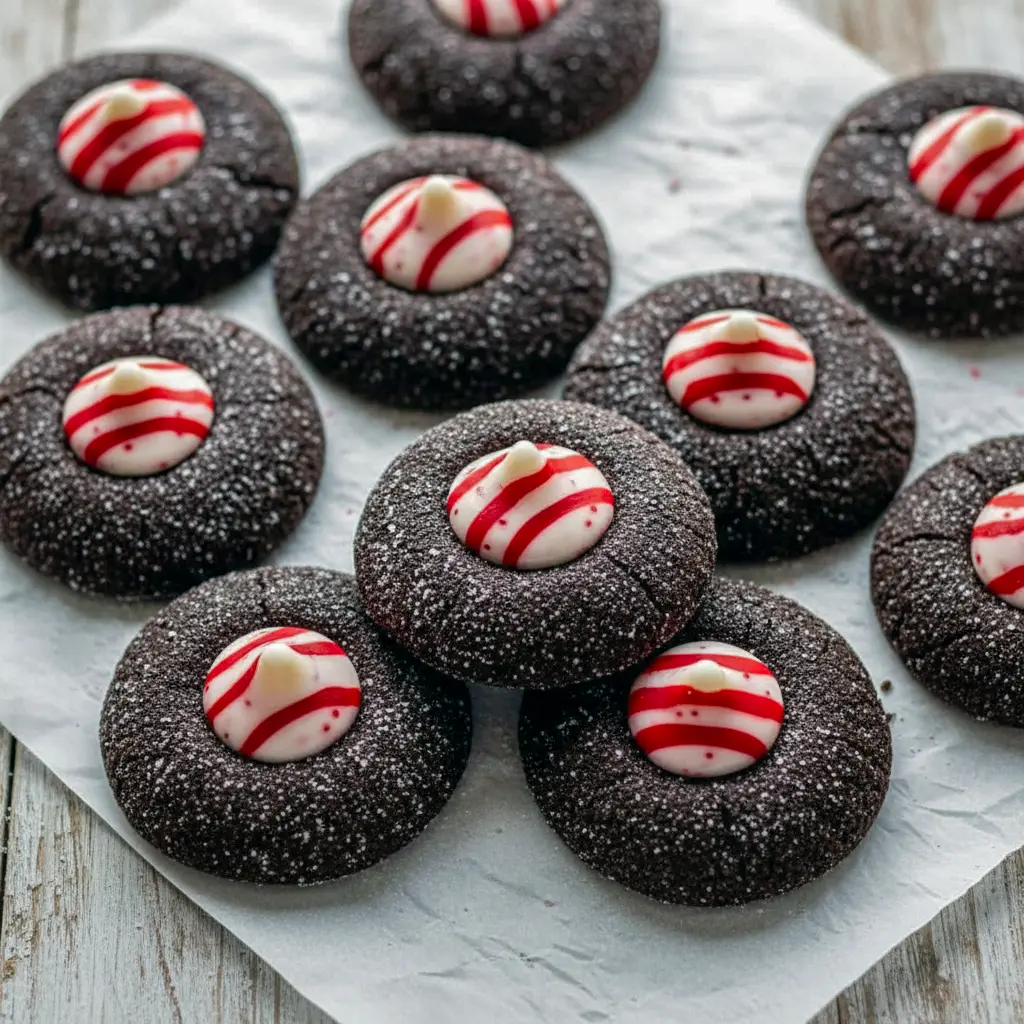
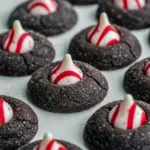
Chocolate Peppermint Blossoms — a bright, fudgy holiday showstopper
Chocolate Peppermint Blossoms are the kind of cookie that makes people stop mid-conversation, point dramatically, and ask for the recipe. These fudgy, chewy dark chocolate cookies hug a chilled white chocolate peppermint Hershey Kiss in the center, and the result is pure holiday joy in one bite. If you love the chocolate + mint pairing, this recipe reads like a love letter to December.
Brief introduction to the recipe
You get a deep, cocoa-forward cookie with a soft chew, rimmed by a lightly crisp edge. Then—boom—White Chocolate Peppermint Kiss Cookies add that glossy, minty center that looks like it belongs on a cookie platter in every Victorian Christmas card. They’re simple, fast, and ridiculously satisfying.
Why you’ll love this recipe
Why grab these cookies instead of another batch of sugar cookies? Three words: easy, chewy, festive.
- They’re super easy to make — no tempering, no fussy piping, no oven drama.
- They’re super chewy (thanks to brown sugar and egg yolk).
- They pack the best holiday combo: chocolate + peppermint. Honestly, who can argue with chocolate peppermint? If you want more peppermint inspiration, check out my other recipes like double chocolate peppermint cookies, chocolate dipped peppermint sugar cookies, or Chocolate Candy Cane Blossoms for more festive vibes.
The story behind the recipe
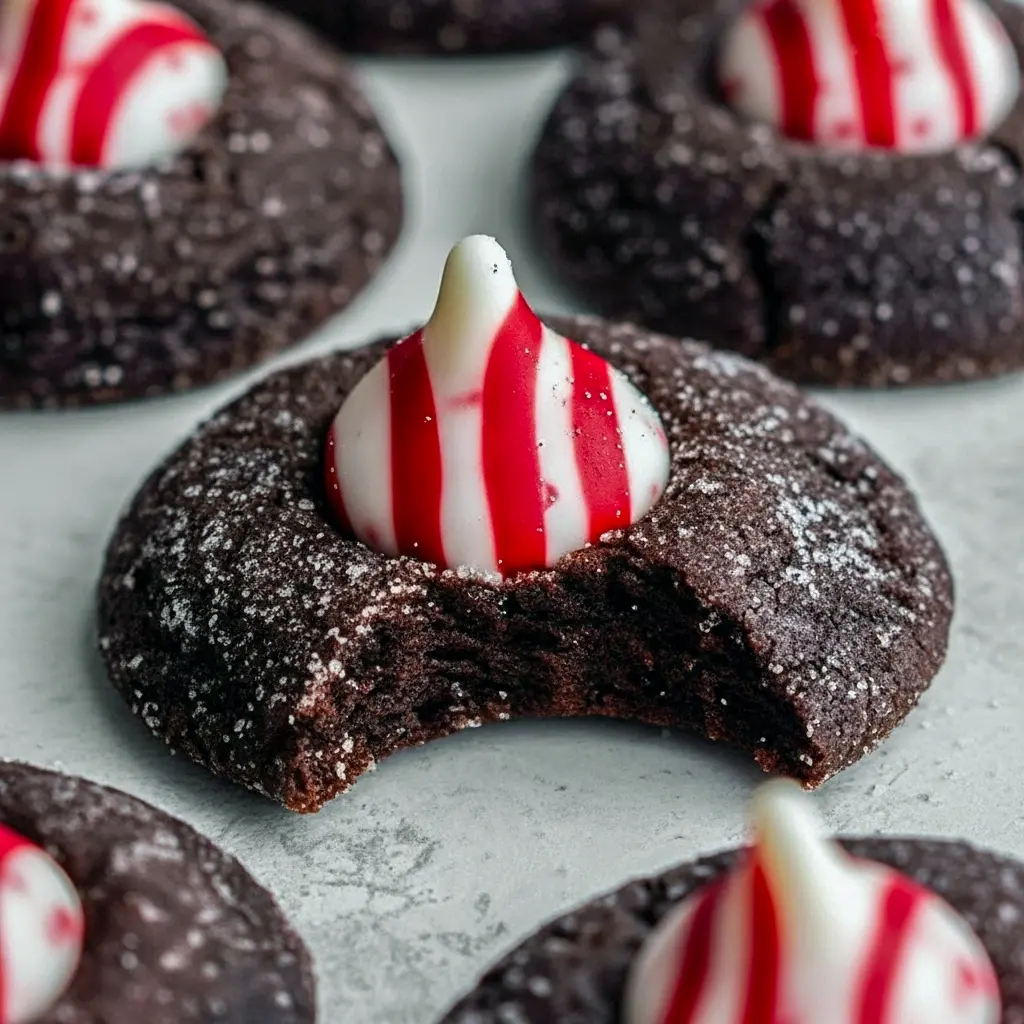
This came about during a cookie swap gone rogue. I wanted a cookie that felt classic but gave a little wink: deep chocolate, soft chew, then that peppermint Kiss center that snaps the holiday into focus. I tested a few versions — with milk chocolate, with dark, with melted Kisses — and found the best version used chilled, frozen peppermint Kisses pressed into just-baked cookies so the candy keeps its pretty swirl without collapsing into a chocolate puddle. FYI: freezing the Kisses is a game-changer.
Ingredients breakdown (short blurbs)
Here’s what you’ll use and why each item earns a spot in the bowl.
- All-purpose flour — gives structure and the perfect chewy bite. Tip: measure properly.
- Cocoa powder (Dutch-processed recommended) — for a rich, rounded chocolate flavor that isn’t bitter.
- Salt — tiny but mighty; it lifts the chocolate and balances the sugar.
- Baking powder & baking soda — for a gentle rise and lovely texture.
- Butter (softened) — richness and that slightly crisp edge when baked.
- Brown sugar — the secret to chewiness and caramel notes. Use mostly brown sugar.
- Granulated sugar — pairs with brown sugar to sweeten and help spread.
- Egg yolks (room temp) — they add tenderness and chew without extra egg whites making the cookies cakier.
- Vanilla — vanilla bean paste if you’re feeling fancy; extract works fine too.
- Candy Cane Kisses — the white-and-red striped peppermint Kisses that make these Peppermint Blossom Cookies iconic. If you’re not a peppermint fan, regular milk chocolate or dark chocolate Kisses work great.
Remember: you’ll want those Kisses frozen to keep their shape when pressed into piping-hot cookies.
Step-by-step: How to make Chocolate Peppermint Blossoms
Follow these steps for best results. (Scroll to the recipe for exact measurements and baking time.)
STEP ONE: Whisk flour, cocoa powder, salt, baking powder, and baking soda together in a bowl. Set aside.
STEP TWO: In a large bowl, cream softened butter with brown sugar and granulated white sugar until light and slightly fluffy. This builds structure and chew.
STEP THREE: Add the room-temperature egg yolk and vanilla. Mix until the dough feels cohesive and smooth.
STEP FOUR: Add the dry ingredients and mix until everything just comes together. Don’t overmix — overworked dough = tougher cookies.
STEP FIVE: Scoop the dough into balls (about a tablespoon or cookie scoop), roll each ball in granulated sugar, and space them on a parchment-lined baking sheet. Bake until the edges set but the centers look slightly underbaked — that’s the sweet spot for chew.
STEP SIX: Immediately after the cookies come out of the oven, press a frozen peppermint Kiss into the center of each cookie. Let the cookies cool completely on the baking sheet so the Kisses set without losing their shape. If you move them too early, the candy can sink or smear.
Pro tip: press gently; you want the Kiss to sit snugly, not to flatten it.
Pro tips for perfect results
A few crucial things I learned the hard way so you don’t have to.
- Measure your flour properly. Do NOT scoop the cup into the flour jar. Spoon flour into your measuring cup and level it off, or better yet, weigh it: 1 cup = 125 g. This prevents dry, dense cookies.
- Use Dutch-process cocoa for a richer, less acidic chocolate flavor. It changes the whole mood of the cookie.
- Freeze your peppermint Kisses. This keeps that adorable swirl and prevents melting into a sad chocolate blot. I tested unfrozen Kisses — total collapse. Don’t be me.
- Room-temperature egg yolks only. Cold yolks can chill the dough and affect texture.
- Don’t overbake. Pull the cookies when the edges look set but the center still slightly glossy. They continue to set as they cool.
- Roll in sugar for texture. That little sugar crust adds a subtle crunch and gives the cookies a professional finish.
Bold tip: Freeze the Kisses — I can’t stress this enough.
Variations to try
Want to riff on the recipe? Here are easy swaps that keep the spirit of the cookie but mix up the flavor.
- Swap Candy Cane Kisses for plain dark chocolate Kisses for a richer surprise. Then you’ve got Chocolate Peppermint Blossom Cookies with extra depth.
- Use crushed candy cane sprinkled atop the warm Kisses for extra texture and a candy cane crunch. Hello, Chocolate Candy Cane Blossoms.
- Try white chocolate Kisses with a drop of peppermint extract in the dough for White Chocolate Peppermint Kiss Cookies that are bright and sweet.
- For grown-up holiday vibes, press in an orange-infused dark chocolate instead of peppermint and call them Chocolate Mint Blossoms (minty + citrus = wild success).
- Want mini treats? Make smaller dough balls, bake briefly, then press in mini Kisses to create bite-size Peppermint Blossoms perfect for cookie trays.
Best ways to serve
These cookies deserve a little fanfare.
- Arrange on a festive platter with sprigs of rosemary for a faux-wreath look.
- Pair with hot cocoa or espresso for a dessert coffee pairing. The peppermint center sings alongside bitter coffee.
- Put them in clear cellophane bags tied with twine for instantly adorable gifts. Friends will assume you slaved for days. (You didn’t — keep that to yourself.)
- Build a cookie board: stack these with your spritz cookies, thumbprints, and Peppermint Chocolate Blossoms to impress guests.
Quick tips for storage & leftovers
- Store cooled cookies in an airtight container for up to three days at room temperature. Layer parchment between stacks.
- Freeze for up to two weeks. Thaw at room temperature when ready to serve. If you plan to freeze, press the frozen Kisses into the cookies after thawing and a quick 2-3 minute bake to reseal, or freeze fully baked cookies that already have Kisses set.
- If you want long-term storage, freeze cookie dough balls (rolled and sugared), then bake straight from frozen—add a minute or two to the bake time.
Quick note: Freezing whole baked cookies with Kisses is fine, but stuffed cookies sometimes shift in the freezer, so pack them snugly.
FAQs
How do I store the cookies?
Airtight container at room temp up to three days, or freeze for up to two weeks. For longer storage, freeze dough or fully baked cookies as noted above.
Do I have to use peppermint Kisses?
Nope. Use regular milk chocolate Kisses, dark chocolate, or even seasonal varieties (cookies n’ creme, sugar cookie, etc.). They all work—just mind the melting behavior. If using non-frozen Kisses, expect more spreading.
My Kisses melted—what happened?
You likely used unfrozen Kisses or pressed them in too aggressively while the cookie was too hot. Freeze your peppermint Kisses and gently press them in immediately after baking.
Can I make the dough ahead?
Yes. You can refrigerate the dough for up to 48 hours to deepen the flavor. Bring dough to room temp slightly before scooping for easier handling.
Final thoughts — wrap-up & serving sass
If you want a cookie that says “I care about texture, flavor, and party aesthetics,” Chocolate Peppermint Blossoms deliver. They’re decadent without being complicated and festive without being fussy. Whether you’re making them for a cookie swap, a cozy night in, or a neighbor gift, these cookies look beautiful and taste even better.
So, are you ready to bake? Scoop that dough, freeze those Kisses, and prepare to watch your holiday cookie tray get completely annihilated—by happy guests.
Oh, and one last thing: if you experiment and land on a brilliant tweak (browned-butter version? sea-salt sprinkle?), come tell me. IMO, the best recipes get even better when people play.
Follow me on Pinterest for daily new recipes.
Ultimate Chocolate Peppermint Blossoms — White Chocolate Peppermint Kiss Cookies
- Prep Time: 15 minutes
- Cook Time: 7 minutes
- Total Time: 22 minutes
- Yield: 34 cookies 1x
- Category: Dessert
Description
A decadent, fudgy chocolate cookie with a chilled white-chocolate peppermint Hershey’s Kiss nestled in the middle. Chewy centers, slightly crisp edges, and a minty pop make these a holiday favorite.
Ingredients
- 1 1/2 cups (188 g) all-purpose flour, spooned into the cup and leveled (see note)
- 1/2 cup (40 g) Dutch-process cocoa powder
- 1/2 teaspoon baking powder
- 1/2 teaspoon baking soda
- 1/2 teaspoon salt
- 3/4 cup (168 g) unsalted butter, softened
- 3/4 cup (165 g) light brown sugar, packed
- 1/4 cup (50 g) granulated sugar (plus extra for coating)
- 2 large egg yolks, brought to room temperature
- 1 teaspoon vanilla (vanilla bean paste or extract)
- 34 Candy Cane Hershey Kisses, unwrapped and frozen for 30 minutes
Instructions
- Freeze the Kisses. Remove the wrappers from all 34 candy cane Kisses and put them in the freezer for about 30 minutes so they stay intact when pressed into hot cookies.
- Heat the oven & prep pans. Preheat your oven to 350°F (175°C). Line three baking sheets with parchment and set aside.
- Whisk the dry mix. In a medium bowl combine the flour, Dutch-process cocoa, baking powder, baking soda, and salt. Whisk until evenly blended and set the bowl aside.
- Cream the fats and sugars. In a large mixing bowl, beat the softened butter with the brown sugar and the 1/4 cup granulated sugar on medium speed for 1–2 minutes until the mixture lightens slightly.
- Add yolks & vanilla. Mix in the two room-temperature egg yolks and the vanilla. Beat until the mixture becomes paler and a bit fluffy, about 1–2 minutes.
- Combine wet and dry. Add the dry ingredients to the butter mixture and stir just until the dough comes together. Avoid overmixing.
- Form the cookies. Portion the dough into 34 equal mounds (a 1-tbsp scoop works well). Roll each portion into a smooth ball, then toss or roll each ball in additional granulated sugar to coat.
- Bake. Place the sugared dough balls on the prepared sheets about 2 inches apart (I fit 12 on two sheets and 10 on the last). Bake for 7–8 minutes — 7 minutes for a chewier result, 8 if you prefer slightly firmer edges.
- Press in the Kisses. Immediately after removing the pans from the oven, gently press one frozen Candy Cane Kiss into the center of each cookie. Press just enough so the candy nests into the cookie without flattening it.
- Cool on the pans. Let the cookies cool completely on the baking sheets so the candy centers set up and keep their shape. Once fully cooled, transfer to a serving plate.
Notes
- Storage
- Keep cooled cookies in an airtight container at room temperature for up to 3 days. For longer storage, place them in the freezer for up to 2 weeks; thaw before serving.
- Notes & tips
- Measure flour correctly. Don’t scoop flour directly with the measuring cup. Spoon the flour into the cup and level it off, or weigh it. 1 cup flour = 125 g.
- Freezing the Kisses is key — it prevents the candy from completely melting into the warm cookie.
- If you prefer smaller cookies, halve the dough portions and reduce bake time by a minute or two.
- To freeze dough for later, roll and sugar the balls, freeze on a tray until solid, then store in a sealed bag. Bake from frozen, adding a minute or two to the bake time.
Chocolate Peppermint Blossoms, White Chocolate Peppermint Kiss Cookies, Chocolate Peppermint Blossom Cookies, Peppermint Blossom Cookies, Peppermint Chocolate Blossoms, Chocolate Mint Blossoms, Peppermint Blossoms, Peppermint Blossom, Chocolate Candy Cane Blossoms