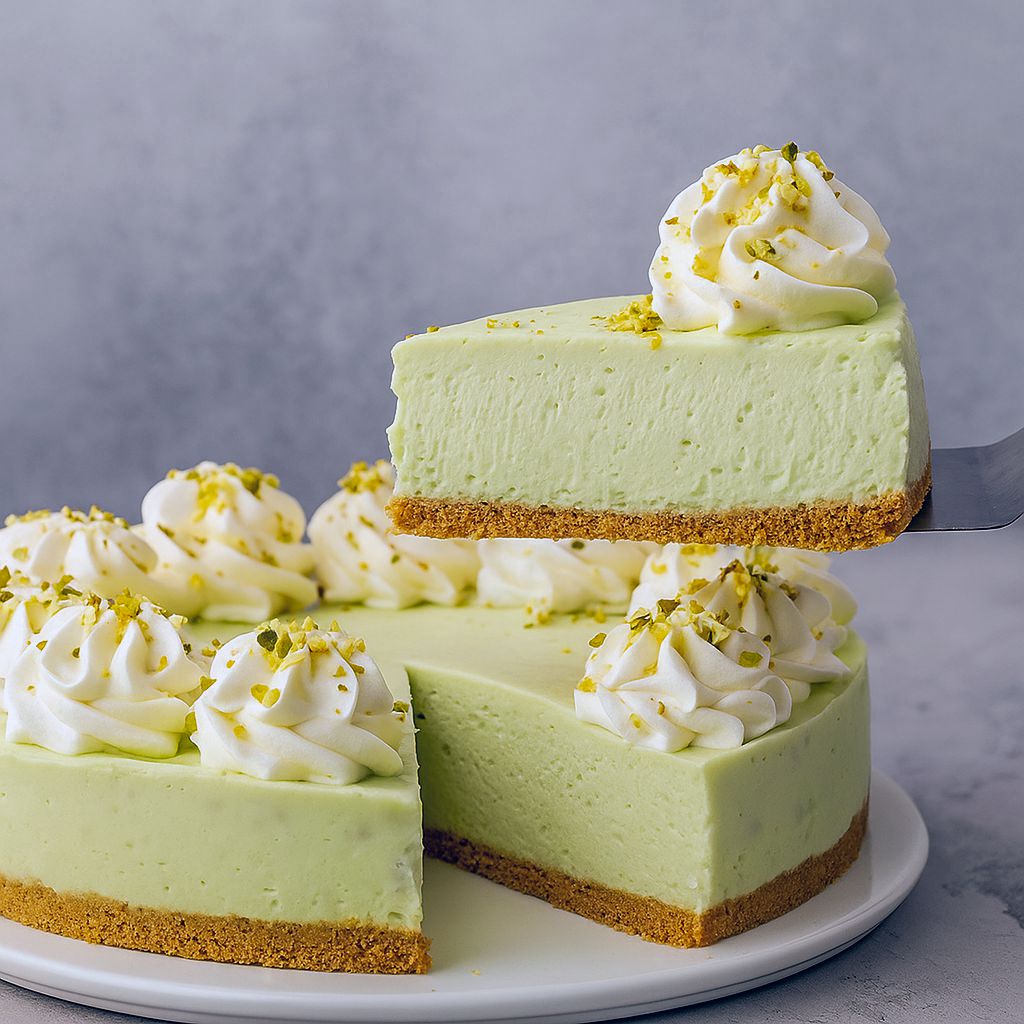
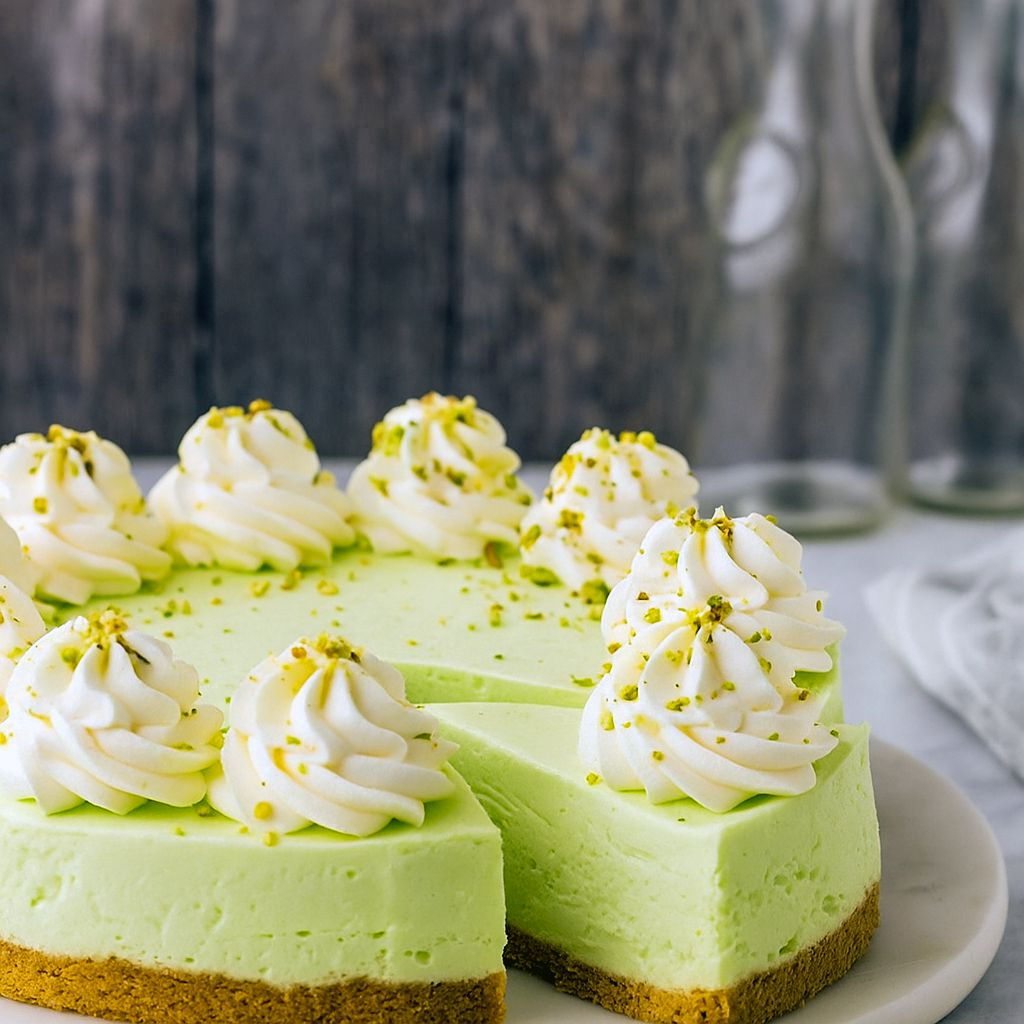
No Bake Pistachio Cheesecake: if that doesn’t make you hit “save,” I don’t know what will. This lush, green beauty gives you the dreamy texture of cheesecake without the oven drama — no cracks, no water baths, no nail-biting wait to see if it set. Just smooth, nutty flavor and a gorgeous pistachio hue that screams spring holidays, showers, or any moment you want to feel fancy with minimal effort.
What makes this recipe so irresistible?
- Creamy, no-fail texture — because you skip baking, you avoid those weird cheesecake cracks and rubbery edges.
- Nostalgic pistachio flavor — the kind that makes people think of retro puddings and modern patisserie all at once.
- Show-stopping looks with almost no work — that green color is a magnet on a dessert table.
- Totally customizable toppings — chopped pistachios, whipped rosettes, or a drizzle of melted white chocolate. Yum. FYI: this goes from weeknight to party-dessert in 30 minutes of hands-on time.
How to Make No Bake Pistachio Cheesecake (Quick overview)
Ingredients & why they matter
- Graham cracker crumbs — the buttery, toasty base everyone loves.
- Butter — binds the crust and adds richness.
- Cream cheese (block) — the backbone of the filling; use blocks, not spreadable kind. Big tip: high-quality cream cheese equals silkier results.
- Instant pistachio pudding mix — this is the shortcut that gives flavor + color without extra fuss. It turns this into a real Pistachio Pudding Cream Cheese Dessert.
- Powdered sugar — smooth sweetness that blends seamlessly.
- Almond extract — tiny splash adds nutty depth (optional but lovely).
- Heavy cream — whipped into peaks to lighten the filling and make it airy.
- Chopped pistachios (for garnish) — texture and visual pop.
Simple method (the short version)
- Make the crust: Stir graham crumbs with melted butter, press into a springform pan, chill 30 minutes (or bake 5 minutes at 350°F for extra crispness).
- Whip the filling: Beat cream cheese until smooth. Add instant pistachio pudding, powdered sugar, and almond extract. In a separate bowl, whip heavy cream to stiff peaks, then gently fold into the cream cheese mixture.
- Assemble & chill: Spread filling into crust, smooth top, chill at least 6 hours (overnight is best). Garnish with whipped cream swirls and chopped pistachios before serving.
The story behind the recipe
I adore all things pistachio — bread, cakes, fluff — you name it. I built this dessert as a riff on a beloved no-bake pistachio cream pie I used to make: same dreamy flavor, firmer bite, more cheesecake tang. It’s my go-to when I want something that looks impressive but behaves itself in the kitchen. IMO, it’s the perfect compromise between “I have guests” and “I’m not baking for the next three hours.”
Headings with the keyword
No Bake Pistachio Cheesecake — Why It Works
How to Make a No Bake Pistachio Dessert Everyone Will Love
Pro tips for best results
- Use block cream cheese, cold but softened — beat it until perfectly smooth to avoid lumps.
- Don’t over-whip the whipped cream — fold it in gently to keep the filling light.
- Chill long enough — refrigerate at least 6 hours; overnight gives the best texture.
- Charter crust option: press crumbs firmly and bake briefly for a sturdier base if you like more crunch.
- Flavor booster: a splash of almond extract pairs beautifully with pistachio.
Pro tip: If you must rush, a 4-hour chill works in a pinch, but the texture will firm up more fully with longer rest.
Variations to try
- Pistachio Pudding Cream Cheese Dessert (classic): keep the pudding but swap in a Nilla wafer crust.
- No Bake Pistachio Dessert (lighter): use Greek yogurt instead of some of the cream for tang and fewer calories.
- Pistachio Cheesecake Recipe Without Cream Cheese: yep, you can. Use a thick coconut cream base or blended silken tofu + pistachio pudding for a dairy-free take. (Texture differs, but it’s a viable swap.)
- Pistachio Cheesecake With Graham Cracker Crust: the classic combo — golden, buttery, perfect every time.
- Seasonal variations: add lemon zest for a fresher spring vibe or swap some pudding for crushed pistachios for extra nuttiness.
Best way to serve
Slice with a hot, dry knife for clean edges. Present on a simple white plate so that gorgeous green color shines. Offer a topping station—whipped cream, chopped pistachios, white chocolate shavings—so guests can customize. This dessert plays nicely at Easter, Mother’s Day, St. Patrick’s Day, or any brunch where you want to impress without stress.
Storage & leftovers (quick tips)
- Refrigerate in an airtight container up to 4 days.
- Freeze slices individually wrapped for up to 6 weeks (thaw in the fridge).
- Refresh leftover slices with a squeeze of fresh lemon or extra whipped cream to revive brightness.
FAQs
Can I use a store-bought crust?
Absolutely. Store-bought crusts save time and taste great—no judgment here.
Is instant pistachio pudding necessary?
It makes life easier and gives that iconic flavor and color. You can substitute real pistachios pureed with some sugar, but results differ—use the pudding for reliable success.
Can I make this in a 10-inch pan?
Yes. Use a 10-inch springform for a shallower cheesecake; an 8-inch gives a slightly thicker slice. Both work.
How can I make it allergy-friendly?
Swap dairy for coconut cream and use a gluten-free crust. For nut allergies, this dessert loses its star ingredient; consider a pistachio-free green tea (matcha) cheesecake instead.
This recipe belongs to the “look like you killed it in the kitchen while barely sweating” category. It’s a crowd-pleaser, easy to scale, and endlessly adaptable. If you love retro Pistachio Desserts Easy to pull together or you’re hunting for Cheesecake Recipes Pistachio that actually come out perfect every time, this is your new go-to.
Give it a whirl, stack on the chopped pistachios, and tell me which topping won bragging rights at your table.

No Bake Pistachio Cheesecake — Easy Spring Dessert
- Prep Time: 15 minutes
- Additional Time: 6 hours
- Total Time: 6 hours 15 minutes
- Yield: 8 servings 1x
- Category: Dessert
Description
This chilled pistachio cheesecake is silky, nutty, and totally fuss-free—no oven required. Perfect for warm days, holiday tables, or anytime you want a showy dessert with minimal effort.
Ingredients
For the crust
- 1½ cups graham cracker crumbs
- 5 tablespoons unsalted butter, melted
For the filling
- 24 ounces (3 blocks) cream cheese, softened
- 3.4 ounces instant pistachio pudding mix (1 box)
- ¾ cup powdered (confectioners’) sugar
- ½ teaspoon almond extract
- 2 cups heavy whipping cream, cold
Instructions
- Form the crust. In a bowl, combine the graham crumbs with the melted butter until the mixture resembles wet sand. Press it firmly into the base of an 8″ or 9″ springform pan, creating an even layer. Chill for 30 minutes to set. (If you’re pressed for time, bake the crust at 350°F for 5 minutes, then cool completely before filling.)
- Make the cheesecake base. In a large bowl, beat the softened cream cheese with the instant pistachio pudding mix, powdered sugar, and almond extract until the mixture is completely smooth and lump-free. Set aside.
- Whip the cream. In a separate bowl, whip the heavy cream on high speed until you reach stiff peaks—about 3–4 minutes with an electric mixer.
- Combine gently. Fold the whipped cream into the cream cheese mixture in two or three additions. Use a rubber spatula and a light hand to keep the filling airy and smooth.
- Assemble and chill. Spread the filling evenly over the prepared crust. Smooth the top, cover the pan, and refrigerate for at least 6 hours (overnight is ideal) so the cheesecake firms up.
- Serve. Release the springform, slice, and garnish as desired—whipped cream rosettes and chopped pistachios are classic choices.
Notes
- Notes & Tips
- Use block-style cream cheese, not the spreadable tub. It gives a much better texture.
- For a crisper crust: briefly bake the crust before cooling and filling.
- Storage: Keep refrigerated in an airtight container for up to 4 days. You can freeze slices (individually wrapped) for up to 3 months; thaw in the fridge.
- Crust swaps: Golden Oreos, Nilla wafers, or a store-bought crust work fine if you’d rather shortcut.
- Pan size tip: An 8-inch pan yields a thicker filling; a 9-inch pan makes slightly shallower slices—both are fine.