This Peppermint Dream Dessert is the kind of holiday magic that looks like you spent all morning fussing — but really, you barely broke a sweat. Ready for puffed-up compliments and people whispering, “Who made this?” Yeah, that’ll be you.
Quick intro to the recipe
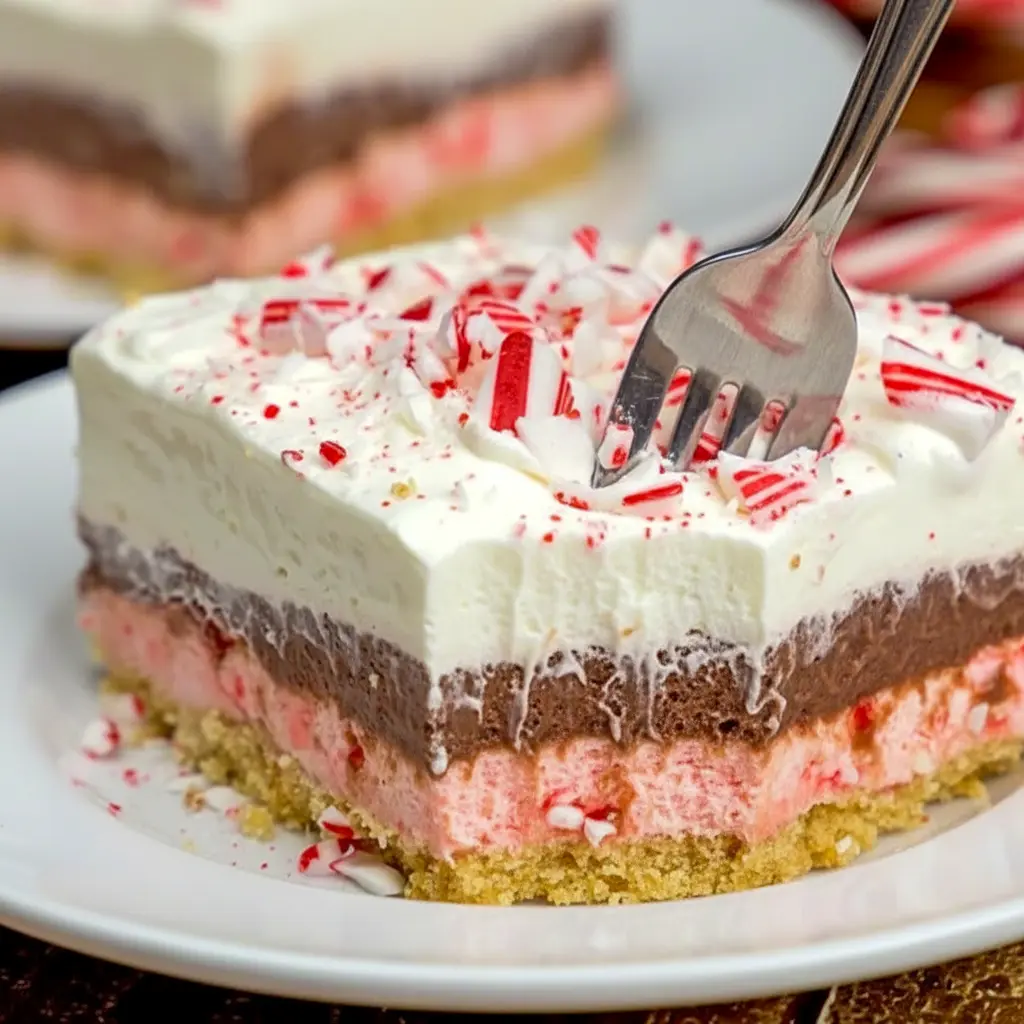
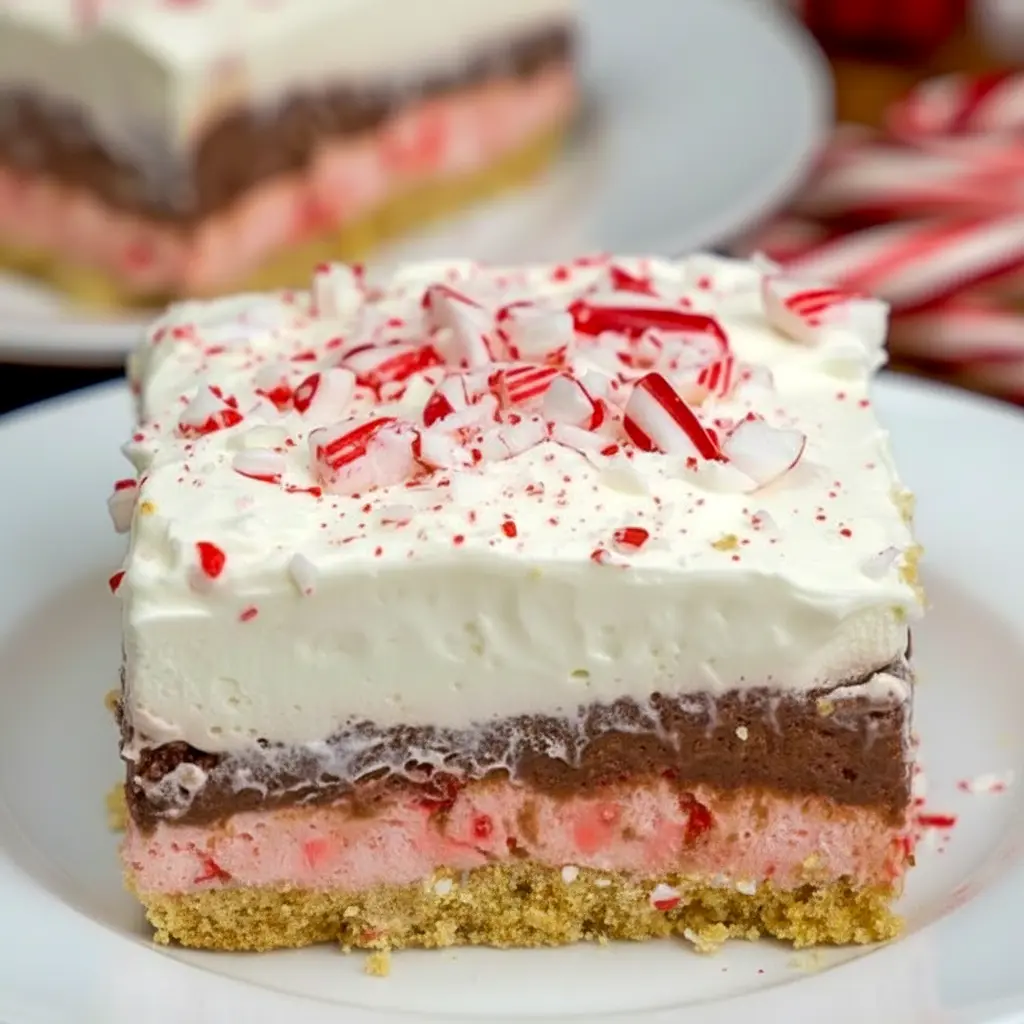
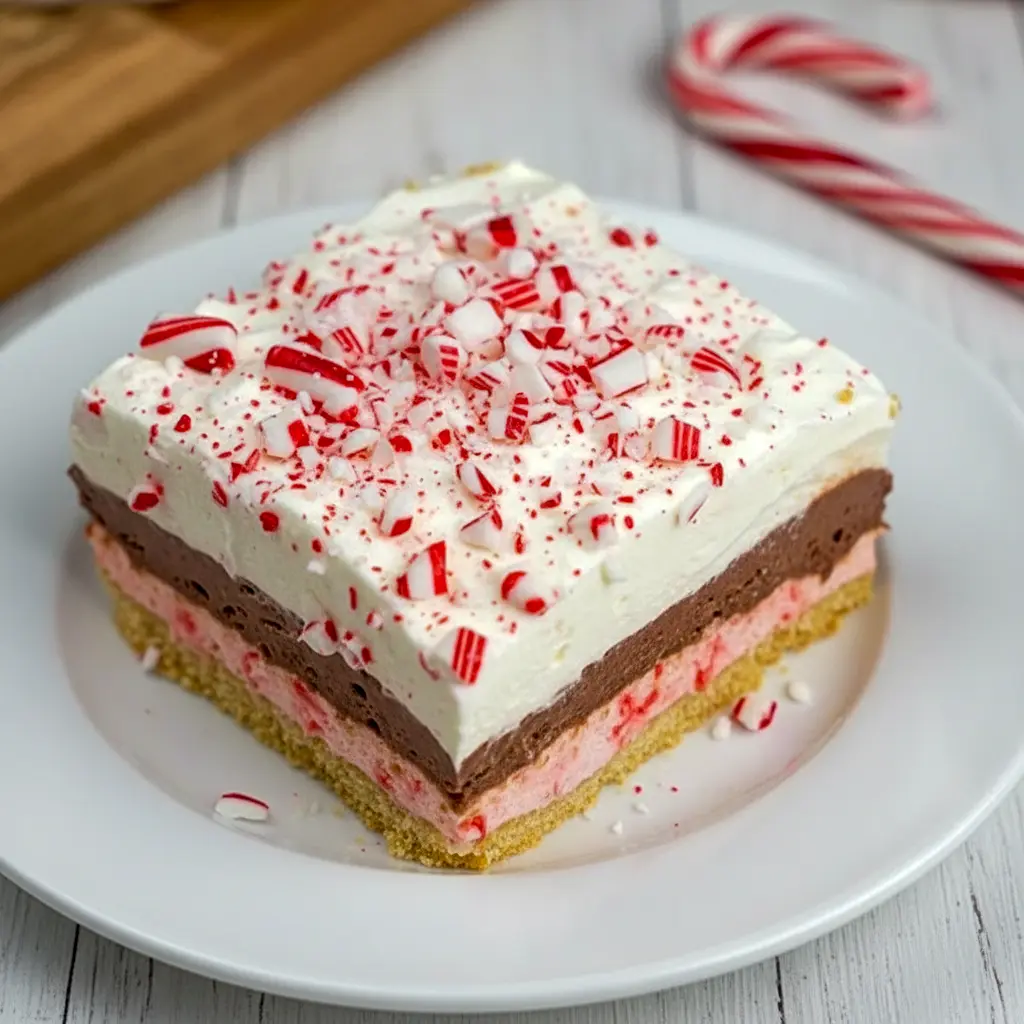
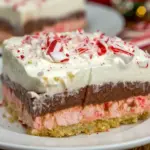
Here’s the deal: an easy, no-bake tray dessert with a buttery cookie crumb crust, a minty pink peppermint cheesecake layer, a silky chocolate pudding layer, and a cloud of whipped topping. It’s basically a festive, fridge-friendly treat that screams holiday cheer without the oven drama. Think of it as an ice-cream-cake-adjacent, sliceable delight that fits in the fridge or freezer and looks way fancier than it is.
Why you’ll love this (short & delicious)
- Zero baking — perfect for last-minute holiday plans or if your oven is already busy with the turkey.
- It’s easy to scale: make it in a 9×9 or as part of 8×8 Dessert Recipes Easy rotation.
- Mint + chocolate = instant crowd approval. Seriously, who can say no?
- Freeze it for an ice-cream-cake vibe, or chill it and slice it cleanly. Either way, guests think you’re a kitchen wizard.
The story behind the bars
I’ll be honest: this dessert exists because my kitchen needed something showy for Christmas morning that wouldn’t monopolize my time. I wanted a Christmas Pot Luck Desserts option that traveled well (hey, been there) and got devoured instantly. I riffed off a classic layered pudding/cheesecake slab and added crushed candy canes for that festive pop. The pink cheesecake layer was an accidental joy — candy canes color it slightly, which makes it delightfully cheery. FYI: kids go wild for the pink.
Ingredients breakdown (with short blurbs)
Below is the classic lineup. Each component is straightforward — nothing fussy.
CRUST
- 1 1/2 cups vanilla wafer crumbs — sweet and sturdy. You can swap Oreos for a richer base.
- 1/4 cup (1/2 stick) unsalted butter — melts everything together and helps the crust hold.
- 2 tbs sugar — optional if your wafers are already sweet.
PEPPERMINT LAYER
- 8 oz cream cheese, softened — the creamy backbone. Beat it smooth.
- 1/2 cup finely crushed peppermint candy cane or starlight mints — gives flavor, texture, and that signature pink tint.
- 2 tbs milk — smooths the cream cheese out.
- 1/3 cup sugar — sweetens the mint layer.
- 1 1/4 cup whipped topping — aerates and lightens the peppermint cheesecake.
CHOCOLATE LAYER
- 1 pkg 4-serving instant chocolate pudding — the lazy genius of the dish.
- 1 3/4 cups milk — makes the pudding luscious.
TOPPING
- 1 tub (8 oz) whipped topping — spread it like frosting.
- 1/4 cup coarsely chopped peppermint candy cane — garnish for crunch and drama.
Bold tip: If you want the crust more chocolatey, swap vanilla wafers for Oreos. Instant mood change.
How to make it — step-by-step (short, actionable)
- Make the crust. Mix the vanilla wafer crumbs, melted butter, and sugar. Press firmly into the bottom of a 9×9-inch pan. Chill while you make the other layers.
- Peppermint layer. Beat the softened cream cheese with the milk until silky and smooth. Add sugar and crushed candy; beat again. Fold in 1 1/4 cups whipped topping until fluffy. Spread this over the chilled crust.
- Chocolate layer. Whisk the instant pudding and 1 3/4 cups milk for 2 minutes (yes, two). Spread the pudding gently over the peppermint layer. Let it set 5–10 minutes.
- Top it. Spread the remaining whipped topping on the pudding. Sprinkle with coarsely chopped candy cane.
- Chill or freeze. Refrigerate at least 4 hours in the coldest part of your fridge. For an ice-cream-cake texture freeze for 4 hours. If you want easier slicing but not solid-freeze, pop it in the freezer for about an hour before cutting.
- Serve. Cut into bars and watch the holiday applause roll in.
Pro tips for perfect results (bold, please read)
- Use room-temperature cream cheese — it blends smoother and keeps the peppermint layer lump-free.
- Press the crust firmly into the pan so bars don’t crumble when sliced. A flat-bottomed measuring cup helps.
- Don’t overmix the whipped topping. Fold it in gently to keep the layer light.
- Set time matters. Chill at least 4 hours; if you skip this, the bars will be sloppy. Freezing for 4 hours makes slicing a dream.
- Want neat slices? Run a sharp knife under hot water, wipe it dry, then slice. Repeat between cuts. Works like magic.
- Swap suggestions: If you make an alternative crust (Oreos), reduce added sugar since Oreos are sweeter.
Variations to try (because variety = fun)
- Chocolate crust: Use crushed Oreos. Your dessert becomes decadently dark.
- Extra crunchy: Fold 1/4 cup crushed candy cane into the crust for peppermint crunch beneath every bite.
- Boozy adult version: Add 1–2 tbsp of peppermint schnapps or Kahlúa to the pudding for grown-up vibes. (IMO, that’s a party move.)
- Peppermint Lasagna riff: Layer extra pudding or add a layer of crushed cookies and call it Peppermint Lasagna — same idea, more layers.
- Pie-style: Make it in a 9-inch springform and serve as a chilled cake — it’s basically a Christmas Desserts Easy Pie reimagined.
- Make it dairy-free: Use dairy-free cream cheese and coconut whipped topping; keep an eye on the pudding (use a compatible instant pudding mix or make a stovetop chocolate pudding).
Best ways to serve (short and useful)
- Serve straight from the fridge for easy slices, or from the freezer for an ice-cream-like bite. Both are winners.
- Pair with hot coffee or peppermint mocha — contrast of hot & cold = chef’s kiss.
- Bring to a potluck? Wrap the pan in foil and chill until you arrive. It travels well and keeps its shape when frozen — perfect for Christmas Pot Luck Desserts.
- For presentation, dust with extra crushed candy cane or a drizzle of chocolate sauce. Looks fancy, takes two seconds.
Quick tips for storage and leftovers
- Refrigerator: Store covered for up to 4 days. The texture softens a bit but flavors meld nicely.
- Freezer: Wrap the pan in cling film and foil; freeze up to 2 months. Thaw in the fridge overnight before slicing.
- Leftover hack: Crumble slices over vanilla ice cream for instant sundae upgrade. Trust me.
FAQs (short answers — because people always ask)
Can I make these in an 8×8 pan?
Yes — this recipe scales to 8×8 Dessert Recipes Easy style. Expect slightly thicker layers if you use 8×8 for the same amount of filling.
Can I use a different candy than candy cane?
Absolutely. Starlight mints work great. Chocolate-mint candies will deepen the flavor.
Is this the same as Peppermint Bark Cake Recipe or a pudding?
It’s its own thing — think layered no-bake bar. The middle chocolate layer is an instant pudding, so you get a Peppermint Pudding Dessert vibe but with cheesecake in the mix.
Can I make it nut-free?
Yes. Avoid crusts that include nuts and ensure toppings are nut-free.
Can kids help make this?
Definitely. Crushing candy canes and pressing the crust are kid-friendly tasks. (Supervised, of course.)
A note on keywords & inspiration (brief, helpful)
If you’re building holiday content, this dessert fits snugly in several categories: Christmas Peppermint Desserts, easy slab desserts for gatherings, and creative swaps for pies — e.g., when someone asks for Christmas Desserts Easy Pie, you can confidently recommend this as a no-bake, pie-like alternative. It also pairs well with trends for make-ahead desserts and things you can freeze and transport to potlucks.
Final thoughts (wrap-up & cheeky sign-off)
So — you’ve got a dessert that’s easy, showy, and totally adaptable. Whether you call it a Peppermint Dream Dessert, a festive slab for Christmas Pot Luck Desserts, or a playful riff on Peppermint Bark Cake Recipe, it hits the holiday sweet spot: nostalgic, minty, and satisfyingly chocolatey.
Final bold tip: If you freeze it, treat it like ice cream cake and slice slightly frozen — the texture is dreamy and guests will assume you worked for hours.
Want a printable card or Pinterest-optimized description and alt text to promote this on your blog? I can whip one up — and yes, I’ll include the keywords so your pin gets noticed. Or, if you want the recipe reformatted into an easy-to-print, single-page card for cookie exchanges and potlucks, say the word.
Happy holiday baking (or — better yet — no-baking). Who knew being a kitchen genius could be this effortless?
Follow me on Pinterest for daily new recipes.
Christmas Morning No-Bake Peppermint Bars — Must-Try Peppermint Dream Dessert
- Prep Time: 20 minutes
- Cook Time: 4 hours
- Total Time: 4 hours 20 minutes
- Yield: 9 servings 1x
- Category: Dessert
Description
A chilled, no-oven treat built on a crunchy cookie base, a minty cream-cheese layer, a silky chocolate middle, and a fluffy whipped topping — all set in a 9×9 pan. Easy to assemble and perfect straight from the fridge or slightly frozen like an ice-cream cake.
Ingredients
For the crust
- 1½ cups vanilla wafer crumbs
- ¼ cup (½ stick) unsalted butter, melted
- 2 tbsp granulated sugar
Peppermint cream layer
- 8 oz cream cheese, softened
- ½ cup finely crushed peppermint candy canes or starlight mints
- 2 tbsp milk
- 1/3 cup granulated sugar
- 1 1/4 cups whipped topping (see note below)
Chocolate layer
- 1 package (4-serving) instant chocolate pudding mix
- 1 3/4 cups cold milk
Finish
- 1 tub (8 oz) whipped topping
- 1/4 cup coarsely chopped peppermint candy cane for garnish
Note: You’ll want about two 8-oz containers of whipped topping (or one larger 12-oz tub) available — you won’t necessarily use every last spoonful.
Instructions
- Make the crust. Combine the vanilla wafer crumbs, melted butter, and sugar in a bowl. Press the mixture firmly into the bottom of a 9×9-inch baking dish to form an even layer. Place the pan in the refrigerator while you prepare the next layers.
- Prepare the peppermint layer. In a mixing bowl, beat the softened cream cheese with the milk until the texture is smooth and creamy. Add the sugar and the finely crushed peppermint bits; continue beating until fully incorporated. Gently fold in 1 1/4 cups of whipped topping until the mixture is light and airy. Spread this mixture evenly over the chilled crust.
- Make the chocolate layer. Whisk the instant pudding mix with 1 3/4 cups cold milk for about two minutes, until thickened. Carefully spread the pudding over the peppermint layer. Let the pudding set for 5–10 minutes at room temperature so it firms slightly.
- Top and garnish. Smooth the remaining tub of whipped topping over the pudding layer. Sprinkle the chopped candy cane pieces over the top for color and crunch.
- Chill or freeze. Refrigerate the pan for at least 4 hours (the chill time lets everything firm up). For an ice-cream-cake texture, freeze the squares for about 4 hours. If you prefer easier slicing without fully freezing, pop the pan into the freezer for 1 hour before cutting.
- Slice and serve. Use a clean, sharp knife (wiping the blade between cuts helps) to slice into bars. Serve cold.
Notes
- Storage tips
- Keep leftovers covered in the refrigerator for up to 4 days.
- To store long-term, wrap tightly and freeze for up to 2 months; thaw overnight in the fridge before serving.
Nutrition
- Serving Size: 1person
- Calories: 424kcal
- Sugar: 37g
- Sodium: 204mg
- Fat: 23g
- Saturated Fat: 14g
- Carbohydrates: 49g
- Fiber: 1g
- Protein: 5g
- Cholesterol: 47mg
Peppermint Dream Dessert, 8×8 Dessert Recipes Easy, Christmas Pot Luck Desserts, Christmas Desserts Easy Pie, Christmas Peppermint Desserts, Peppermint Bark Cake Recipe, Peppermint Pudding Dessert, Peppermint Christmas Desserts, Peppermint Lasagna