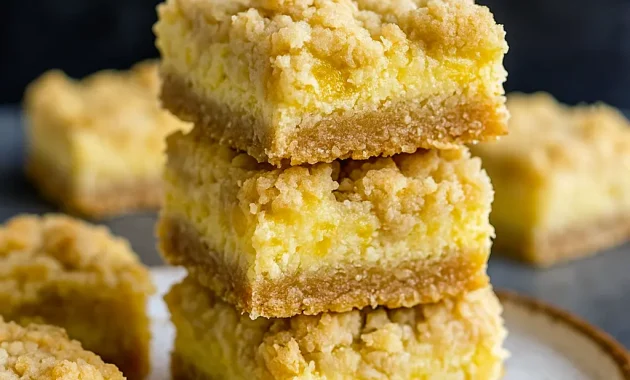
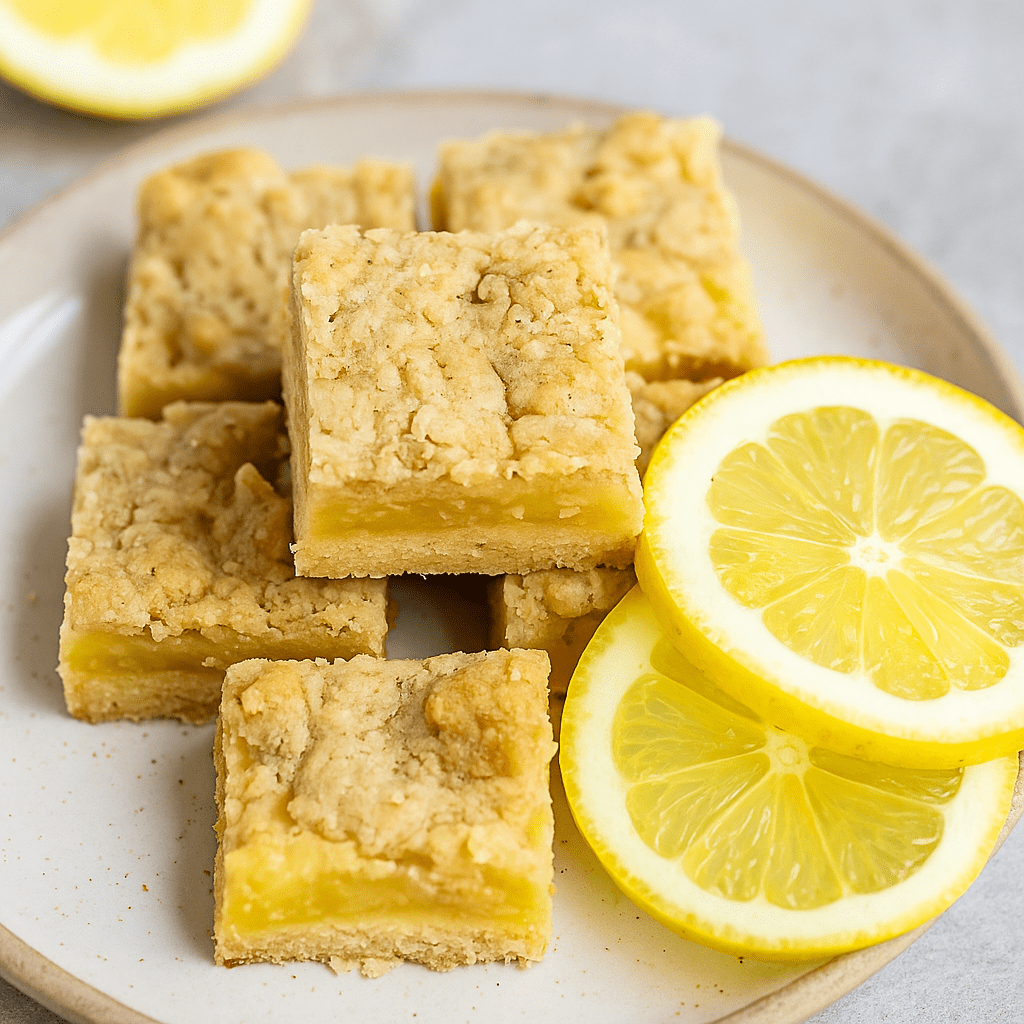
There’s something about a lemon bar that feels like instant sunshine on a plate. Bright, tangy, sweet, and just the right amount of creamy — they’re the ultimate pick-me-up dessert. And let me tell you, these aren’t your ordinary bars. These are next-level lemon bars with shortbread crust (with a buttery oat crumble twist!) that taste like springtime and happiness had a baby.
I still remember the first time I tried a lemon crumb bar at a little café near my house. I wasn’t even planning on dessert (I know, who even am I?), but the golden topping caught my eye. One bite in, and I knew I had a new obsession. It had all the classic tartness of a traditional lemon shortbread bar, but with an irresistible crunch and creamy center that made me think, “I need to make this at home — like, ASAP.”
So here we are. I recreated it, tweaked it, and dare I say, made it even better. This is the lemon bars recipe you’ll be baking all season long.
Why This Lemon Bar Recipe is Irresistible
What makes these bars so special? Glad you asked.
✨ Double-Duty Crumble – The oat crumble plays both crust and topping. You get crunchy, nutty goodness in every bite.
✨ Custardy Lemon Filling – The condensed milk and egg yolks create a silky, custard-like layer that’s creamier than the classic version.
✨ Perfect for Sharing – They’re made for baking for a crowd — brunches, BBQs, baby showers, or any time you need a little sunshine on the table.
✨ Make-Ahead Friendly – They taste even better the next day (hello, stress-free hosting!).
In short, they’re sweet, zesty, crumbly, and creamy — everything you want in a sweet bar.
Ingredient Notes (and Simple Swaps)
No fancy ingredients here — just pantry staples and fresh lemons.
- All-Purpose Flour – Creates structure and keeps the crust together.
- Quick Oats – Adds crunch and a nutty flavor. (You can use old-fashioned oats if you like a chewier bite.)
- Lemon Juice + Zest – Fresh is best here. Don’t skimp — this is where the bright flavor comes from.
- Sweetened Condensed Milk – Gives that smooth, creamy texture to the filling.
- Egg Yolks – Make the filling thick and custardy.
- Unsalted Butter – Adds richness. (Only have salted butter? Just skip extra salt.)
- White & Brown Sugar – This combo helps get that golden, crisp crumble.
- Salt – Balances the sweetness.
How to Make These Lemon Shortbread Bars
This is one of those recipes that looks impressive but is secretly super easy. Here’s the play-by-play:
1. Make the Crust
Preheat your oven to 325°F and line a 9×13-inch pan with parchment paper. (Leave an overhang so you can lift the bars out later — trust me, this is a game-changer.)
Beat butter, white sugar, brown sugar, vanilla, and a bit of lemon zest until fluffy. Add the flour, oats, and salt, then mix until it forms a crumbly dough.
Press half the mixture into your pan and bake for about 20 minutes until golden. Chill the remaining dough in the fridge while it bakes.
Pro Tip: Don’t overmix. You want little bits of butter to stay visible for that perfectly flaky shortbread bars texture.
2. Make the Filling
Whisk together sweetened condensed milk, egg yolks, lemon juice, and zest until smooth. The filling should be thick but still pourable.
3. Assemble & Bake Again
Pour the filling over the baked crust and smooth it out. Crumble the remaining oat mixture on top and bake for 25–30 minutes, until the topping is golden and the filling looks set.
4. Cool & Slice
Let the bars cool completely before cutting. (If you have the patience, chill them in the fridge for a couple hours — they slice like a dream.)
Expert Tip: Wipe your knife clean between cuts for picture-perfect squares.
The Story Behind This Recipe
This recipe was inspired by a random café discovery. I wasn’t expecting to fall in love with a lemon dessert that day — but sometimes dessert finds you. And once it did, I had to recreate it in my own kitchen.
I swapped the usual shortbread for an oat crumble (because I love a little crunch), used sweetened condensed milk for a creamy twist, and after a couple of test runs, I landed on the ultimate version. Now it’s my go-to for easy Easter desserts and casual spring brunches.
Pro Tips for the Best Lemon Bars
- Use Fresh Lemons – Bottled lemon juice just doesn’t hit the same.
- Chill Before Cutting – I know it’s hard to wait, but the bars will slice so much cleaner.
- Make Ahead for Parties – The flavor actually deepens after a day. Perfect for stress-free hosting.
- Taste the Filling – If you like it more tart, add a bit more zest before baking.
Variations to Try
Want to mix it up? Here are some fun ideas:
🍓 Berry Swirl – Add fresh raspberries or blueberries to the filling before baking.
🥥 Coconut Lover’s – Stir shredded coconut into the crumble topping.
🍫 Chocolate Drizzle – Once cooled, drizzle with dark chocolate for a decadent twist.
🌿 Herby Vibes – Add thyme or basil for a lemon savory moment that feels super gourmet.
Best Way to Serve
These bars are best served slightly chilled with a dusting of powdered sugar. For brunch, pair them with coffee or mimosas. For a backyard BBQ, serve them cold straight from the fridge — so refreshing!
And if you’re baking for a crowd, double the recipe. You’ll thank yourself later because these disappear fast.
Storage & Leftovers
Store bars in an airtight container in the fridge for up to 5 days. Layer parchment paper between them to keep them from sticking.
Want to freeze them? Totally doable. Wrap each bar in plastic wrap, then place in a freezer-safe bag. Thaw in the fridge overnight and they’ll taste just as good as fresh.
Quick FAQs
Can I use bottled lemon juice?
Technically yes, but fresh lemons make a huge difference in flavor.
Do I have to use oats?
Nope! You can make a classic lemon bars with shortbread crust by swapping the oats for extra flour.
Can I make them gluten-free?
Yes — just use a 1:1 gluten-free baking flour blend and certified GF oats.
These bars are everything you want from a sweet bar: tangy, creamy, crunchy, and easy enough to whip up any day of the week. Whether you’re serving them as part of your easy Easter desserts spread, taking them to a potluck, or just baking for yourself (no judgment), they’re going to be the star of the table.
So grab those lemons and let’s make some magic.
Print
Lemon Bars Recipe | Creamy Lemon Bars With Shortbread Crust
- Prep Time: 10 minutes
- Cook Time: 30 minutes
- Total Time: 40 minutes
- Yield: 20 bars 1x
- Category: Dessert
Description
Bright, zesty, and just the right amount of creamy — these lemon bars are basically springtime baked into dessert form. A buttery oat shortbread crust meets a silky lemon filling, then gets topped with more crumble for the perfect sweet-tart bite.
Ingredients
- 3 sticks unsalted butter, softened (use salted butter? Just skip the added salt)
- ¾ cup light brown sugar
- ¾ cup white sugar
- 1 tablespoon pure vanilla extract
- Zest from 3 large lemons (or 4 if yours are smaller)
- 1 ¾ cups all-purpose flour
- 1 ¾ cups quick-cooking oats
- 1 teaspoon salt
- 21 ounces sweetened condensed milk (that’s 1 ½ cans)
- ¾ cup fresh lemon juice (about 3 large lemons)
- 3 large egg yolks
Instructions
- Prep Your Pan
- Set your oven to 325°F. Line a 9×13-inch baking dish with parchment paper, leaving some overhang on the sides so you can lift the bars out easily later.
- Make the Crust
- In a stand mixer (or grab a bowl and a hand mixer), beat together the butter, both sugars, vanilla, and 1 tablespoon of the lemon zest until smooth and creamy.
- Add the flour, oats, and salt, then mix until just combined. Don’t overdo it — you want it crumbly, not doughy.
- Bake the Base
- Press half the dough firmly into the bottom of your pan, spreading it evenly. Pop it in the oven and bake for about 20 minutes, or until lightly golden. While that’s happening, refrigerate the remaining dough so it stays nice and firm.
- Whip Up the Filling
- In a separate bowl, whisk together the sweetened condensed milk, remaining lemon zest, egg yolks, and fresh lemon juice until smooth and silky. The mixture should look creamy but still pourable.
- Assemble and Bake Again
- Take the crust out of the oven and immediately pour the lemon mixture over the top, spreading it evenly. Crumble the chilled dough over the filling.
- Bake for another 25–30 minutes, or until the top is golden brown and the center doesn’t jiggle when you gently shake the pan.
- Cool & Slice
- Let the bars cool completely in the pan — patience is key here, or they’ll fall apart when cutting. For ultra-clean edges, chill them in the fridge for a couple of hours before slicing into squares.
Notes
- These bars make a surprisingly big batch, so they’re perfect for parties, potlucks, or spring gatherings. If you slice them into bite-size squares, you’ll have plenty for a crowd — though honestly, no one will complain if you cut them extra large.
- Store leftovers in the fridge, covered, for up to 5 days. They taste just as good (maybe even better!) chilled.