Holiday Cookie Tray: The Ultimate Christmas Cookie Bars Guide
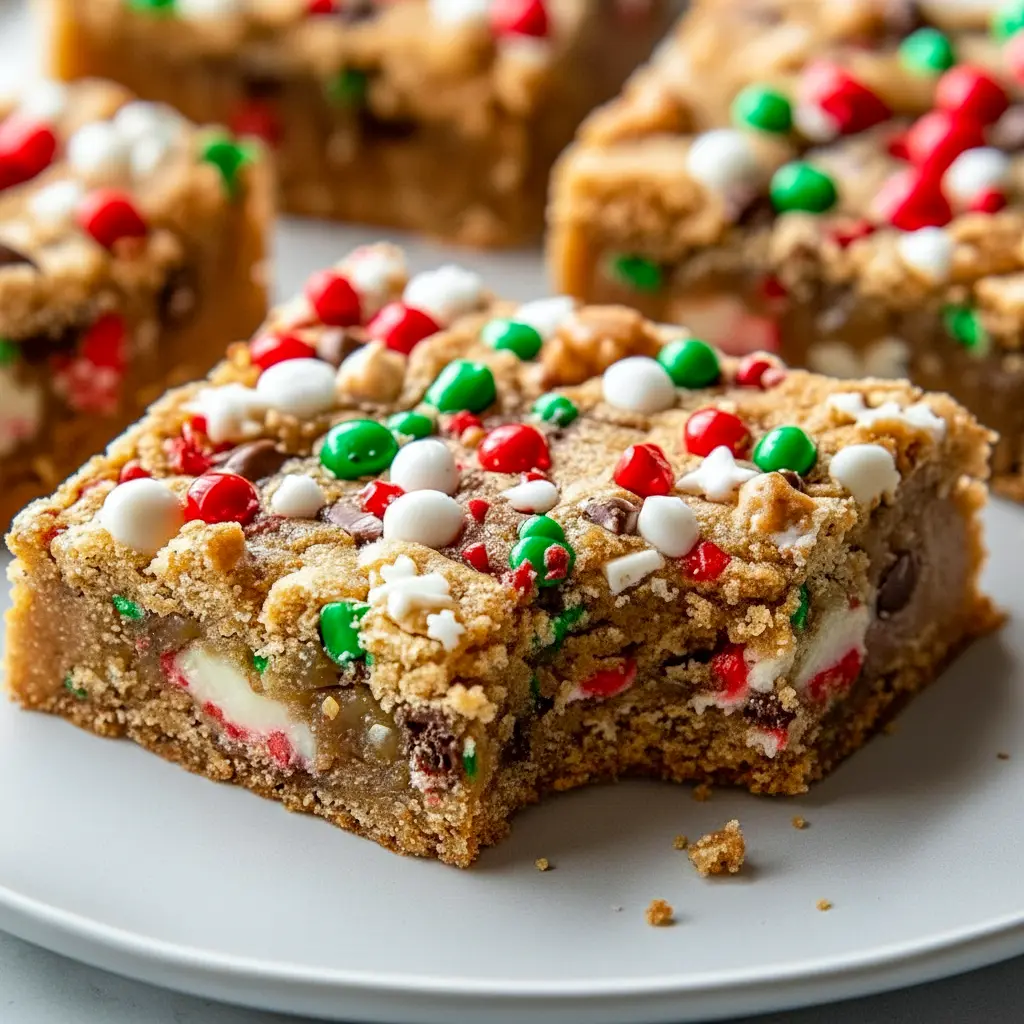
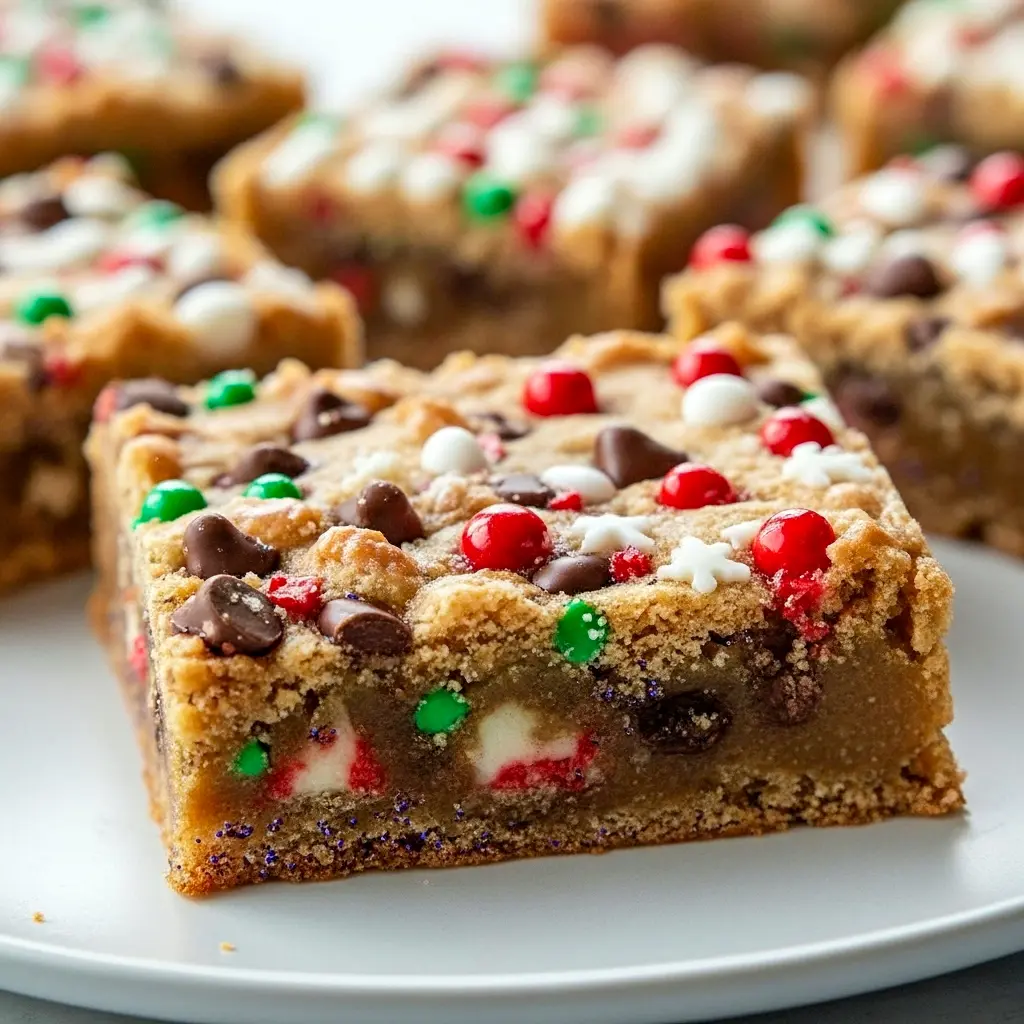
If you’re putting together a Holiday Cookie Tray, these Christmas Cookie Bars deserve the center spot — chewy, buttery, and loaded with festive flair. They marry the best parts of cookies and bars into handheld squares that travel well, gift beautifully, and vanish faster than you can say “seconds.”
Brief introduction to the recipe
Think of these bars as the cozy, no-fuss cousin of classic cookies. They keep a tender, slightly chewy crumb like your favorite cookie but bake in one pan — which means less fuss and more delicious output. With a rich butter base, brown sugar depth, and pockets of chocolate and nuts, these are holiday comfort in square form.
Why you’ll love this recipe
Why bother? Because they’re easy, reliable, and endlessly tweakable. Need a last-minute contribution to a cookie swap? Boom — you’re done. Want to make a dozen gift boxes without losing your mind? These slice beautifully and stack like a dream. They hit the sweet spot between homestyle and show-stopping.
The story behind these bars
I started making bars because my oven time became precious during holidays. One-pan magic meant I could chat with guests while a tray of chewy goodness baked away. Over time I perfected ratios so the edges crisp while the center stays chewy. The result: bar after bar of consistent, crowd-pleasing joy.
Ingredients breakdown (short blurbs)
- 1 cup unsalted butter, softened — Butter gives flavor and that golden edge we love.
- 1 cup granulated sugar + 1 cup packed brown sugar — The combo gives sweetness and chew; brown sugar adds molasses depth.
- 2 large eggs — Bind and add richness.
- 2 teaspoons vanilla extract — A must for warmth and aroma.
- 3 cups all-purpose flour — The structure. Don’t overpack the cup.
- 1 teaspoon baking powder + 1 teaspoon baking soda — Lift and a gentle rise.
- 1/2 teaspoon salt — Small but mighty flavor booster.
- 2 cups chocolate chips — Semi-sweet or milk — your call. I use semi-sweet for balance.
- 1 cup chopped nuts (optional) — Walnuts or pecans add crunch and holiday vibes.
- 1/2 cup festive sprinkles — For color and cheer; optional but fun.
Prep time sits at about 20 minutes, bake time 25–30 minutes, total roughly 50 minutes, and you’ll get about 24 generous bars — perfect for sharing.
How to Make It — Step-by-step (clear & punchy)
- Preheat to 350°F (175°C). Let the oven get cozy before the batter goes in.
- Line a 9×13 pan with parchment and leave an overhang so you can lift the whole slab out later. Grease lightly if your parchment is thin.
- Whisk dry stuff. In a bowl, whisk flour, baking powder, baking soda, and salt. Easy and quick.
- Cream butter and sugars. In a large bowl, beat softened butter with granulated and brown sugar until light and fluffy.
- Add eggs and vanilla. Mix until smooth and well combined.
- Fold in dry ingredients. Add the flour mix gradually and mix until just combined — don’t over-mix. Overworking makes tough bars.
- Stir in mix-ins. Fold in chocolate chips and nuts (if using). Save a handful of chips to sprinkle on top for looks.
- Spread into the pan. Press the batter evenly into the prepared pan, smoothing into the corners.
- Bake 25–30 minutes. Edges should be golden and the center set but slightly soft. Use a toothpick — it should come out mostly clean with a few moist crumbs.
- Cool 10 minutes, then lift out. Let cool completely on a wire rack before cutting into squares. Cutting hot = crumble city.
Pro tips for perfect results
- Room-temperature butter and eggs mix easier and give better texture.
- Don’t overmix the dough. Mix until the dry ingredients disappear — that’s it.
- For cleaner slices, chill briefly after the bars cool to room temp. Then use a hot, dry knife (run under hot water, dry, and slice) and wipe between cuts.
- Use parchment overhang so you can lift the slab and slice with ease.
- Want chewier bars? Take them out a minute or two earlier. They’ll finish setting as they cool.
- Prefer cakier bars? Add a tablespoon of milk to the batter.
- FYI: If you want glossy chocolate on top, melt a few extra chips and spread quickly before the bars cool.
Bold tip: If your oven runs hot, lower the temp by 15°F and watch closely. Oven temps vary wildly, and slight tweaks prevent burned edges.
Variations to try (get playful)
- Chocolate Peppermint Bars: Stir in crushed candy cane and swirl melted chocolate frosting on top — holiday crowd-pleaser. (Great with a Christmas Baking Bars board in mind.)
- Nutty Cranberry Bliss Bars: Fold in dried cranberries and pecans for tart-sweet contrast.
- Gingerbread Cookie Bars: Swap half the flour with spiced flour (cinnamon, ginger, clove) for a warm, festive spin.
- White Chocolate Macadamia: Replace chocolate chips with white chocolate and macadamia nuts. Luxurious and classy.
- Eggnog Sugar Cookie Bars: Use eggnog in place of milk and a dash of nutmeg for cozy, seasonal flavor.
- Mix-and-match: Try half chocolate chips and half butterscotch or toffee bits. The options are endless.
Want ideas targeted toward a specific theme? Try an assortment: some bars sprinkled, some drizzled with chocolate, some topped with nuts — and call it a Christmas Cookies And Bars platter.
Best ways to serve
Serve at room temperature for the best texture. Stack on a platter, add sprigs of rosemary or orange peel for color, and label the tray if you bring it to a gathering. For gifts, stack bars with parchment between layers and tie with baker’s twine or a festive ribbon. If you’re building a Holiday Cookie Tray, arrange bars beside small cookies and candies for variety — people love variety!
Storage and leftovers
- Room temp: Airtight container for up to 1 week.
- Fridge: Keeps longer but may firm up; bring to room temp before serving.
- Freeze: Wrap squares tightly in plastic and freeze up to 3 months. Thaw overnight in the fridge.
Quick tip: Separate layers with parchment to prevent sticking if you stack bars in storage.

FAQs (short, useful answers)
Can I swap the flour?
Yes. Whole wheat adds nuttiness; gluten-free blends work too but may change texture slightly. Adjust liquid if the mix looks dry.
Can I make smaller/bigger pans?
Sure. Reduce bake time for smaller pans and increase slightly for deeper pans. Watch for golden edges.
My bars are crumbly — why?
Overbaking or too much flour. Next batch: measure flour properly (fluff, spoon, level) and pull them a touch earlier.
Can I make them ahead?
Absolutely. Bake, cool, and freeze or refrigerate. Thaw to room temp before serving for best texture.
What toppings work best?
Chocolate drizzle, sprinkles, chopped nuts, sea salt flakes, or a dusting of powdered sugar — pick your vibe.
Common mistakes and how to avoid them
- Overbaking: Check 5 minutes early. The center should still look slightly soft.
- Overmixing: Mix until combined. Stop. That’s the secret to tender bars.
- Skipping parchment: Don’t do it. Lining makes removal and slicing so much cleaner.
- Ignoring oven quirks: Rotate your pan if your oven has hot spots. Use an oven thermometer if you suspect temp issues.
Make it part of a bigger spread
These bars work wonderfully on a Christmas Squares Recipes board. Pair them with brownies, thumbprint cookies, and shortbread for a variety-packed tray. If you’re curating an Xmas Bars And Squares table, add labels (gluten-free, nut-free, contains dairy) to help guests navigate.
Quick menu pairing suggestions
- Hot cocoa or mulled cider — classic cozy pairings.
- Espresso or strong coffee — the bitterness balances the sweetness.
- Cheese platter — for a grown-up twist, mix sweet bars with savory bites.
Final thoughts wrap-up
These Christmas Cookie Bars hit every holiday checklist: easy, adaptable, and delicious. Whether you’re building a Holiday Cookie Tray, hunting for Christmas Dessert Bars Recipes, or just craving a sweet bite with your coffee, this recipe delivers. It’s one of those simple, dependable wins you’ll make again and again.
So, what’s your move — classic chocolate chip, peppermint sparkled, or a white-chocolate macadamia flex? Whichever you pick, you’re guaranteed smiles. Bake a batch, stash a few for yourself, and send the rest out into the wild. Trust me — they’ll come back with compliments.
Follow me on Pinterest for daily new recipes.

Ultimate Holiday Cookie Tray — Irresistible Christmas Cookie Bars
- Prep Time: 20 minutes
- Cook Time: 30 minutes
- Total Time: 50 minutes
- Yield: 24 bars 1x
- Category: Dessert
Description
Chewy, buttery squares studded with chocolate and festive sprinkles—these Christmas Cookie Bars are a one-pan win for holiday baking. They bake up quickly, slice cleanly, and make great gifts or party platters.
Ingredients
- 1 cup (226 g) unsalted butter, softened
- 1 cup (200 g) granulated sugar
- 1 cup (220 g) packed brown sugar
- 2 large eggs
- 2 teaspoons pure vanilla extract
- 3 cups (360 g) all-purpose flour
- 1 teaspoon baking powder
- 1 teaspoon baking soda
- ½ teaspoon fine salt
- 2 cups (340 g) chocolate chips
- 1 cup chopped nuts (optional)
- ½ cup holiday sprinkles (optional, for garnish)
Instructions
- Heat the oven. Set it to 350°F (175°C) so it’s ready when your batter is.
- Prep the pan. Line a 9×13-inch pan with parchment, leaving a couple inches over the sides as handles for easy removal.
- Whisk the dry mix. In a bowl, whisk together flour, baking powder, baking soda, and salt until uniform.
- Cream butter and sugars. In a large mixing bowl, beat the softened butter with the granulated and brown sugars until light and fluffy. Add eggs one at a time, then beat in the vanilla.
- Combine wet + dry. Add the flour mixture in batches, stirring until just incorporated. Don’t overwork the dough — you want tender bars, not hockey pucks.
- Stir in mix-ins. Fold in the chocolate chips and nuts (if using), reserving a few chips and sprinkles to scatter on top.
- Press into the pan. Transfer the batter to the prepared pan and press it evenly into the corners with a spatula. Smooth the surface.
- Bake. Slide the pan into the oven and bake 25–30 minutes, until the edges are golden and a toothpick from the center comes out with a few moist crumbs.
- Cool, lift, slice. Let the slab cool in the pan about 10 minutes, then lift out using the parchment overhang and transfer to a wire rack. Cool fully before cutting into squares.
Notes
- Quick tips & must-dos
- Use room-temperature butter and eggs for even creaming.
- Measure flour properly (spoon into cup, level off) to avoid dense bars.
- Don’t overmix after adding flour — mix until you can’t see dry streaks.
- For sharper slices, chill the pan briefly, then cut with a hot, dry knife (run it under hot water, dry, slice). FYI: wiping the blade between cuts helps a ton.
- Storage & freezing
- Store bars in an airtight container at room temperature up to 1 week. To freeze, wrap individual squares tightly in plastic, place in a freezer-safe bag, and freeze up to 3 months. Thaw overnight in the fridge or bring to room temp before serving.
- Variations to try
- White chocolate & macadamia: Swap in white chips and macadamias for a classy twist.
- Cranberry–nut: Fold in dried cranberries and pecans for tartness and crunch.
- Butterscotch or toffee: Replace some chips with butterscotch or toffee bits.
- Spiced holiday bars: Add 1–2 teaspoons of cinnamon and a pinch of nutmeg for a warm, cozy note.
- Final note
- Want chewy centers and crisp edges? Pull the bars a minute or two early — they’ll finish setting as they cool. Who doesn’t love a dessert that behaves? Go bake a tray and watch them disappear.
Keywords used naturally above: Holiday Cookie Tray, Christmas Baking Bars, Christmas Dessert Bars Recipes, Cookies Holiday, Christmas Squares Recipes, Xmas Bars And Squares, Christmas Cookie Bars Recipes Easy, Christmas Cookies And Bars, Christmas Cookie Bars Easy.