Gf Protein Bars that taste like candy? Oh yes — meet my no-bake, gluten-free, dairy-free, refined-sugar-free Twix-style bars with a protein kick. They’re gooey, chocolatey, and actually nourishing thanks to clean protein powder and collagen peptides. Want a sweet that behaves like a treat and a snack? Read on.
Gf Protein Bars — what makes these bars irresistible
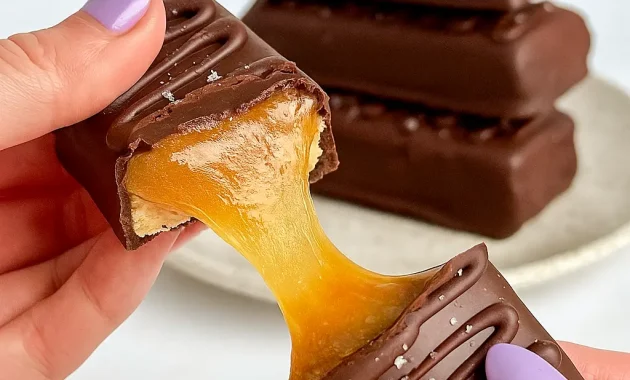
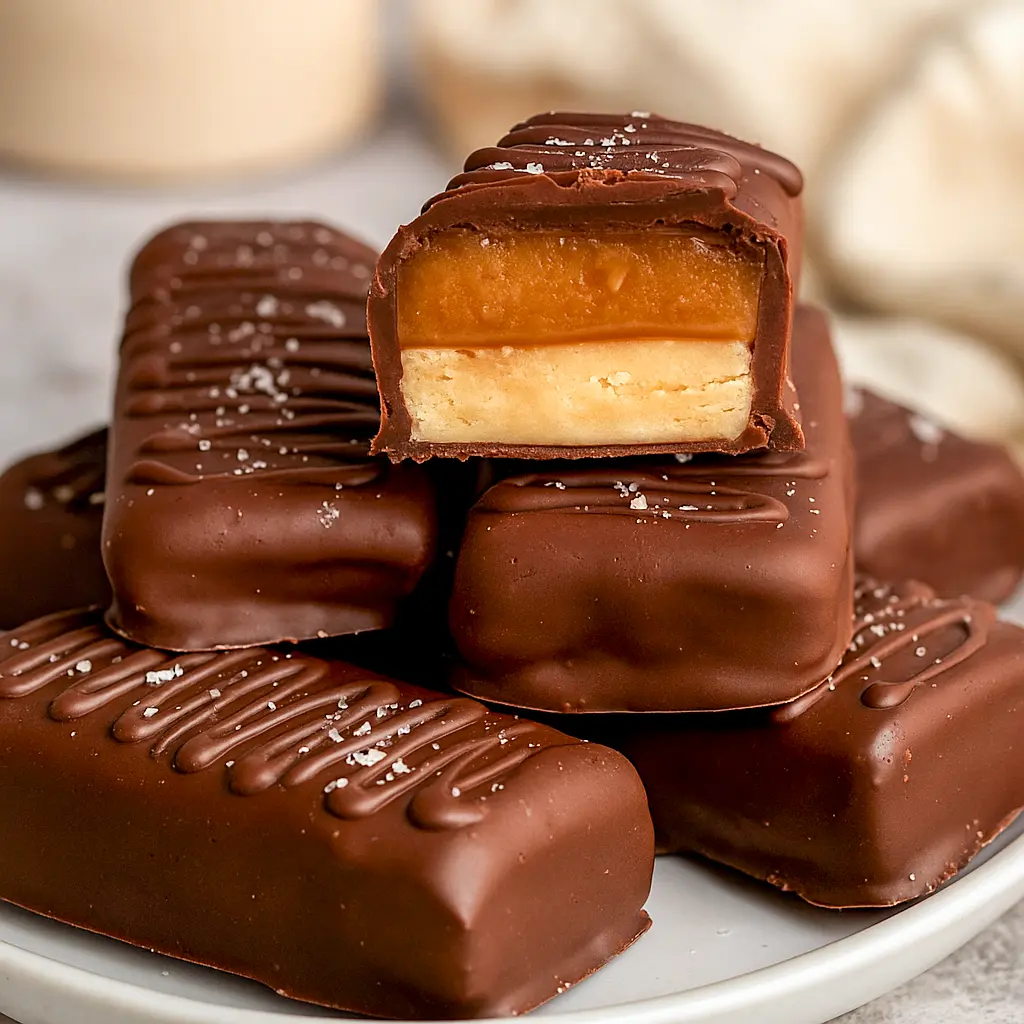
Why do these bars vanish the second you set them on the counter? Texture, baby. A soft, nutty shortbread base, a sticky, pull-worthy caramel middle, and a glossy dark chocolate shell — that combo hits crunchy, chewy, and silky in one bite. Plus, they’re loaded with protein and free from gluten, dairy, and refined sugar, so they show up for snack time without the sugar crash. Bold tip: let the bars sit at room temp for ~10 minutes before digging in for that perfect gooey caramel pull.
These aren’t just dessert — they fit the bill for Dairy Free Sweets Recipes, Gluten And Dairy Free Candy, and even Dessert No Dairy lovers. If you need Gluten Free Dairy Free Sugar Free Snacks or Sugar Free Protein Snacks, this recipe aims right at the sweet spot.
Ingredients (short notes — what each part does)
Shortbread base
- Almond flour — tender, nutty foundation.
- Vanilla protein powder (or oat flour) — adds structure and flavor; protein boost if you use protein powder.
- Maple syrup — natural sweetener and binder.
- Coconut oil — brings richness and helps the base set.
Caramel layer
- Creamy peanut (or cashew) butter — nutty, buttery chew.
- Maple syrup — sweetener and goo factor.
- Coconut oil — keeps the caramel glossy.
- Collagen peptides — optional, but they help the caramel stay luscious and pull-y.
- Vanilla & pinch of salt — essential flavor boosters.
Chocolate coating
- Dark chocolate — the roof of deliciousness.
- Coconut oil — thins the chocolate for easy dipping and shiny finish.
Bold tip: use freshly melted chocolate and keep a little extra — you’ll want enough to dunk bars fully or drizzle generously.
## Gf Protein Bars — simple how-to (no bake, minimal drama)
- Make the base: Mix almond flour, protein powder, maple syrup, and melted coconut oil into a dough. Press it firmly into an 8×8 pan lined with parchment. Freeze while you assemble the caramel.
- Whip the caramel: Stir peanut butter, maple syrup, melted coconut oil, collagen (if using), and vanilla until smooth. Pour over the chilled base and freeze at least 1 hour.
- Cut & coat: Melt dark chocolate with coconut oil. Slice the set slab into 10 bars or 20 squares. Dip each bar into chocolate (or drizzle), let excess drip off, and set on parchment. Sprinkle flaky sea salt if you’re feeling fancy. Chill 10 minutes until the shell sets.
- Enjoy: Let them sit 10+ minutes at room temperature before eating for true pull-y caramel.
Short, sweet, and zero oven time. FYI — if you skip collagen the caramel still works; it’s just slightly less elastic.
The story behind these bars
I set out to make a Twix-style treat that didn’t wreck my week. I wanted something you could stash in the fridge, hand to a kiddo, or toss in a gym bag without guilt. After a few experiments (and a lot of taste-testing), the almond-shortbread + nut-butter caramel + dark chocolate combo won. I love that these bars feel indulgent but use Highly Nutritious Foods like almond flour, clean protein, and collagen — snack + nutrition in one mouthful.
Pro tips for the best outcome
- Press the base firmly. A compact crust means clean slices.
- Freeze between layers. That makes cutting and coating tidy.
- Let chocolate set fully in the fridge but pull to room temp for the best caramel pull.
- Shred leftover chocolate? Keep extras in the fridge for your next dip or drizzle.
- Swap protein mindfully: if you use a flavored protein, reduce added vanilla.
Bold tip: slice with a warm sharp knife for cleaner edges — wipe between cuts.
Variations to try
- Swap almond flour for oat flour if you prefer a softer base (still GF if oats are certified).
- Use cashew butter for a milder caramel or sunflower seed butter to keep nut-free.
- Add a teaspoon of espresso powder to the chocolate for an adult mocha twist.
- Make mini-bites instead of bars for party trays.
These little swaps let you call them Healthy Sweets For Diabetics or keep them friendlier for certain dietary needs (always double-check sugar content).
Best way to serve
Serve chilled or slightly room-temp. Pair with coffee, a mug of unsweetened almond milk, or pack one as an afternoon protein top-up. Want to impress? Crumble a bar over frozen yogurt or slice thin and serve alongside fruit for a dessert board.
Storage & leftovers (quick tips)
- Fridge: store in an airtight container up to 2 weeks.
- Freezer: freeze in layers separated by parchment for up to 3 months. Thaw in the fridge or 10–15 minutes at room temp before eating.
Bold tip: store with parchment between layers to prevent sticking and chocolate theft. (You know who you are.)
FAQs
Can I skip the collagen?
Yes — collagen adds elasticity to the caramel but you’ll still get a delicious result without it.
Which protein powder should I use?
Use a clean-flavor protein — vanilla works beautifully. If you use a very sweet or flavored powder, reduce maple syrup slightly.
Are these suitable for insulin-resistant people?
These bars reduce refined sugar and use natural sweeteners, so they can fit in mindful eating plans. Still, check your carb goals — these are not zero-carb. Label them under Insulin Resistance Sweets thoughtfully and enjoy in moderation.
Can I make them nut-free?
Yes — swap almond flour for certified oat flour and use sunflower seed butter instead of peanut/cashew.
How do I make them less sweet?
Choose a higher-cacao dark chocolate and cut back a tablespoon or two of maple syrup in the caramel.
Why these bars belong in your snack drawer
If you want a tasty treat that plays nice with clean-eating goals, these are your people. They fit multiple categories: High Protein Desserts Dairy Free, Sugar Free Protein Snacks, and Gluten And Dairy Free Candy. They work for dessert, post-workout fuel, or a pantry-friendly pick-me-up.
So—ready to make candy that behaves like a snack? Preheat nothing, press some almond dough, whisk a dreamy caramel, and dunk away. Your future self (and your snack drawer) will thank you.

Healthy High Protein Twix Bars — Gf Protein Bars
- Prep Time: 10 minutes
- Total Time: 10 minutes
- Yield: 20 bars 1x
- Category: Dessert
Description
These no-bake bars deliver that classic shortbread + caramel + chocolate vibe — but made gluten-free, dairy-free and sweetened with maple syrup. They also pack a protein punch if you use your favorite vanilla protein powder and collagen peptides, though both are optional.
Ingredients
Base (shortbread layer)
- 2 cups almond flour
- ½ cup vanilla protein powder (or substitute oat flour)
- ¼ cup pure maple syrup
- ¼ cup melted coconut oil
Caramel layer
- 2/3 cup creamy peanut butter (or cashew butter)
- 1/3 cup pure maple syrup
- 2 tbsp melted coconut oil
- 2 scoops collagen peptides (optional)
- 1 tsp vanilla extract
Chocolate coating
- 2 cups dark chocolate (chopped or chips)
- 2 tsp coconut oil
Instructions
- Line an 8×8-inch pan with parchment. In a bowl, stir the almond flour, protein powder (or oat flour), maple syrup and melted coconut oil into a soft dough. Press this mixture evenly into the prepared pan to form the shortbread base. Pop the pan in the freezer while you make the next layer.
- In a separate bowl, whisk together the nut butter, maple syrup, melted coconut oil, collagen (if using) and vanilla until completely smooth and glossy. Taste and adjust if you want it sweeter or more nutty.
- Pour the caramel mixture over the chilled shortbread and spread to the edges. Freeze the pan for at least 1 hour so the caramel firms up.
- When the caramel is set, melt the dark chocolate and coconut oil together (microwave in short bursts or use a double boiler), stirring until smooth. Remove the pan from the freezer and lift the slab out using the parchment. Slice into 10 bars or 20 small squares.
- Working quickly, dip each bar into the melted chocolate to coat, letting excess drip off before transferring to a parchment-lined tray. If you prefer less chocolate, drizzle the chocolate on top instead of fully dunking.
- Sprinkle flaky sea salt if desired, then chill the coated bars in the refrigerator for about 10 minutes until the chocolate firms.
- For the most pull-worthy caramel texture, let bars sit at room temperature for 10+ minutes before eating — they’re firmer straight from the fridge.
Notes
- Tips & Variations
- If you don’t want to use protein powder, swap in oat flour (certified gluten-free if needed).
- Collagen helps create a stretchier caramel but isn’t required; omit it if you prefer.
- You’ll likely have extra melted chocolate — pour it into a container and refrigerate for another use, or drizzle it over the finished bars.
- For a nut-free version, use sunflower seed butter and oat flour in place of almond flour.
- To get clean slices, warm a sharp knife under hot water, dry it, then slice; wipe the blade between cuts.
- Storage
- Keep the bars refrigerated in an airtight container for up to 2 weeks, or freeze individually wrapped for up to 3 months. Thaw in the fridge or on the counter for a few minutes before serving.
- Final note
- If you love that classic “Twix pull,” remember: room temperature = gooey caramel. Right out of the fridge they’re firmer — both ways are delicious, just different textures. Enjoy!