Description
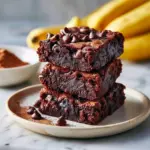
A fudgy, chocolatey tray bake that uses ripe bananas for sweetness and moisture. Easy one-bowl method — perfect for a snack, dessert, or portioned lunchbox treat.
Ingredients
Scale
Liquid mix
- 2 very ripe bananas, mashed (≈1 cup)
- 2 large eggs
- 1/4 cup maple syrup (sub honey if you prefer)
- 1/4 cup plain Greek yogurt (or applesauce for a dairy-free option)
- 1 teaspoon vanilla extract
- 2 tablespoons coconut oil, melted
Dry mix
- 1/3 cup unsweetened cocoa powder
- 1/2 cup oat flour (or almond flour to make it grain-free)
- 1/4 teaspoon baking soda
- 1/4 teaspoon fine sea salt
- Optional: 1/4 teaspoon ground cinnamon
Add-ins
- 1/4 cup dark chocolate chips or chopped dark chocolate (70%+)
- Optional: 1/4 cup chopped walnuts or pecans for texture (leave out for nut-free)
Instructions
- Preheat the oven to 350°F (175°C). Line an 8×8-inch baking tin with parchment, leaving a little overhang to help lift the brownies out later.
- In a large mixing bowl, mash the bananas thoroughly with a fork until mostly smooth. The darker the bananas, the richer the flavor.
- Add the eggs, maple syrup, Greek yogurt, vanilla, and melted coconut oil to the mashed bananas. Whisk until the mixture looks uniform and glossy.
- Sift (or whisk) the cocoa powder into the wet mixture to avoid lumps. Stir in the oat flour, baking soda, salt, and cinnamon if using. Combine gently until you have a thick, fudgy batter—avoid vigorous stirring.
- Fold in the dark chocolate pieces and nuts (if using), making sure they’re evenly distributed without overworking the batter.
- Spread the batter into the prepared pan and smooth the top lightly. Scatter a few extra chips or nuts across the surface if you like a bakery-style finish.
- Bake for 20–25 minutes. The center should still have a few moist crumbs when tested with a toothpick—this keeps the brownies dense and fudgy. Remove from the oven and let cool in the pan for 20–30 minutes.
- Use the parchment overhang to lift the slab from the tin. Transfer to a cutting board and slice into 9 or 12 squares, depending on preferred portion size.
Notes
- Don’t overbake — pull them when the center still looks slightly underdone; they finish setting as they cool.
- For a gluten-free version, use certified gluten-free oat flour.
- Store airtight at room temperature for up to 3 days, refrigerate for up to a week, or freeze individual squares for up to 2 months. Thaw at room temp or warm briefly in the microwave.
