Coconut Cream Dream Bars — a silky, tropical treat you’ll make again and again
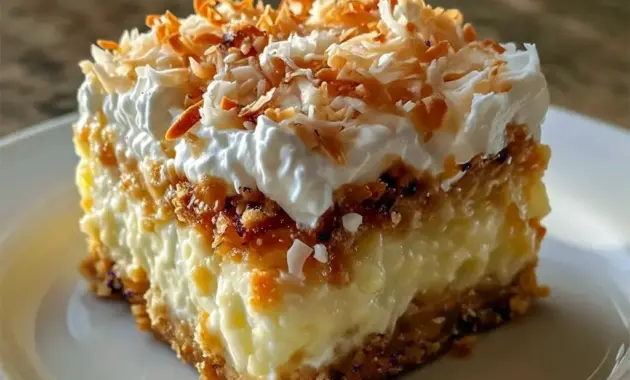
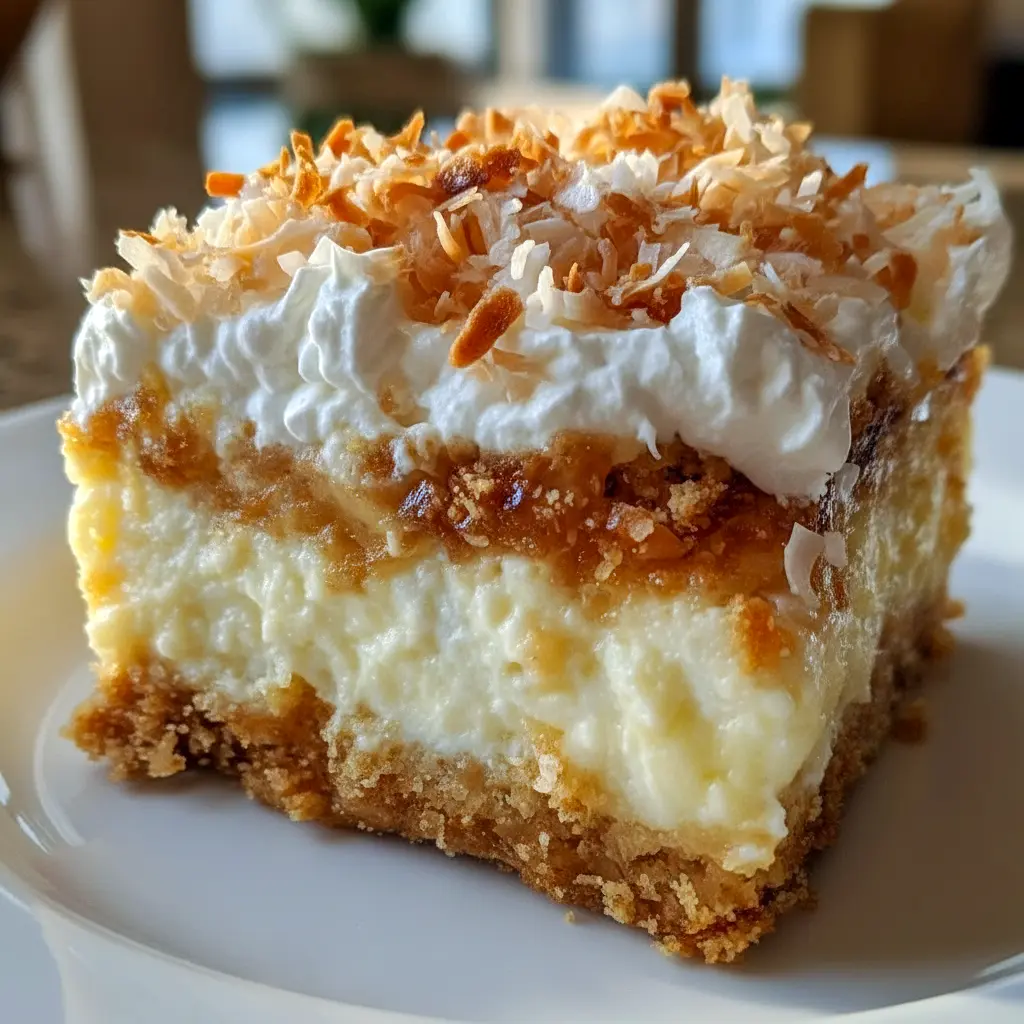
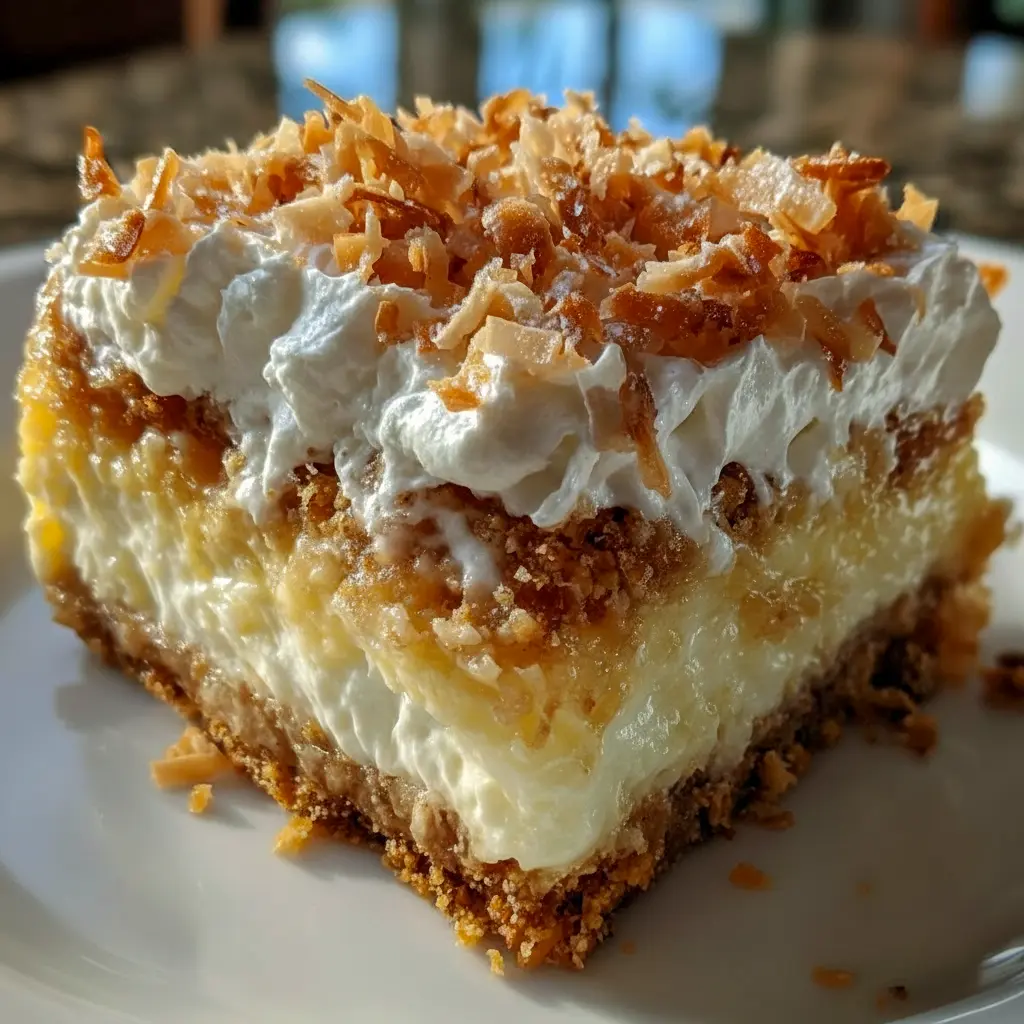
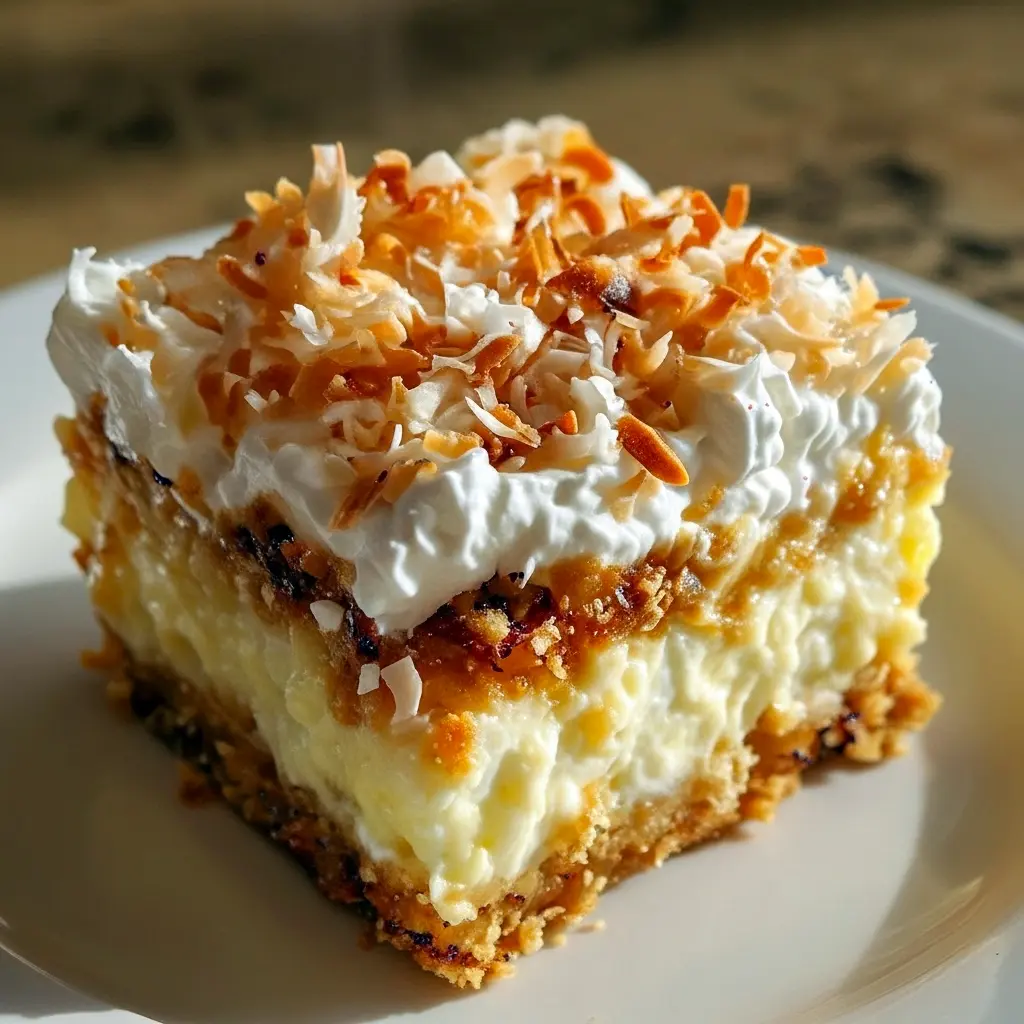
If you’re craving something silky and tropical, Coconut Cream Dream Bars deliver big time. These bars layer a buttery graham cracker base with a sweet, coconut-forward filling and a cloud of whipped cream on top — then finish with a shower of toasted coconut. They look fancy, but they’re honestly simple to pull together. Perfect for potlucks, holidays, backyard BBQs, or just because you deserve dessert tonight.
Why you’ll fall for these bars (fast)
What makes these bars a winner? Short answer: texture and effortless indulgence.
- They combine a crunchy, buttery crust with a dense, chewy coconut center and a light whipped top.
- You get strong coconut flavor without needing a million ingredients.
- They chill into neat squares that travel well — hello, Pot Luck Dessert Idea.
- They feel decadent but don’t demand hours in the kitchen.
Ask yourself: do you want dessert that tastes luxurious but doesn’t wreck your evening? Exactly. That’s why these are a Best Coconut Dessert Recipe contender.
The Key Ingredients (and Why You Need Them)
Below I list the main elements (no amounts here — your printable card has those). I’ll explain the role each ingredient plays so you know how to swap and why each piece matters.
- Graham cracker crumbs — The crust gives structure and crunch. It crisps up when toasted with butter and provides a toasty backdrop to the sweet coconut filling.
- Unsalted butter — Binds the crumbs and adds richness. Use melted so the crumbs press together easily.
- Sweetened condensed milk — This is the secret binder that creates a dense, almost caramel-y coconut filling. It’s key for that classic bar texture.
- Shredded sweetened coconut — The star ingredient. It gives chew and coconut flavor. Fresh is great if you can get it, but the packaged stuff melts into the filling beautifully.
- Powdered sugar — Adds sweetness without graininess and helps stabilize the middle layer with a smoother mouthfeel.
- Heavy whipping cream — Whips into a pillowy top that contrasts the denser filling. Don’t over-whip; you want soft peaks so the cream spreads easily.
- Vanilla extract — A splash of vanilla rounds and lifts the coconut, making the flavors sing.
- Toasted coconut flakes (garnish) — Texture and appearance: a little crunch and a golden finish that screams “I baked something impressive.”
Want a gluten-free version? Swap in gluten-free crackers for the graham crumbs. Want lighter? Try a coconut-based condensed milk alternative. These bars invite tweaks.
How to Make It
- Preheat and prep. Heat your oven to 350°F (175°C). Grease a 9×9-inch baking pan, or line it with parchment for easy lifting later.
- Make the crust. Stir graham cracker crumbs with melted butter until the texture resembles wet sand. Press firmly into the bottom of the pan. Bake until the edges turn golden and fragrant — that little toasty moment adds huge flavor.
- Mix the filling. Combine sweetened condensed milk, shredded coconut, and powdered sugar in a bowl. Make sure everything is evenly combined; the mixture should be thick and sticky.
- Bake the filling. Spread the coconut mixture over the cooled crust and bake again until the filling sets and the top develops light golden spots. This creates that pleasing chew without sogginess.
- Whip the cream. While the bars cool, whip heavy cream with vanilla until soft peaks form. You want a smooth, spreadable cloud, not a stiff mound.
- Assemble and chill. Once the baked bars reach room temperature, spread the whipped cream evenly over the top. Sprinkle generously with toasted coconut flakes. Refrigerate for at least two hours — overnight is even better.
- Slice and serve. Use a sharp knife and wipe between cuts for clean squares. Serve chilled. Yum.
Pro tips for perfect bars every time
- Don’t skip chilling. Chilling firms the filling and makes slicing tidy.
- Toast the coconut. Toasted flakes add a toasty nuttiness and crunch contrast — don’t skip this step.
- Shred your own if you can. Freshly shredded coconut tastes brighter than old packaged stuff.
- Use full-fat ingredients. They yield richer texture and better stability in the filling and whipped top.
- Avoid over-whipping the cream. Stop at soft peaks; overwhipped cream goes grainy.
- Cool the crust slightly before topping. A hot crust can melt the filling or create uneven texture.
Bold tip: If your bars seem too soft after baking, give them more chill time. They firm up a lot in the fridge.
Flavor variations and twists
Want to remix these bars? Here are fun directions to try:
- Tropical burst: Fold chopped pineapple into the filling for a fast pina colada vibe.
- Chocolate-coconut: Sprinkle mini chocolate chips into the filling or drizzle melted chocolate over the whipped cream. Instant crowd-pleaser.
- Nutty crunch: Mix toasted macadamias or chopped almonds into the crust for texture contrast.
- Cream-of-coconut riff: Use Recipes Using Cream Of Coconut to swap in a portion of the sweetened condensed milk for deeper coconut flavor.
- Lime twist: Add lime zest to the whipped topping for bright counterpoint to the sweet coconut.
- Vegan version: Use coconut condensed milk and coconut-based whipped topping for a plant-based Recipe Using Coconut Cream approach.
Each variation keeps the core idea but nudges the flavor profile — try a couple and see which becomes your signature.
Best ways to serve these bars
These bars look polished and taste comforting, so serve them where they’ll shine.
- Pot luck hero: They slice well and travel easily, which makes them a top Pot Luck Dessert Idea.
- On a dessert platter: Arrange with fresh fruit (mango, pineapple, berries) for color and balance.
- With coffee or tea: The sweet, rich bars pair nicely with a strong cup to cut the richness.
- As a chilled finish: Serve small squares after a heavy meal — they still feel like a treat but won’t overwhelm.
Want to be fancy? Add a sprinkle of toasted coconut and a tiny mint leaf to each square. Nice.
Storage, freezing, and reheating
- Fridge: Store bars in an airtight container for up to one week. They keep well chilled and stay sliceable.
- Freezer: Wrap individual bars tightly in plastic and freeze them in a sealed container for up to three months. Thaw in the fridge overnight.
- No reheating needed: These bars taste best cold; don’t heat them — you’ll kill the whipped topping and ruin the texture.
- Make-ahead: You can bake and cool the bars a day ahead, then whip and top the cream just before serving for the freshest look.
Quick tip: Freeze single squares for easy grab-and-go chilled treats — they thaw fast.
Common mistakes (and easy fixes)
Problem: Filling runs when sliced.
Fix: The bars need more chill time. Place them in the fridge for several hours or overnight.
Problem: Whipped cream collapses.
Fix: Use cold cream and chill your mixing bowl. Whip to soft peaks and spread right away.
Problem: Crust is soggy.
Fix: Bake the crust a bit longer or press it firmly into the pan; a denser crust resists sogginess.
Problem: Coconut flavor is weak.
Fix: Use fresh shredded coconut or add a splash of coconut extract for a stronger profile.
FAQs
Can I use unsweetened coconut in the filling?
Yes, but you’ll likely want to add a touch more sweetener to match the expected sweetness. Unsweetened coconut tastes fresher but changes texture slightly.
How do I make this gluten-free?
Swap in gluten-free graham crumbs or use crushed gluten-free cookies. Ensure all packaged ingredients are labeled gluten-free.
Can I prepare these a day ahead?
Absolutely. In fact, they often taste better after a night in the fridge when the flavors settle. This makes them a smart Pot Luck Dessert Idea.
What if I want these less sweet?
Reduce powdered sugar slightly in the filling and top with unsweetened whipped cream or lightly sweetened coconut cream.
Are these a good party dessert?
Yes — they slice nicely and plate pretty. They rank high as a Top Rated Dessert at gatherings.
Why this deserves a spot in your dessert rotation
These bars hit the trifecta: they look special, taste decadent, and don’t demand a full afternoon in the kitchen. They tick the boxes for a Delicious Coconut Dessert Recipe: texture, flavor, and crowd appeal. Whether you label them a Coconut Delight Dessert or simply “the thing everyone asks for seconds of,” they deliver.
Also, they pull double duty: a fancy-looking treat for guests and an easy make-ahead dessert for weeknight nibbling. That versatility nudges them into the “must-keep” category.
Final thoughts (short and honest)
If you want a dessert that reads like effort and performs like a pro, these Coconut Cream Dream Bars are your shortcut to dessert glory. They work as a Best Coconut Dessert candidate for any event and make an especially smart Pot Luck Dessert Idea when you need something that travels and thrills.
Try a variation, keep one tray in the fridge for emergencies, and expect compliments. IMO, desserts that travel well and taste indulgent are the real kitchen win. So go on — make a batch, slice neat squares, and enjoy that toasted coconut crunch on top. You’ve earned it.
Follow me on Pinterest for daily new recipes.

Coconut Cream Dream Bars — Rich, Creamy & Irresistible
- Prep Time: 20 minutes
- Cook Time: 30 minutes
- Total Time: 50 minutes
- Yield: 16 bars 1x
- Category: Dessert
- Cuisine: American
- Diet: Vegetarian
Description
Light, tropical bars with a buttery crumb base, a chewy coconut center, and a cloud of whipped cream on top — chilled, sliceable, and perfect for warm-weather get-togethers or holiday desserts.
Ingredients
- Graham cracker crumbs — enough to fill a 9×9-inch pan base (about 1½ cups)
- Unsalted butter, melted (about ½ cup)
- Sweetened condensed milk (roughly 1 cup)
- Sweetened shredded coconut (about 1½ cups)
- Powdered (confectioners’) sugar (about 1 cup)
- Heavy cream for whipping (about 1 cup)
- Vanilla extract (1 teaspoon)
- Toasted coconut flakes, for sprinkling
Instructions
-
Heat the oven to 350°F (175°C). Lightly grease a 9×9-inch baking pan or line it with parchment.
-
In a bowl, stir the graham crumbs into the melted butter until the mixture clumps together. Press this firmly into the prepared pan to form an even crust. Bake until the edges turn light brown, about 8–10 minutes. Let the crust cool a bit.
-
In a separate bowl, mix the sweetened condensed milk with the shredded coconut and powdered sugar until they form a thick, sticky filling. Spread it evenly over the cooled crust.
-
Return the pan to the oven and bake again until the coconut layer sets and develops faint golden spots on top, about 15–20 minutes. Remove and let cool to room temperature.
-
While the bars cool, whip the heavy cream with the vanilla until soft peaks form. Spread the whipped cream gently over the cooled coconut layer.
-
Scatter toasted coconut across the top, then chill the whole pan for at least two hours so the bars firm up. Cut into squares and keep refrigerated until serving.
Notes
- Refrigerate leftovers in an airtight container for up to one week.
- To freeze, wrap individual pieces tightly in plastic and place in a freezer-safe box for up to three months; thaw in the fridge before eating.
- For a crisper crust, press the crumbs firmly and give the crust a little extra bake time. For a lighter topping, fold a small amount of powdered sugar into the whipped cream.
Nutrition
- Serving Size: 1 bar
- Calories: 250
- Sugar: 18g
- Sodium: 150mg
- Fat: 15g
- Saturated Fat: 10g
- Unsaturated Fat: 3g
- Trans Fat: 0g
- Carbohydrates: 30g
- Fiber: 2g
- Protein: 2g
- Cholesterol: 30mg