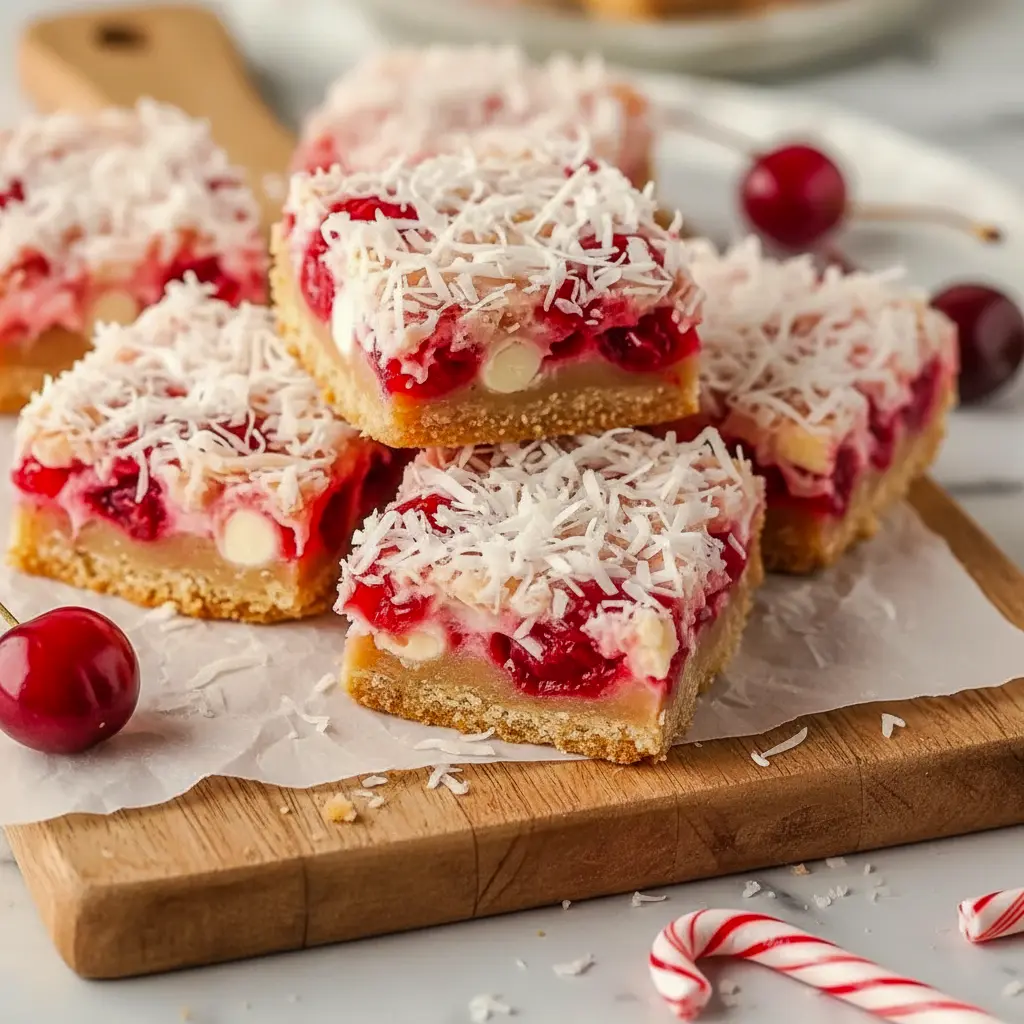
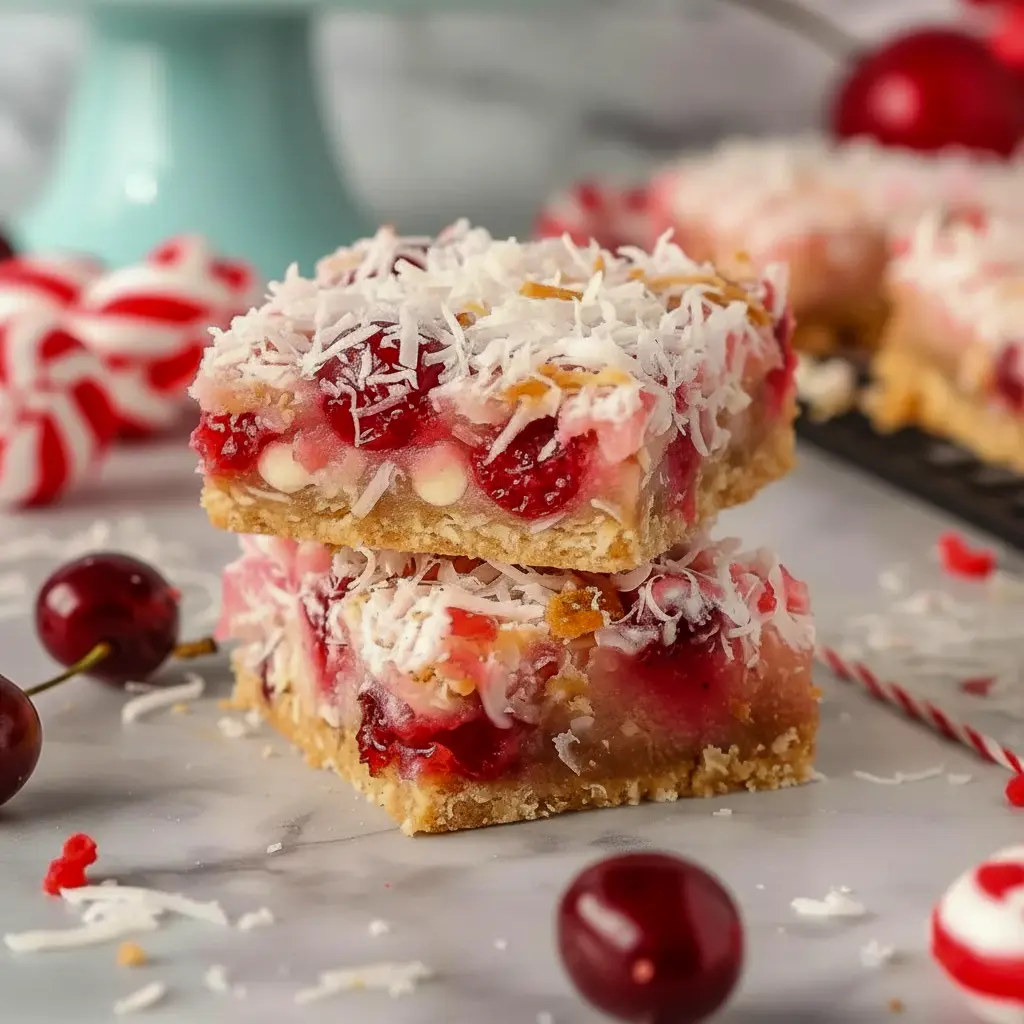
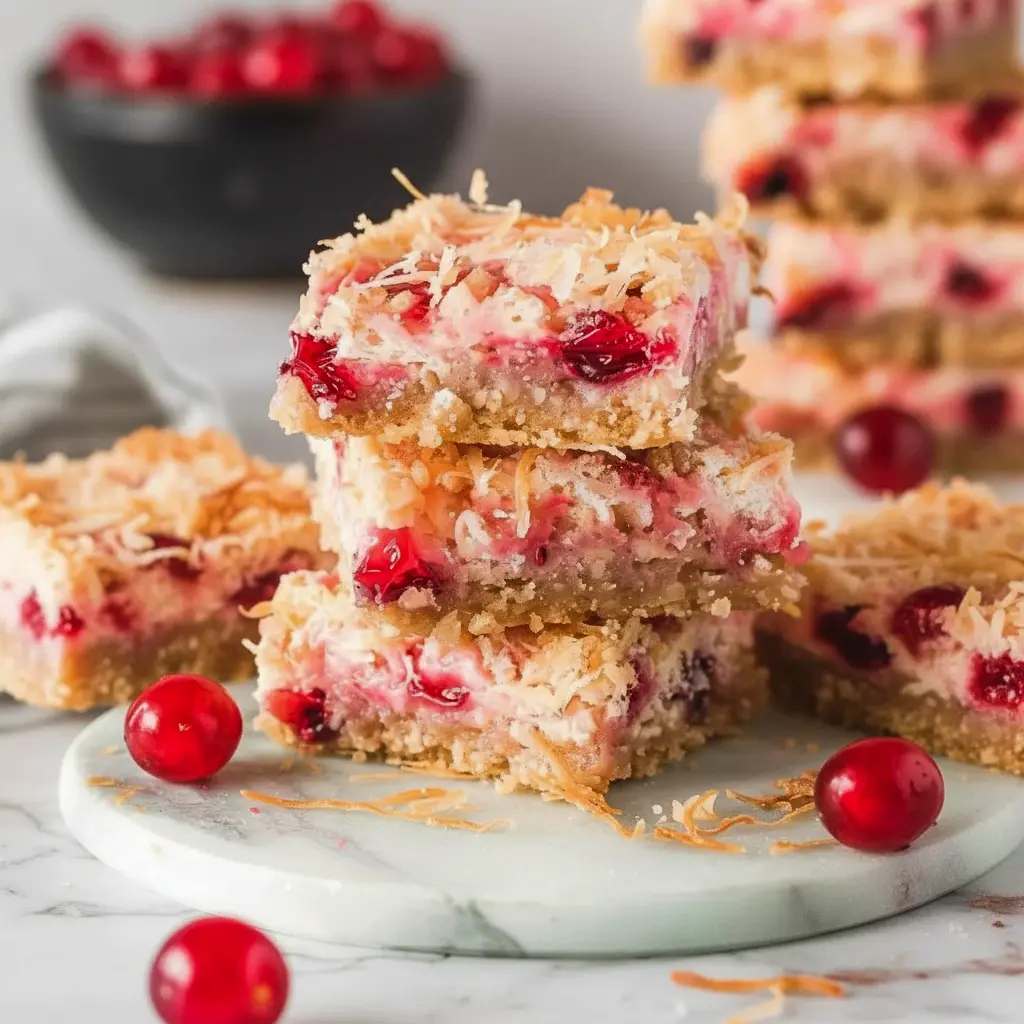
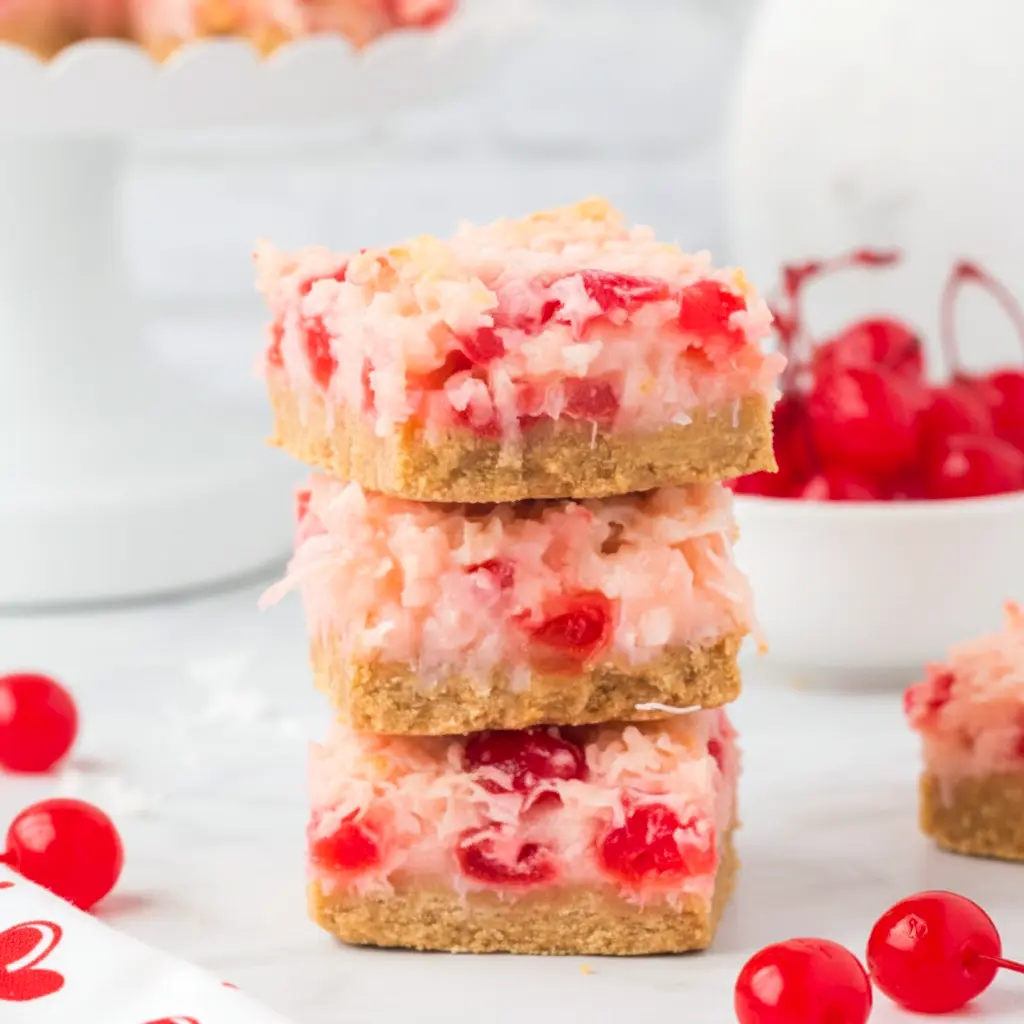
Cherry Coconut Bars are the kind of dessert that makes people stop mid-conversation and ask, “Who brought these?” Soft, chewy coconut melds with bright cherries and a buttery graham-style base to create a crowd-pleasing square you’ll want to hide in the back of the fridge (but probably won’t). They’re quick to prep, easy to scale, and taste like you worked a lot harder than you did.
Why you’ll love these chewy, nostalgic bars
Right off the bat: this recipe hits texture gold. A sturdy, slightly crunchy crust gives the bars structure. A gooey coconut-cherry filling provides chew and sweetness. The whole thing firms up into perfectly sliceable squares after chilling. Bold tip: Chill at least four hours — it changes everything.
- Fast prep (about 15 minutes).
- Comfort-food vibes with a tropical twist.
- Fantastic for potlucks, bake sales, and lunchbox treats.
- Freezer-friendly for future snack emergencies.
The tiny backstory (aka why I make these on repeat)
I stumbled onto this combo when I wanted something that felt like a candy bar but used simple pantry staples. One pan, no frosting, no piping tips — just good ingredients and a little patience. My mom called them “bar magic” and then I read the internet and learned other folks call variations Cherry Magic Bars. Whatever you call them, they disappear fast.
Ingredients — what you need and why
Short list, big payoff. Use the best basics you can find.
- Graham-cracker-style crumb base (or use crushed digestive biscuits) — gives structure and a bready, nostalgic flavor.
- All-purpose flour — helps the crust hold together; a little extra stability vs. straight crumbs.
- Brown sugar — adds caramel notes and chew to the crust.
- Melted butter — the glue and richness. Use real butter for best flavor.
- Unsweetened shredded coconut — chewy texture without over-sweetening.
- Sweetened condensed milk — this is the glue in the filling; it caramelizes slightly and binds everything into gooey perfection.
- Maraschino cherries (drained and chopped) — tart-sweet pops throughout.
- Vanilla & almond extract — the little secret: almond extract lifts cherries and coconut to dreamy territory.
- A pinch of salt — don’t skip it; it balances the sweetness.
Bold tip: Use unsweetened coconut so the filling doesn’t become cloying — the sweetened condensed milk provides all the sweetness you need.
Quick pantry checklist
Before you start: graham crumbs, flour, brown sugar, butter, shredded coconut, sweetened condensed milk, cherries, extracts, and a 9×13 pan. That’s it.
Step-by-step: make the bars (short and simple)
- Preheat the oven to 325°F (163°C). Grease a 9×13 pan or line it with parchment for easy slicing.
- Make the crust: Stir crumbs, flour, brown sugar, baking powder, and a pinch of salt. Add melted butter and mix until it clumps like damp sand. Press this evenly into the pan.
- Mix the filling: Combine shredded coconut, chopped maraschino cherries (drain well!), sweetened condensed milk, vanilla, and a teaspoon of almond extract. Stir until evenly coated.
- Layer: Spread the coconut-cherry filling over the crust. Smooth it but don’t compress it too hard — you want the filling to stay slightly airy.
- Bake: Slide pan into the oven and bake 35–40 minutes. The edges should brown slightly; center should set but remain a touch gooey.
- Cool & chill: Let the bars cool at room temp for about an hour, then cover and chill at least four hours (overnight is best).
- Cut & serve: Lift the slab from the pan with parchment, slice into squares, and enjoy.
Bold tip: Drain the cherries thoroughly — excess liquid ruins the crust’s texture.
Pro tips for perfect texture and flavor
- Press the crust firmly so it holds together after baking.
- Don’t skip chilling. The filling firms and becomes chewy rather than runny.
- Toast the coconut lightly in a dry skillet for extra depth — do it 2–3 minutes until golden.
- Reserve a few cherries to press on top before baking for a prettier bar.
- For even slices, refrigerate fully then warm a knife under hot water and wipe between cuts. This gives clean edges.
Variations & riff ideas
Want to make these your signature? Try these:
- Nutty upgrade: Add ½ cup chopped pecans or almonds into the filling — boom, Cherry Nut Bars territory.
- Dream squares: Swap maraschino cherries for dried cherries rehydrated briefly — you’ll get a chewier, less sweet bite — think Cherry Dream Bars.
- Chocolate drizzle: Melt dark chocolate and drizzle over cooled bars for a luxe finish.
- Tropical swap: Use macadamia nuts + lime zest for a different beach vibe.
- Coconut chewies version: Use extra coconut and less cherry for a Coconut Chewies Recipe spin.
- Cherry dream squares recipe: Use maraschino plus a bit of dried tart cherries for complex flavor — great as gifts.
Bold tip: If you want firmer bars for gifting, bake 5–7 minutes longer and chill overnight.
How to serve — quick ideas for parties and gifts
- Arrange squares on a pretty platter dusted lightly with powdered sugar.
- Put individual bars in cupcake liners for grab-and-go treats.
- Wrap small stacks with parchment and ribbon for Breakfast Gift Ideas or bake-sale donations.
- Serve with a scoop of vanilla ice cream or a dollop of whipped cream for dessert.
Rhetorical Q: Want something both retro and modern on your dessert table? This is literally it.
Storage, reheating & freezing
- Fridge: Store in an airtight container for up to 7 days (they stay chewy!).
- Freeze: Wrap tightly (individual pieces) and freeze up to 3 months. Thaw in the fridge overnight.
- Travel: Pack in a flat container with wax paper between layers to keep them intact.
Bold tip: These bars freeze beautifully — make a double batch and stash extras.
Troubleshooting: fix common issues
- Soggy base? Might be too much cherry liquid. Next time, pat cherries dry and press crust more firmly.
- Filling too runny after baking? It needs more chill time. Pop it in the fridge overnight.
- Crumbs fall apart? Press the crust much firmer, and bake until edges show golden color.
FAQs (short answers)
Can I use fresh cherries?
Fresh cherries add moisture; they may make the crust soft. If you use fresh, pit and pat them dry well and consider roasting them briefly to reduce water.
Can I swap sweetened condensed milk?
Not easily — it’s key to the chew. Evaporated milk + extra sugar won’t set the same. For vegan versions try sweetened condensed coconut milk alternatives.
Can I make mini bars?
Yes — use a smaller pan and check baking time (start checking at 20–25 minutes).
Keyword-friendly name drops (because SEO, duh)
This recipe fits into lots of family-favorite categories: Cherry Magic Bars, Cherry Coconut Squares Recipe, Cherry Chews Recipe, Cherry Chews, Cherry Nut Bars, Cherry Dream Bars, Cherry Dream Squares Recipe, and even a Coconut Chewies Recipe if you amp the coconut.
Why these are perfect for potlucks and gifts
They travel well, stack nicely, and cut into neat squares. People love a handheld sweet, and the cherry-coconut combo tastes nostalgic yet slightly exotic. Make a tray and you’ll be the one everyone thanks.
Final thoughts — the verdict
If you want a dessert that’s simple to make, easy to scale, and reliably loved, this is it. Bold final tip: Make them the night before to save yourself morning stress — they taste even better the next day. FYI, you may want to double the batch.
Go bake these, stash a few, and watch them vanish. Want printable recipe cards or social captions for sharing pics? I’ll make them — and maybe I’ll sneak you my secret almond-extract ratio. 😉
Follow me on Pinterest for daily new recipes.


Easy Cherry Coconut Bars — Sweet, Chewy, and Totally Comforting
- Prep Time: 15 minutes
- Cook Time: 35 minutes
- Total Time: 50 minutes
- Yield: 24 servings 1x
- Category: Dessert
Description
A sticky-sweet traybake that nails chewy texture, bright cherry pops, and buttery base — perfect for parties, holiday trays, or a serious snack stash. Easy to throw together, even easier to eat.
Ingredients
For the base
- 1½ cups (190 g) all-purpose flour
- 1 cup graham cracker crumbs (about 10–12 crackers, crushed)
- 2/3 cup packed brown sugar
- 1 tsp baking powder
- ½ tsp fine salt
- 1 cup (225 g) unsalted butter, melted
For the filling
- 4 cups finely shredded unsweetened coconut
- 2 (14 oz) cans sweetened condensed milk
- 2 (10 oz) jars maraschino cherries, well drained and roughly chopped
- 2 tsp pure vanilla extract
- 1 tsp almond extract
Instructions
- Heat the oven & prep pan. Preheat to 325°F (163°C). Grease a 9×13-inch baking dish or line it with parchment for easy removal.
- Make the crust. In a medium bowl, whisk together the flour, graham crumbs, brown sugar, baking powder, and salt. Stir in the melted butter until the mixture clumps and holds when pressed.
- Press into pan. Press the crumb mixture evenly across the bottom of the prepared pan; use the bottom of a measuring cup for an even finish.
- Mix the filling. In a large bowl, combine the shredded coconut, condensed milk, chopped cherries, vanilla, and almond extract. Stir until everything is evenly coated.
- Assemble and bake. Spread the coconut-cherry mixture over the crust in an even layer. Bake for 35–40 minutes, or until the edges are golden and the center looks set.
- Cool then chill. Allow the pan to cool on a wire rack for about an hour. Cover and refrigerate for at least 4 hours (overnight is ideal) so the bars firm up for clean slicing.
- Slice and serve. Lift from the pan, slice into squares, and enjoy chilled or at room temperature.
Bold tip: Drain the cherries thoroughly — excess liquid makes the bars too soft.
Notes
- Make-ahead & storage
- Store airtight in the fridge up to 1 week. For longer storage, wrap individual squares and freeze for up to 3 months; thaw in the refrigerator.
- Gluten-free swap
- Want these gluten-free? Replace the all-purpose flour with a 1:1 gluten-free baking blend and use certified gluten-free graham crumbs. Everything else stays the same.
- Bold tip: Chill before cutting — chilling makes neater slices and a better chew.
Cherry Coconut Bars, Cherry Chews Recipe, Cherry Nut Bars, Cherry Dream Bars, Cherry Dream Squares Recipe, Cherry Chews, Coconut Chewies Recipe, Cherry Magic Bars, Cherry Coconut Squares Recipe, Christmas Coconut Bars, Cherry Blossom Bars, Cherry Coconut Dessert, Cherry Dream Squares, Maraschino Cherry Bars