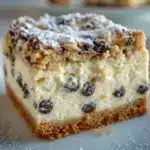
Description
The Cannoli Bars Recipe turns all the best bits of a classic cannoli into an easy cheesecake bar you can make in minutes and enjoy for days.
Ingredients
- 1½ cups graham cracker crumbs (about 12 sheets, packed)
- ¼ cup granulated sugar (for the crust)
- 6 tbsp melted unsalted butter
- 16 oz full-fat cream cheese, softened to room temperature
- ½ cup granulated sugar (for the filling)
- 1 tsp pure vanilla extract
- 2 large eggs, at room temp
- 1 cup whole-milk ricotta cheese
- ½ cup mini chocolate chips
- ¼ cup powdered sugar, for dusting
Instructions
Method — crust first
-
Preheat oven to 325°F (163°C) and line an 8×8-inch pan with parchment, leaving two sides overhanging.
-
Stir graham crumbs, ¼ cup sugar, and melted butter until the crumbs look like damp sand. Press the mixture firmly into the bottom of the pan. Create a slight lip if you want neater slices later.
Method — filling
-
Beat the softened cream cheese and ½ cup sugar until smooth and lump-free. Scrape the bowl often.
-
Add eggs one at a time, mixing gently after each. Stir in the vanilla. Don’t overbeat — overmixing means cracks later.
-
Fold in the ricotta and mini chocolate chips with a spatula until just combined. The batter should read creamy with small ricotta bits, not pancake-smooth.
-
Pour the filling over the prepared crust and smooth the top. Tap the pan once on the counter to knock out large air pockets.
Baking & chilling
-
Bake for 40–45 minutes, until the edges are set and the center still has a slight wobble. If the top puffs, relax — it will settle.
-
Cool on the counter for about 1 hour, then transfer to the fridge and chill at least 4 hours (overnight is best) so the bars firm up and slice cleanly.
-
Lift the slab from the pan using the parchment overhang, dust with sifted powdered sugar, and cut into squares.
Notes
- Notes & swaps
- Full-fat dairy is essential. Low-fat versions dilute texture and flavor.
- For gluten-free crust, use 1¼ cups almond flour + 2 tbsp sugar instead of graham crumbs.
- Dairy-free option: try coconut cream cheese and strained almond-milk ricotta.
- Use mini chocolate chips — they stay suspended and distribute evenly.
- Pro tips for perfect bars
- Room-temp ingredients matter. Cold cream cheese = lumpy batter. Don’t skip this.
- Parchment with an overhang makes removal and slicing so much easier.
- Chill time is not optional if you want tidy bars — plan ahead.
- For neat slices, dip a sharp knife in hot water and wipe dry between cuts.
- Avoid high-speed mixing to keep the filling from puffing and cracking.
- Quick troubleshooting
- Batter too loose? Pop the bowl in the fridge for 15–20 minutes before baking.
- Crust soggy? Press it firmer or pre-bake the crust 5–7 minutes next time.
- Cracks on top? Shorter bake and gentle mixing will help.
- Serving & storage
- Dust with powdered sugar right before serving for the best look.
- Keep refrigerated in an airtight container for up to 5 days.
- Freeze individual squares wrapped tightly for up to 2 months; thaw overnight in the fridge.
- Final notes
- These bars are simple, forgiving, and perfect when you crave cannoli but want easier prep. Chill well, use mini chips, and be gentle with mixing — follow those three and you’ll end up with bakery-worthy squares every time. Ready to bake? Trust me, they vanish fast.