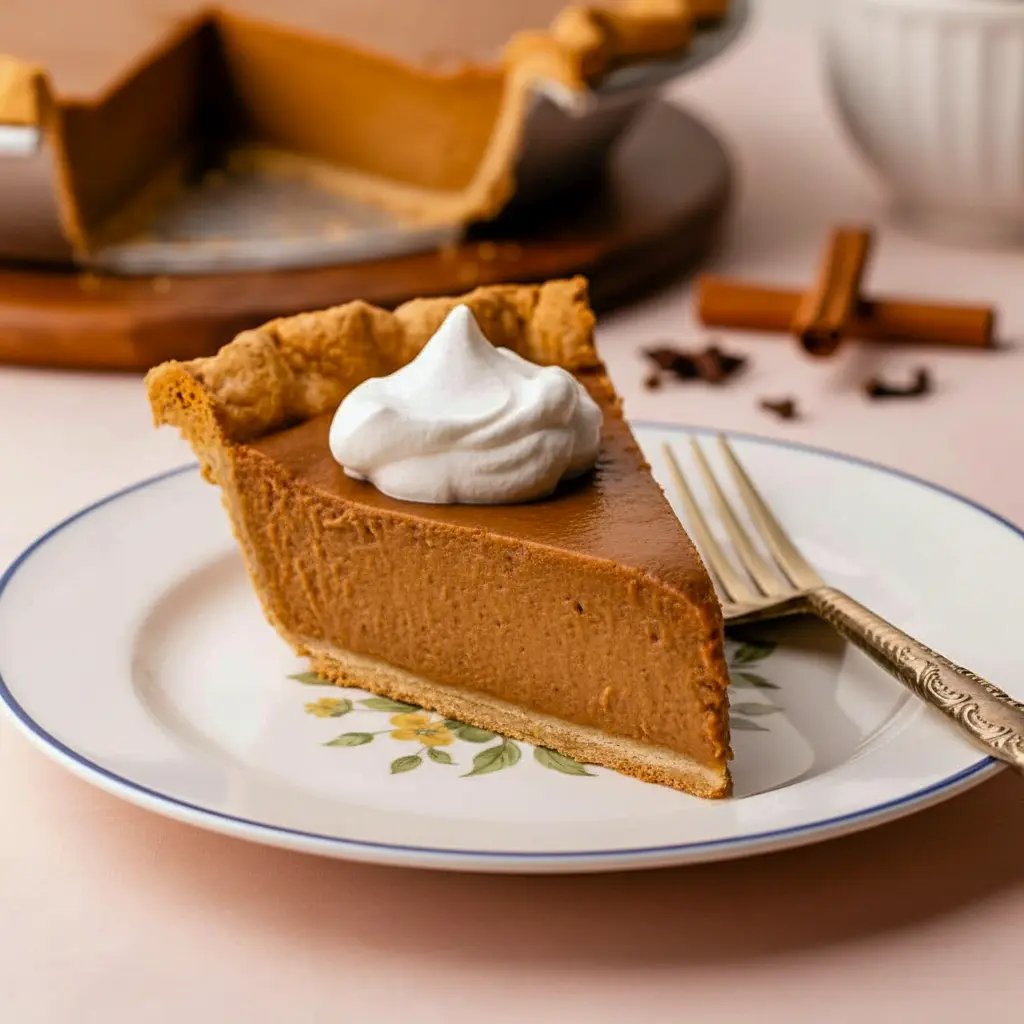
Apple Butter Pie is the cozy, spice-kissed twist on a classic custard pie that tastes like fall in a forkful. This silky, cinnamon-forward pie uses apple butter as the flavor base, plus cream and eggs for a custardy finish — it’s simple, soulful, and a little unexpected next to the usual pumpkin lineup.
A brief introduction to the recipe
If you love the warm, concentrated apple flavor of slow-cooked preserves, this Apple Butter Pie will make you swoon. At a glance it looks like pumpkin pie, but the flavor profile leans apple-forward, all caramelized fruit and autumn spice. The filling comes together in one bowl and bakes into a smooth, almost velvety custard that highlights the depth of the apple butter you choose.
This recipe works whether you reach for a jar of store-bought apple butter or a batch you made last weekend. Either way, the result is a pie that sits proudly on a holiday table and disappears fast.
Why you’ll love this Apple Butter Pie
- Deep apple flavor without tons of chopping — apple butter does the heavy lifting.
- Fast prep, big payoff — whisk, pour, bake; the mechanics are shockingly simple.
- A fun alternative to the usual fall pies — think Delicious Pies that still feel familiar.
- Make-ahead friendly — it chills and firms beautifully in the fridge, which makes hosting less stressful.
- Crowd-pleasing — guests often ask if it’s pumpkin… then do a double-take when you say “apple.” Curious? You will be.
Want a pie that tastes seasonal but isn’t on every other table? This one’s your ticket.
The Key Ingredients (and Why You Need Them)
Below I list the main ingredients (no amounts here — the printable card has those). I’ll explain how each element contributes so you can tweak with confidence.
- Apple butter — Concentrated apple flavor in a jar. It gives the pie its signature taste and color; it’s the backbone of this recipe.
- Heavy cream — Adds richness and silkiness to the custard. It mellows the spices and produces that creamy mouthfeel we crave in a custard pie.
- Eggs — They set the filling and create a custard texture. Eggs also add body so the pie slices cleanly once chilled.
- Brown sugar — Provides caramel-like sweetness that complements the apples and deepens the overall flavor.
- Cinnamon, nutmeg, and clove — Warm spices that make this pie unmistakably fall. Adjust ratios to taste; cinnamon typically leads.
- Kosher salt — Balances sweetness and brings out the subtleties of the apple butter and spices.
- Pie crust — Your vehicle for the filling. You can go classic butter, a spelt crust for a heartier note, or even a crumb crust for extra texture.
Tip: Try a high-quality apple butter for the most complex flavor. If your jar tastes flat, consider adding a bit of apple cider reduction or a touch more spice.
How to Make It
Follow these steps and you’ll get a smooth, evenly baked Apple Butter Pie with a lovely custard texture.
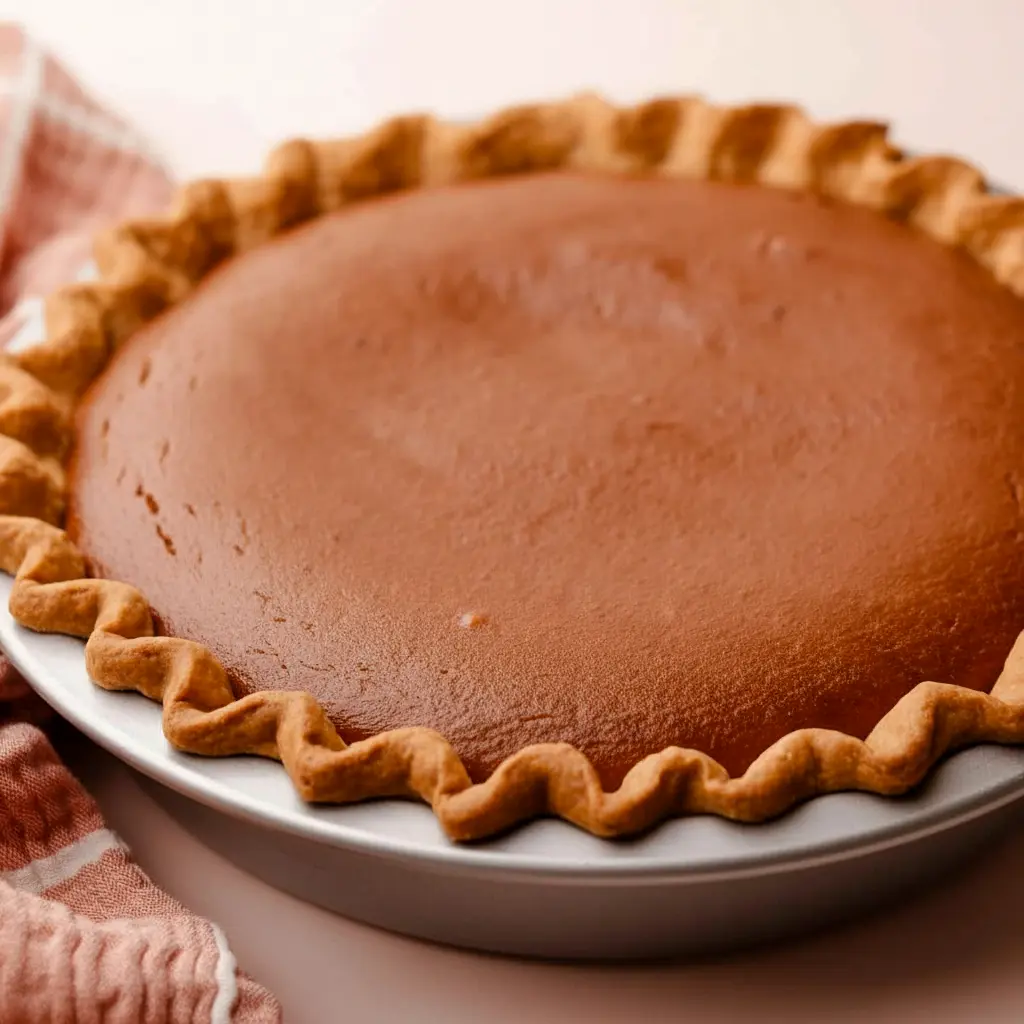
- Blind-bake the crust. Roll your dough to an 11-inch circle and fit it into a 9-inch pie plate. Prick the bottom with a fork, chill 15 minutes, then line with parchment and fill with pie weights (or dry rice/beans). Bake on the lower rack until the dough sets; remove weights and bake a little longer to dry the bottom. This prevents soggy crust.
- Preheat and lower. Preheat your oven to 375ºF for the blind-bake stage, then reduce to 325ºF for the custard bake. This two-step temp keeps the crust crisp without overcooking the filling.
- Whisk the filling. In a large bowl, combine apple butter, heavy cream, eggs, brown sugar, spices, and a pinch of kosher salt. Whisk until homogeneous and smooth. Taste — if it needs more lift, add a squeeze of lemon or a whisper of vanilla.
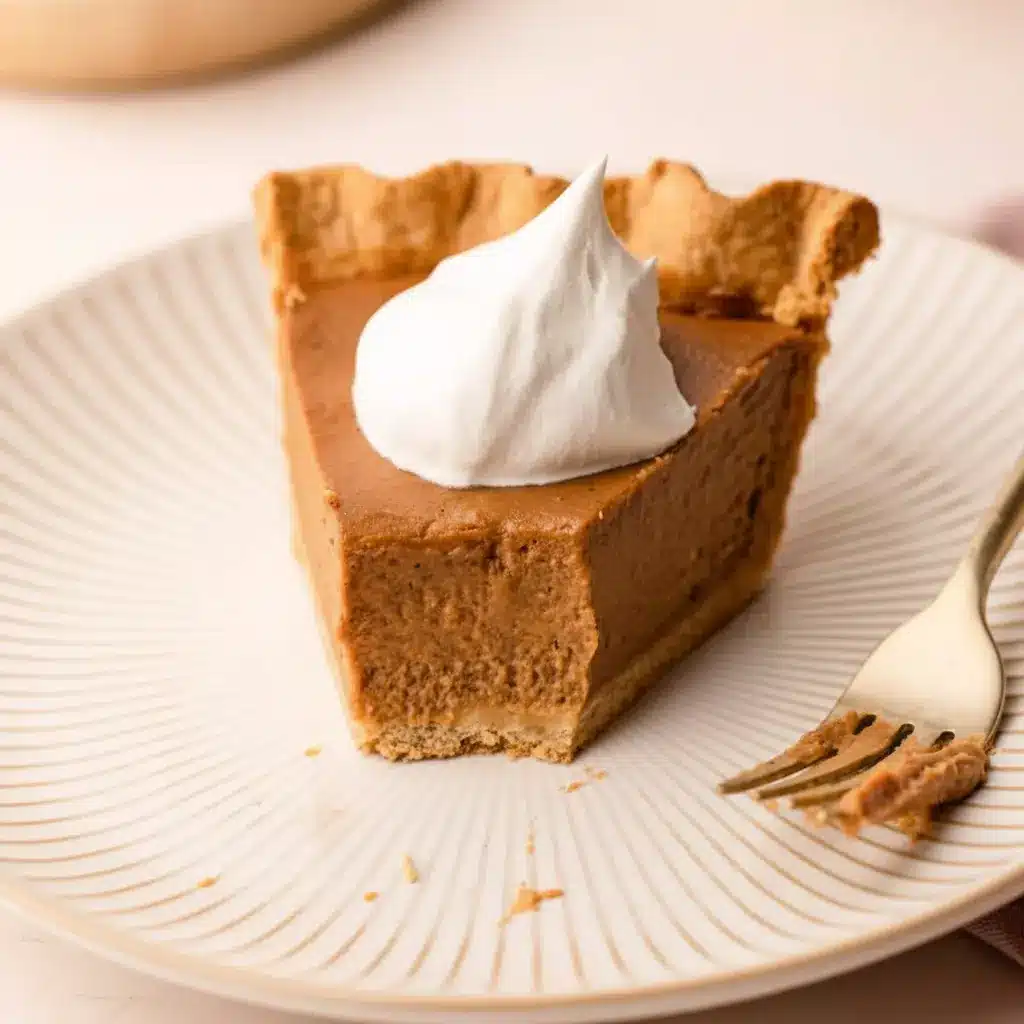
- Pour and bake gently. Pour the mixture into the par-baked shell and smooth the top. Bake on the middle rack until the edges puff slightly and the center has a small wobble — roughly 45–55 minutes, depending on your oven and pie depth. The internal temperature should reach just over 180ºF for a reliably set custard.
- Cool and chill. Let the pie cool on a wire rack, then refrigerate for at least 6 hours (overnight is best). Chilling finishes the set and develops flavor.
Bold tip: Do not over-bake. Custard continues to set as it cools. Over-baking gives a dry, spongy texture and can produce cracks.
Pie crust options and pairing ideas
You can pair this custard with a number of crust styles depending on the vibe you want.
- Classic butter pie crust — flaky and familiar; it’s the safe, delicious choice.
- Spelt pie crust — for a wholesome, nutty note that complements the apple flavor. Spelt rolls easily and adds a subtle whole-grain character.
- Pâte sucrée or sablée — if you want a shortbread-like base with a touch of sweetness. Great for dessert-first meals.
- Graham cracker or Biscoff crust — for a spiced, crunchy contrast that echoes the warm spices in the filling.
Pair the pie with Maple Whipped Cream, a sprinkle of toasted pecans, or a scoop of vanilla ice cream for extra cozy vibes.
Pro tips for perfect results
- Blind-bake properly. Blind baking the crust prevents a soggy bottom. Don’t skip the parchment and weights.
- Use room-temperature eggs. They incorporate more smoothly and help create a uniform custard.
- Whisk, don’t blitz. Over-aerating the custard can lead to too much rise and subsequent collapse; whisk gently to combine.
- Check doneness by wobble, not color. The edges should puff slightly while the center remains slightly wobbly — that’s your cue.
- Chill thoroughly. Refrigerate for at least six hours for clean slices and a silky mouthfeel.
- Adjust salt carefully. Salt enhances sweetness — a little goes a long way in a custard pie.
- If your apple butter is very sweet, reduce the added sugar slightly to keep the pie balanced.
FYI, if you like a faint apple texture, stir in a few teaspoons of finely grated apple peel or a handful of very finely chopped apple that’s been macerated briefly.
Variations to try
- Maple-Apple Butter Pie: Swap part of the brown sugar for pure maple syrup and finish with maple whipped cream.
- Bourbon apple butter pie: Add a tablespoon of bourbon to the custard for warmth and depth — adults-only, IMO.
- Nut-crumble topping: Scatter a toasted pecan or walnut crumble over the top during the last 10 minutes of baking for crunch.
- Spiced-pear twist: Mix equal parts apple butter and pear butter for an autumnal duet.
- Ginger snap crust: Use crushed ginger snaps for the crust to add spice and texture.
Each variation leans into different Apple Recipes traditions and can shift the pie from classic to bold.
Best ways to serve Apple Butter Pie
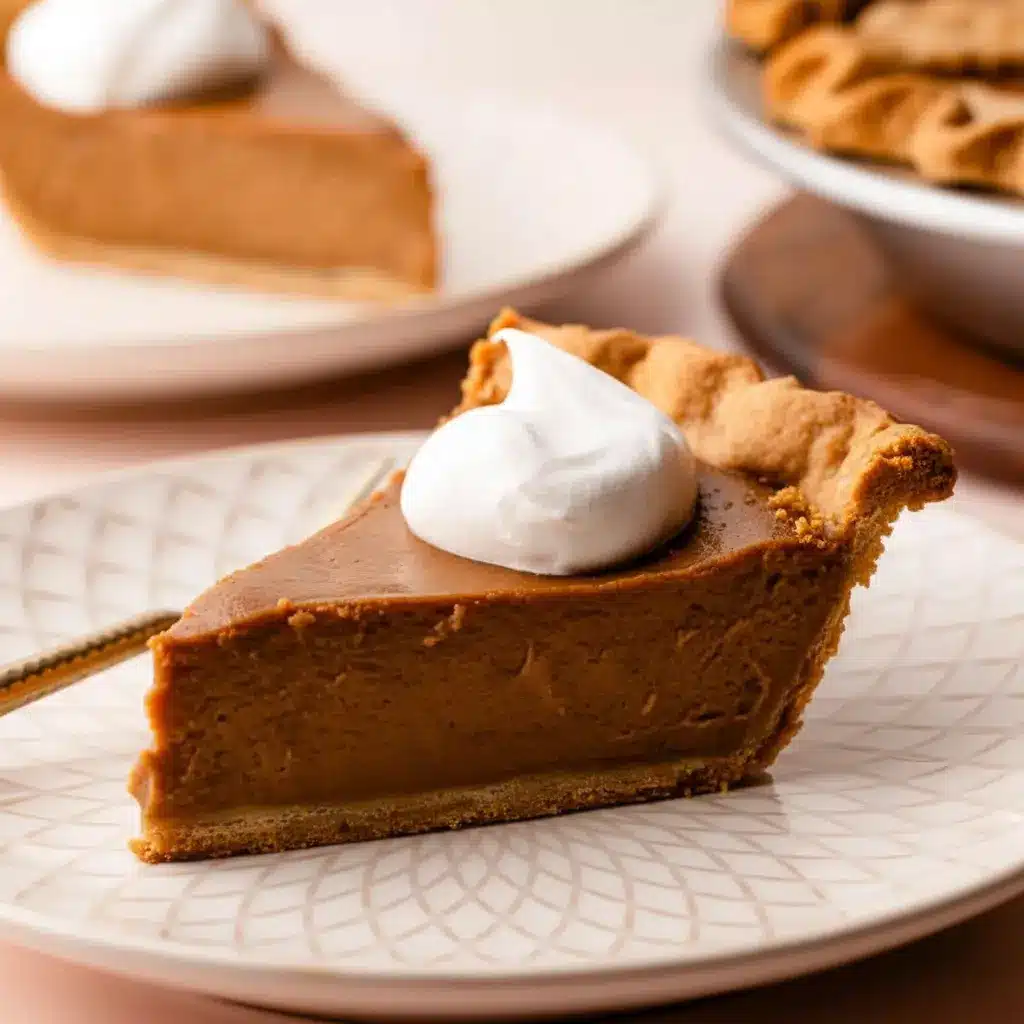
- Classic slice: Room temperature or chilled, topped with a big dollop of lightly sweetened whipped cream or the aforementioned maple whipped cream.
- A la mode: A scoop of vanilla or brown-butter ice cream pairs beautifully.
- With coffee or tea: The spices play nicely with a robust cup of coffee or a mellow black tea.
- As part of a holiday spread: Serve slices alongside pumpkin, pecan, and other Thanksgiving Desserts for a balanced dessert table that’s not all about pumpkin.
For a crowd, prebake multiple shells and pour the filling just before baking to streamline oven time.
Quick tips for storage and leftovers
- Refrigerate in an airtight container or covered with plastic wrap for up to 4 days.
- Freeze slices by wrapping tightly in plastic and foil; thaw overnight in the fridge before serving. Note: texture may change slightly after freezing.
- Make ahead: The pie keeps well and actually tastes better the next day after flavors meld. Chill at least 6 hours.
- Revive slightly firm pie: Let it sit at room temperature for 20 minutes before serving to soften the custard a touch.
FAQs
Can I use homemade apple butter?
Absolutely. Homemade apple butter often has brighter, fresher flavor. Use it one-to-one with store-bought and taste before adjusting sugar.
Do I need to pre-bake the crust?
Yes — blind-baking prevents a soggy bottom. The custard is fairly wet, and the par-bake keeps the base crisp.
Can I make this dairy-free?
You can try substituting full-fat coconut cream for heavy cream, but the flavor and texture will shift. Eggs still provide the custard set; use an egg replacer if you need a vegan version (results vary).
Why did my pie crack?
Over-baking or cooling too quickly can cause cracks. Aim for the slight wobble and cool gradually.
How long will this pie last?
Store refrigerated for up to 4 days. It’s best within the first 48 hours for texture and flavor.
Final thoughts
This Apple Butter Pie brings a fresh spin to fall baking: it’s familiar yet different, easy to make, and deliciously seasonal. Whether you serve it at Thanksgiving, a casual autumn dinner, or just because you love apples, this pie rewards simple techniques with rich results.
Bold reminder: Do not over-bake — aim for a gentle wobble. That’s the difference between a dry custard and a silky, sliceable pie.
So next time you reach for canned pumpkin, maybe pause and ask: “What if apple took center stage?” Whisk, pour, and bake — and then slice a piece, add a cloud of whipped cream, and enjoy that deep, apple-buttery comfort. If you try it, tell me how you served it — did you go classic or go wild with a bourbon twist? I’m all ears (and forks).
Follow me on Pinterest for daily new recipes.

Easy Apple Butter Pie – A Rich & Cozy Homemade Dessert
- Prep Time: 15 minutes
- Cook Time: 1 hour 20 minutes
- Total Time: 1 hour 35 minutes
- Yield: 8 servings 1x
- Category: Dessert
- Diet: Vegetarian
Description
A silky, spiced custard pie that highlights the deep, concentrated flavor of apple butter. Baked in a whole-grain spelt crust (or your favorite crust), this pie sets into a smooth, sliceable custard—serve chilled with maple whipped cream for an extra cozy finish.
Ingredients
- 1 (9-inch) spelt pie crust (see notes for alternatives)
- 1 ¾ cups (about 470 g / 17 oz) apple butter (storebought or homemade)
- 1 cup (240 ml) heavy cream
- 3 large eggs
- ½ cup packed brown sugar (about 110 g)
- 1 teaspoon ground cinnamon
- ½ teaspoon freshly grated nutmeg
- ¼ teaspoon coarse kosher salt*
- Pinch ground cloves
Instructions
-
Lightly roll the dough into an 11-inch circle and line a 9-inch pie plate, pressing the pastry into the bottom and sides. Crimp the rim as you like and prick the bottom all over with a fork. Freeze the prepared shell for 15 minutes to firm the dough.
-
Preheat your oven to 375°F (190°C). Place racks in the middle and lower positions.
-
Remove the chilled crust and fit a round piece of parchment into the shell. Fill with pie weights (or dry rice/beans/lentils), making sure the weights reach the edges. Bake on the lower rack for 20 minutes. Remove the pie carefully, lift out the parchment and weights, then return the shell to the oven for another 5 minutes to dry the bottom. Reduce oven temperature to 325°F (165°C).
-
Meanwhile, whisk together the apple butter, heavy cream, eggs, brown sugar, cinnamon, nutmeg, salt, and cloves in a large bowl until smooth and evenly blended. Scrape any mixture from the bowl sides so everything is homogenous.
-
Pour the filling into the par-baked crust and smooth the top with a spatula. Bake on the middle rack until the edges look slightly puffed and the center still has a gentle wobble—about 45–55 minutes. The filling should register just over 180°F (82°C) when tested in the thickest part.
-
Transfer the pie to a wire rack to cool. Once at room temperature, refrigerate the pie for at least 6 hours (overnight is ideal) so the custard firms fully before slicing.
Notes
- Notes & tips
- Salt note: This recipe was tested with Diamond Crystal kosher salt. If you use Morton’s or fine table salt, use roughly half the amount.
- Tip: Blind-baking the shell prevents a soggy bottom—don’t skip the parchment and weights.
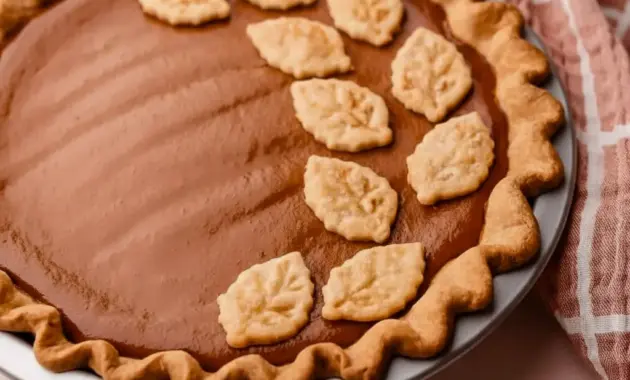
- For decorative flair, roll out any extra dough and cut shapes (leaves, apples, etc.). Chill the cutouts, brush with egg wash, sprinkle coarse sugar, and bake for about 15 minutes at 375°F alongside the crust during the blind-bake stage. Arrange cooled cutouts atop the chilled pie before serving.
- If your apple butter tastes very sweet, reduce the brown sugar slightly and taste the filling before baking.
- Crust ideas
- Spelt crust: nutty, slightly sweet, and easy to work with—my favorite for this pie.
- Pâte sucrée or sablée: for a shortbread-style base that’s rich and tender.
- Graham cracker or Biscoff crumb crust: for a spiced, crunchy contrast to the smooth custard.
- Serving & storage
- Serve chilled or at cool room temperature with a spoonful of maple whipped cream or a scoop of vanilla ice cream. Store covered in the refrigerator for up to 4 days. To freeze, wrap individual slices tightly in plastic and foil; thaw overnight in the fridge before serving.