Pie Dessert heaven, right here. Picture a crunchy peanut cookie shell, a cloudlike peanut butter cream, and bright raspberry jelly ribbons — one slice and you’ll be both nostalgic and totally wowed. This pie plays all the right notes: salty, sweet, creamy, crunchy. Ready to dive in?
Why you’ll fall hard for this pie
Who doesn’t love PB&J? Now imagine it bigger, more sophisticated, and honestly addicting. This pie turns a childhood classic into a bakery-level showstopper. It’s got texture contrast, bold peanut flavor, and jammy pops of fruit. Plus, it rewards a bit of patience: yes, it takes time, but the payoff? Massive.
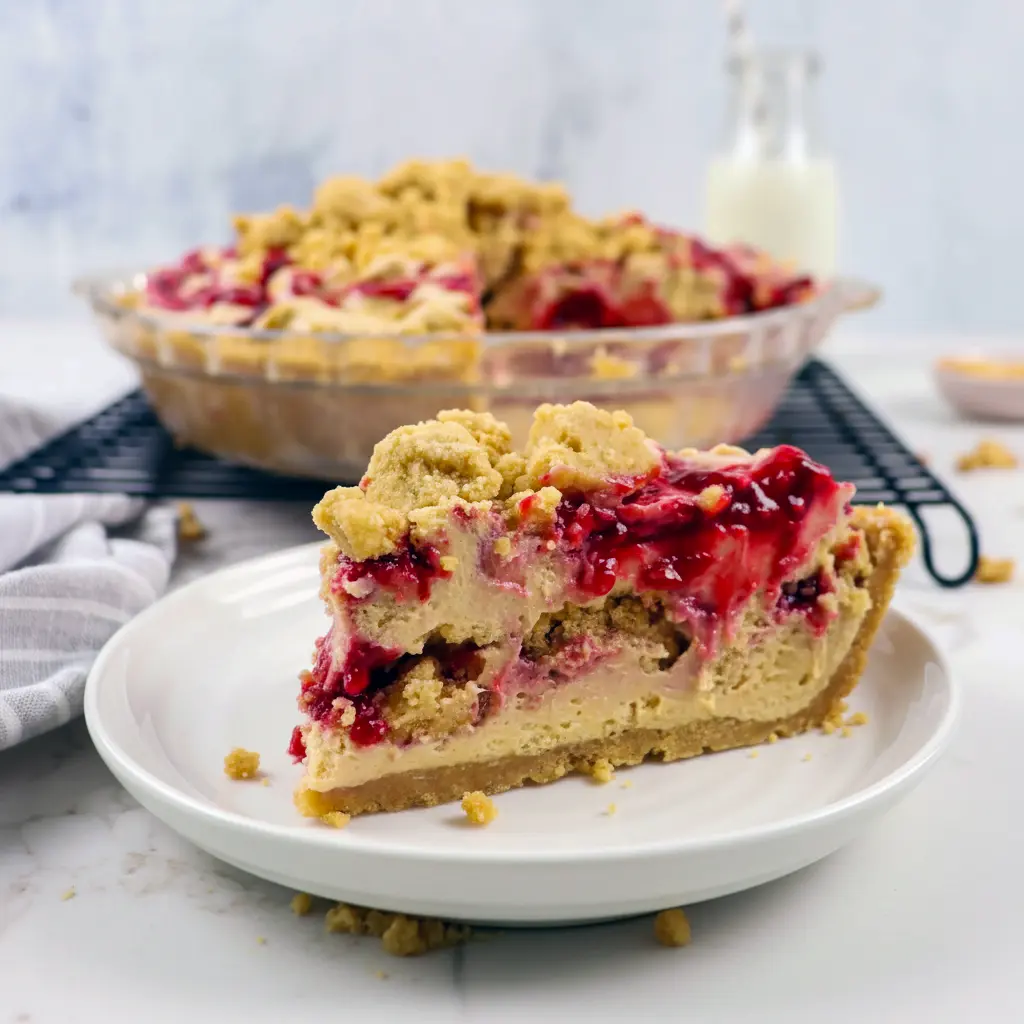
Big reason to make it: the layers each bring a different vibe — cookie crust for crunch, cream for richness, jelly for brightness. That combo is why this ranks among the most memorable Yummy Sweets out there.
The backstory (short and fun)
My sister actually planted the seed for this one. I’d been dabbling with bakery-style crumbs and learned a ton from watching pros like Christina Tosi. I wanted to riff on those techniques but keep the soul of a PB&J sandwich. The result leans on clever sub-recipes — a cookie-based crust, a peanut-packed crumb, whipped peanut filling, and a jammy fruit gel. It’s a little lab work, a little comfort food, and a lotta delicious.
Ingredients breakdown — what each part does
Here’s the short version of the components and why they matter.
- Peanut butter cookies: Grind these for the crust. They pack flavor and structure.
- Chopped salted peanuts: Add crunch and contrast to the sweetness.
- Butter (unsalted): Binds crust and crumb; use unsalted so you control seasoning.
- Frozen raspberries: I prefer them for the intense purée they give — perfect for jelly pockets.
- Sugar + cornstarch: Sweetens and stabilizes the raspberry layer.
- A touch of gelatin (optional): Helps the jam set nicely so your pie slices clean.
- Cream cheese + whipped cream: Make the peanut filling luxuriously creamy and stable.
- Creamy peanut butter: The star — smooth and reliable.
- PB2 powder (optional): Great for a dry, crunchy crumb without extra oil.
These building blocks let you nail flavor and texture. Want a vegan swap? Use plant-based cream cheese and coconut cream — a nod to Desserts Vegan without losing personality.
How to make it — step-by-step (with sub-recipes)
This pie splits into four jobs: raspberry jelly, peanut crumb, cookie crust, and peanut cream. Do them in that order for the easiest workflow.
Raspberry jelly (make this first, ideally the day before)
- Thaw frozen raspberries. Purée in a blender.
- Press the purée through a fine sieve to remove seeds. Yes, it takes effort — but the smooth result? Totally worth it.
- Heat the seedless purée with sugar and cornstarch over medium-low until it bubbles and thickens.
- If you want a firm set, bloom a small amount of gelatin in water, melt briefly, and whisk into the hot purée.
- Press cling film directly on the surface (this prevents a skin) and chill overnight. This step gives you neat jelly pockets that won’t weep.
Peanut crumb topping (makes extra — snack it!)
- Mix oats, PB2, a touch of brown sugar, and melted butter until clumps form.
- Bake at 350°F until lightly browned, about 12–20 minutes. Let cool.
- Break into various-sized clusters — some big pieces for drama, some fine crumbs for structure.
Peanut cookie crust
- Pulse peanut butter cookies and chopped peanuts in a food processor until fine.
- Stir in a little sugar and melted unsalted butter until it clumps.
- Press into a 9-inch pie plate, up the sides and across the bottom. Chill so it firms. Press hard and evenly — you don’t want a crumbly slice.
Peanut butter filling
- Whip heavy cream to stiff peaks; set aside.
- Beat softened cream cheese with powdered sugar, vanilla, and creamy peanut butter until silky.
- Fold in whipped cream in thirds to keep the mixture light and airy.
- Dollop half the filling into the chilled crust in big spoonfuls.
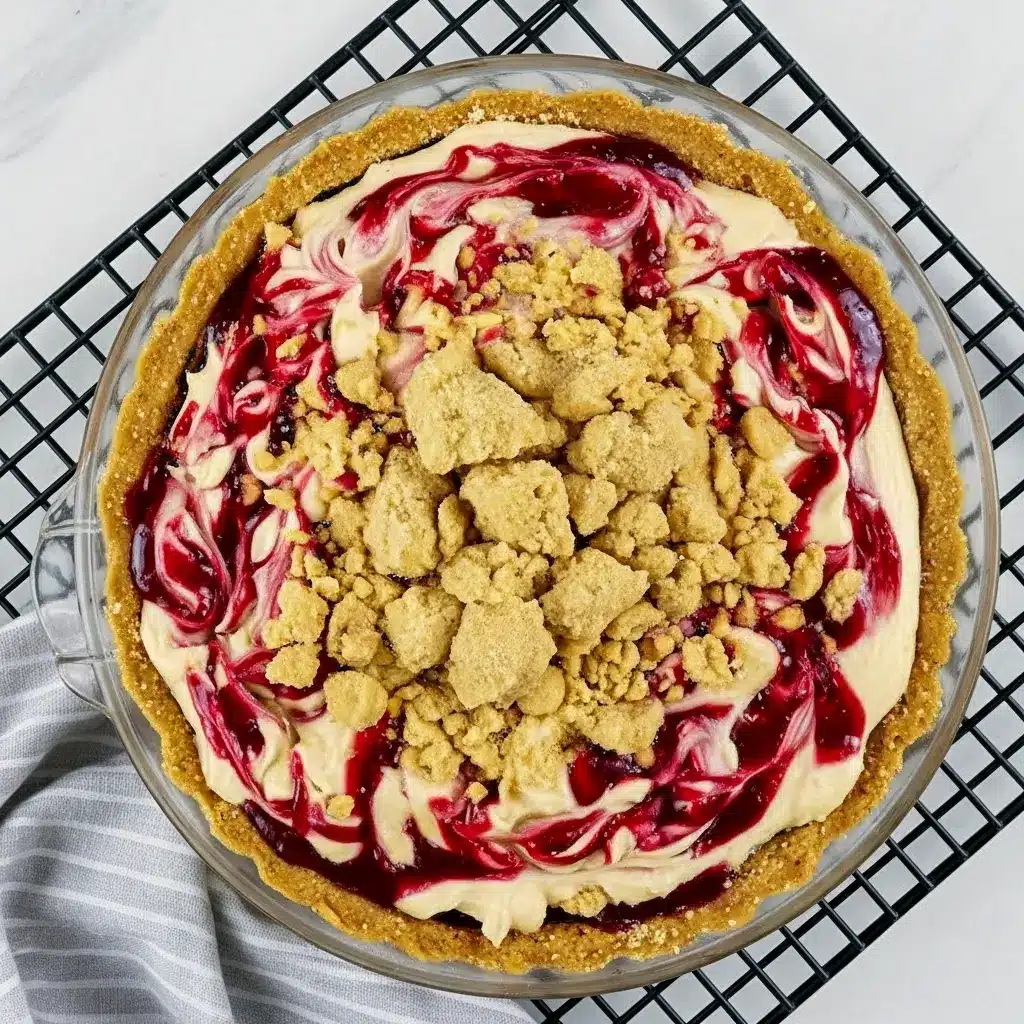
Assemble
- Drop some prepared raspberry jelly into pockets across the filling.
- Use a knife to swirl the jelly and peanut cream — don’t overmix; keep ribbons.
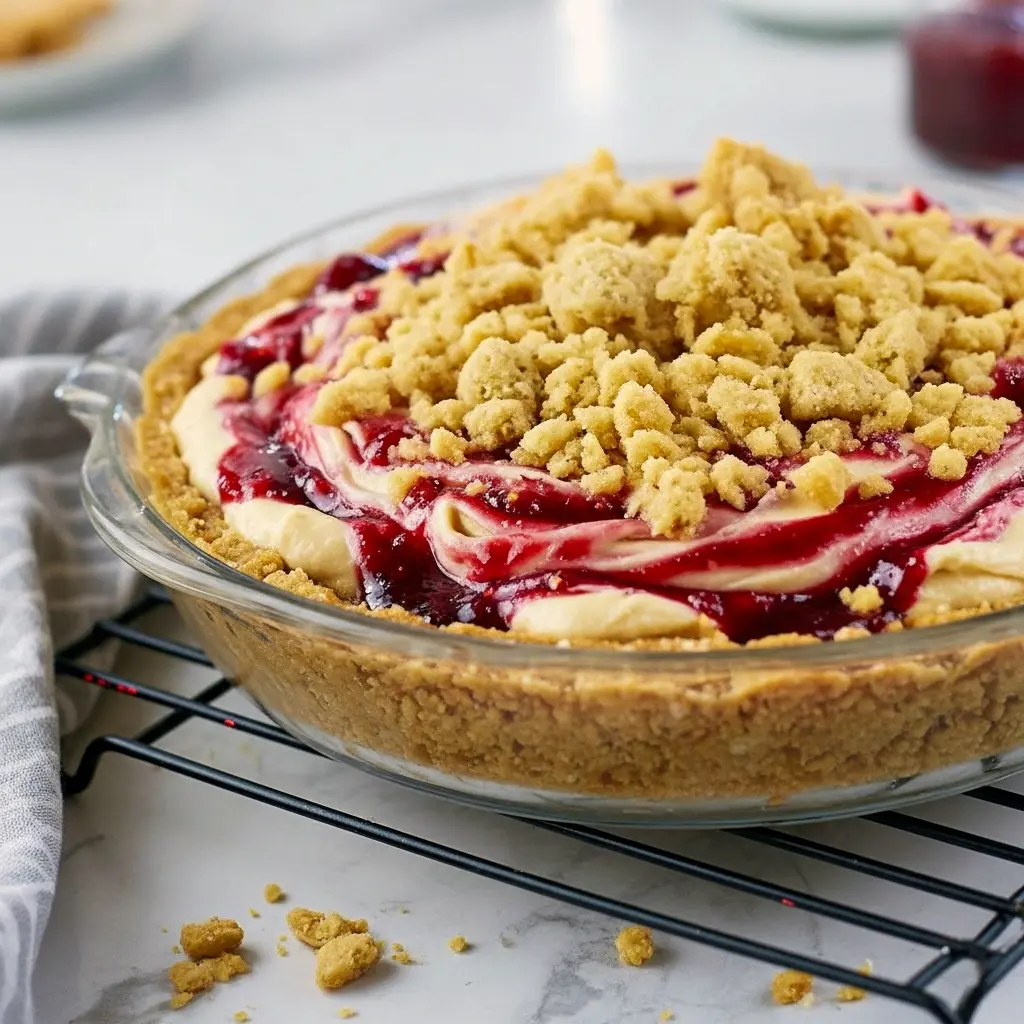
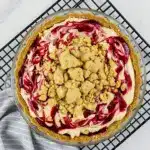
- Scatter toasted peanut crumb over the top, concentrating larger clusters in the center for that bakery look.
- Repeat dollops to build height; swirl again for a marbled effect.
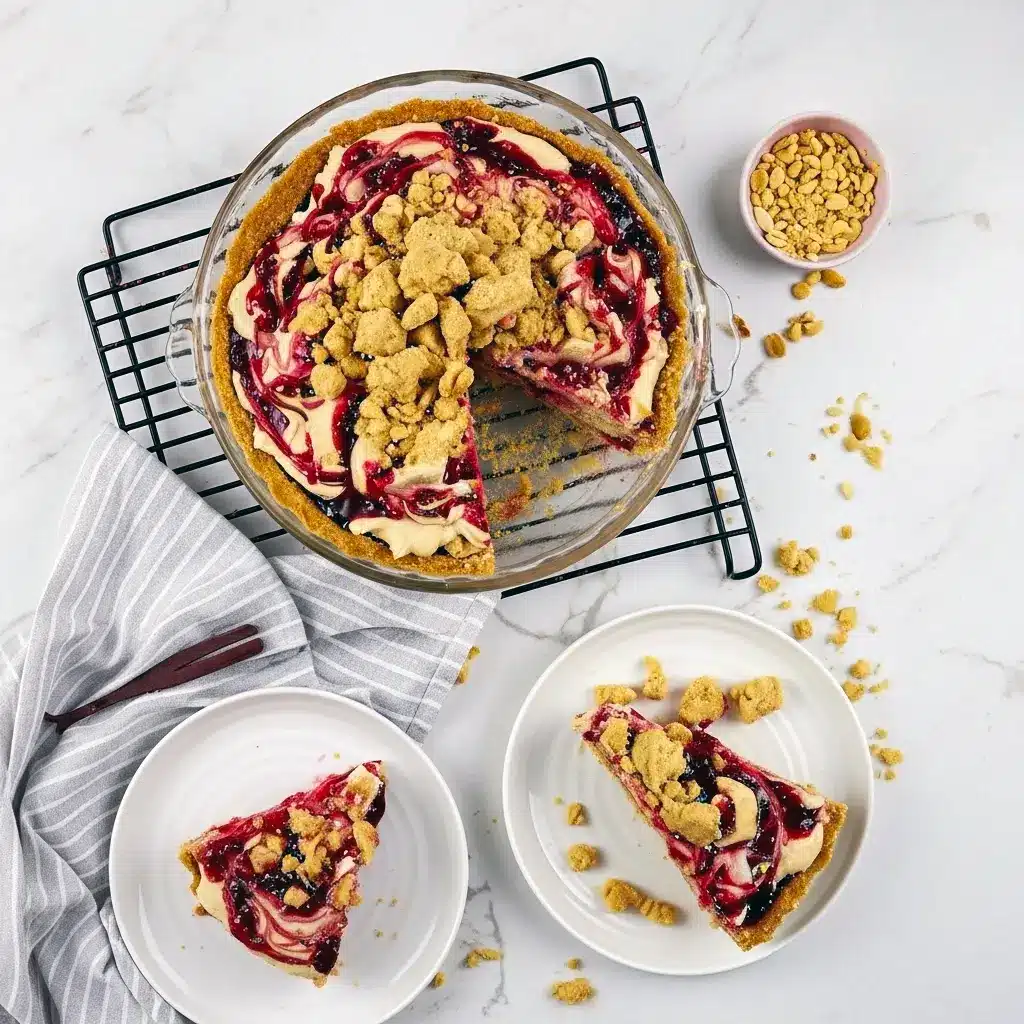
- Chill at least 6–8 hours, ideally overnight, before slicing. Chilling makes slicing clean and your layers stable.
Pro tips for top-notch results
- Use smooth, classic peanut butter for the creamiest texture — no natural oil separation here.
- If you use salted butter, reduce added salt elsewhere — balance is everything.
- Press the crust firmly into the pan so slices stay intact.
- Seal the jelly with cling film while cooling to stop a skin from forming.
- For extra crunch, fold a spoonful of PB2 into the crumb topping. FYI, that little trick amps texture without oil.
Want perfect slices? Chill fully, then use a hot, dry knife — wipe between cuts.
Variations — make it yours
- Swap raspberries for grape jelly if you want classic PB&J nostalgia.
- For a chocolate twist, add a thin ganache layer under the peanut cream — hello, peanut-butter-cup vibes.
- Make mini tarts for parties instead of one big pie. They’re adorable and portable.
- Turn it vegan: use vegan cream cheese, coconut cream, and agar-agar for setting. This keeps the soul of the recipe while fitting Desserts Vegan needs.
- Bake it briefly (10 mins at 325°F) to set the top slightly — a different textural finish for Baking Sweets fans.
Serving & pairing
Serve this pie slightly chilled or at room temp with a cup of strong coffee or a cold glass of milk. Want to impress? Add a dollop of lightly sweetened whipped cream and a sprinkle of chopped roasted peanuts. Guests will ask for the recipe — and you’ll look mysteriously skilled. Want to be cheeky? Tell them it’s a pie that lets you Eat Dessert First and mean it.
Storage and make-ahead advice
- Fridge: Store covered for up to 3 days. The crust softens a bit over time; that’s normal.
- Freeze: You can freeze slices tightly wrapped, but expect a slight texture change. Thaw overnight in the fridge.
- Make-ahead: The jelly, crumb, and crust store separately for a few days. Assemble the day you serve for freshest texture.
- Re-crisp tip: If you want the crumb to stay crunchy, add it just before serving.
FAQs — quick answers
Do I need gelatin?
No — cornstarch alone will thicken the jelly, but gelatin helps it keep shape for clean slices.
Can I simplify with store-bought cookies?
Absolutely. Pulse store-bought peanut cookies for the crust and you’ll save time. Still delicious.
Is this kid-friendly?
Totally. Kids can help dollop fillings and sprinkle crumbs — fun and low-risk.
How long does it take?
Active time runs a few hours across the components; most of the time is chilling. Plan for two days if you want perfectly set layers.
Why this pie works (short science bit)
Texture contrast is the secret: the crunchy crust balances the airy cream and the jammy pockets. The cream’s slight tang, from cream cheese, brightens the peanut butter and keeps the richness from getting flat. Salted peanuts and a sprinkle of kosher salt right at the end cut through sweetness and emphasize peanut flavor. It’s baking sense and flavor balance at play.
Creative serving ideas
- Serve mini slices with espresso for a dessert flight.
- Spoon leftover jelly into yogurt or on pancakes. Resist eating it straight from the bowl… or don’t — I won’t judge. 😉
- Make mini tartlets for parties labeled “adult PB&J” — gets laughs and compliments.
Final thoughts — wrap-up
This peanut butter and jelly pie straddles two worlds: comforting childhood nostalgia and polished bakery technique. Yes, it asks for a little planning. Yes, it layers components. But the result? A dramatic, craveable Sweets Treats centerpiece that people will remember. It’s perfect for celebrating, gifting, or treating yourself on a serious sweet tooth day.
Follow me on Pinterest for daily new recipes.
Easy Peanut Butter and Jelly Pie — Decadent Pie Dessert
- Yield: 8 servings 1x
- Category: Dessert
Description
This Pie Dessert layers crunchy peanut-cookie crust, a fluffy peanut butter cream, crunchy PB crumbs, and glossy raspberry jelly. It takes some steps but rewards you with bakery-worthy slices. Ready? Let’s do it.
Ingredients
Raspberry Jelly
- 3 cups frozen raspberries, thawed
- ½ cup granulated sugar
- 1 Tbsp cornstarch
- ½ tsp kosher salt (or ¼ tsp table salt)
- ¾ tsp unflavored gelatin
- 1½ tsp cold water
Peanut Butter Crumb
- ⅓ cup granulated sugar
- 3 Tbsp packed brown sugar
- ⅔ cup all-purpose flour
- ¼ cup PB2 powdered peanut butter
- ½ tsp baking powder
- ½ tsp kosher salt (or ¼ tsp table salt)
- 6 Tbsp unsalted butter, melted
Peanut Butter Cookie Crust
- 225 g peanut butter cookies (about 6 large)
- ¼ cup salted peanuts, roughly chopped
- 2 Tbsp granulated sugar
- ½ tsp kosher salt (or ¼ tsp table salt)
- 4 Tbsp unsalted butter, melted
Peanut Butter Cream
- 1½ cups heavy whipping cream
- 8 oz cream cheese, softened
- 1 cup smooth peanut butter
- 1 cup powdered (icing) sugar
- 1 tsp vanilla extract
Instructions
Raspberry Jelly (do this first)
-
Measure frozen raspberries and let them thaw. Purée until smooth in a food processor.
-
Pass the purée through a fine mesh sieve into a bowl, pressing with a spatula to remove seeds. You should end up with about 1 cup of seed-free purée.
-
In a tiny microwave-safe dish, stir the gelatin into the water and let it bloom. Set aside.
-
Combine the sugar, cornstarch and salt in a bowl, then whisk into the raspberry purée. Warm the mixture over medium-low heat, whisking constantly, until it thickens and bubbles. Remove from heat.
-
Briefly microwave the gelatin just until it melts (5–8 seconds — watch it). Stir the molten gelatin into the hot purée until fully incorporated.
-
Transfer to a bowl, press cling film directly onto the surface (this prevents a skin), and chill until firm — at least 6–8 hours or overnight for best texture.
Bold tip: chilling the jelly overnight gives you neat pockets that won’t run.
Peanut Butter Crumb
-
Heat oven to 250°F (120°C). Line a sheet with parchment.
-
In a mixer bowl, combine both sugars, flour, PB2, baking powder and salt. Mix on low until even. With the mixer running, drizzle in the melted butter and mix until small clusters form.
-
Spread crumbs on the parchment and bake ~20 minutes until they just start to brown. Cool completely on a rack.
Note: the crumbs crisp up as they cool — don’t panic if they feel soft straight from the oven.
Peanut Butter Cookie Crust
-
Pulse the peanut butter cookies in a food processor until fine crumbs (about 1½ cups). Add chopped peanuts, sugar and salt; pulse to combine.
-
Add melted butter and pulse until the crumbs hold when pressed.
-
Press the mixture firmly into a greased 9-inch glass pie dish, pushing up the sides and packing the bottom evenly. Chill until firm.
Pro tip: press the crust tightly so slices don’t fall apart.
Peanut Butter Cream
-
Whip the heavy cream to stiff peaks; transfer to a bowl and set aside.
-
In the same mixer bowl (no need to wash), beat the cream cheese, peanut butter, powdered sugar and vanilla on low until smooth and lump-free.
-
Fold one-third of the whipped cream into the peanut mixture to loosen it, then gently fold in the remainder in two additions until uniform. Don’t overmix — you want a light, airy texture.
FYI: smooth, commercial peanut butter gives the creamiest filling — avoid gritty naturals here.
Assemble the Pie
-
Spoon large dollops of the peanut butter cream into the chilled crust until you’ve used about half the filling.
-
Drop spoonfuls of the set raspberry jelly into pockets across the surface.
-
Use a knife to swirl the jelly and peanut cream lightly — leave visible ribbons.
-
Scatter a layer of cooled peanut crumbs over the filling, pressing gently so they adhere.
-
Repeat with remaining peanut cream and jelly, swirl again, and pile more crumbs in the center for drama.
-
Refrigerate the assembled pie for at least 6–8 hours, preferably overnight, to allow everything to set cleanly.
Bold tip: full chill time = cleaner slices.
Notes
- Storage & Serving
- Keep the pie covered in the fridge for up to 3 days.
- If you want extra crunch, add the crumb topping right before serving.
- You can freeze slices tightly wrapped, but expect slight texture changes upon thawing.
Pie Dessert, Desserts Vegan, Peanut Butter Recipes, Yummy Sweets, Baking Sweets, Eat Dessert First, How Sweet Eats, Eat Dessert, Sweets Treats


