
Easy Baking Christmas season hits differently when your calendar fills up fast, your oven schedule is already booked, and everyone still expects a wow dessert. You know the vibe. This no-bake peppermint pie swoops in like a holiday hero wearing stretchy pants and zero stress. It’s creamy, cool, minty, and tucked into a chocolate cookie crust that quietly steals the spotlight.
Looking for something that feels festive without feeling fussy? This pie checks all the boxes. It’s one of those Christmas Dessert Recipes No Bake options that looks impressive but secretly takes less time than wrapping presents. And honestly, IMO, that’s the dream.
This is the dessert I reach for when I want compliments without chaos. My kids hover while it chills. Guests ask for the recipe before dessert plates even hit the sink. And every December, it earns its spot among my favorite Desserts To Make For Christmas.
So let’s talk peppermint pie. The kind that disappears fast. The kind that saves your sanity. The kind that makes you look like you planned everything weeks ago (even if you didn’t).
Why you’ll love this peppermint pie (aka why it keeps winning)
This pie isn’t just pretty. It’s practical. And during the holidays, practicality deserves applause.
Make-ahead friendly
You can prep this pie one or even two days early. Let it chill, let it set, let it do its thing while you focus on everything else. Less last-minute chaos = happier host.
No oven required
This is one of those No Bake Christmas Pie Recipes that saves you from oven juggling. Turkey roasting? Cookies baking? Let the oven live its life. This pie stays cool and collected in the fridge.
Simple, grocery-store ingredients
No obscure items. No specialty trips. Everything comes from a regular grocery run. The pre-made crust alone feels like a holiday gift to yourself.
Major holiday wow factor
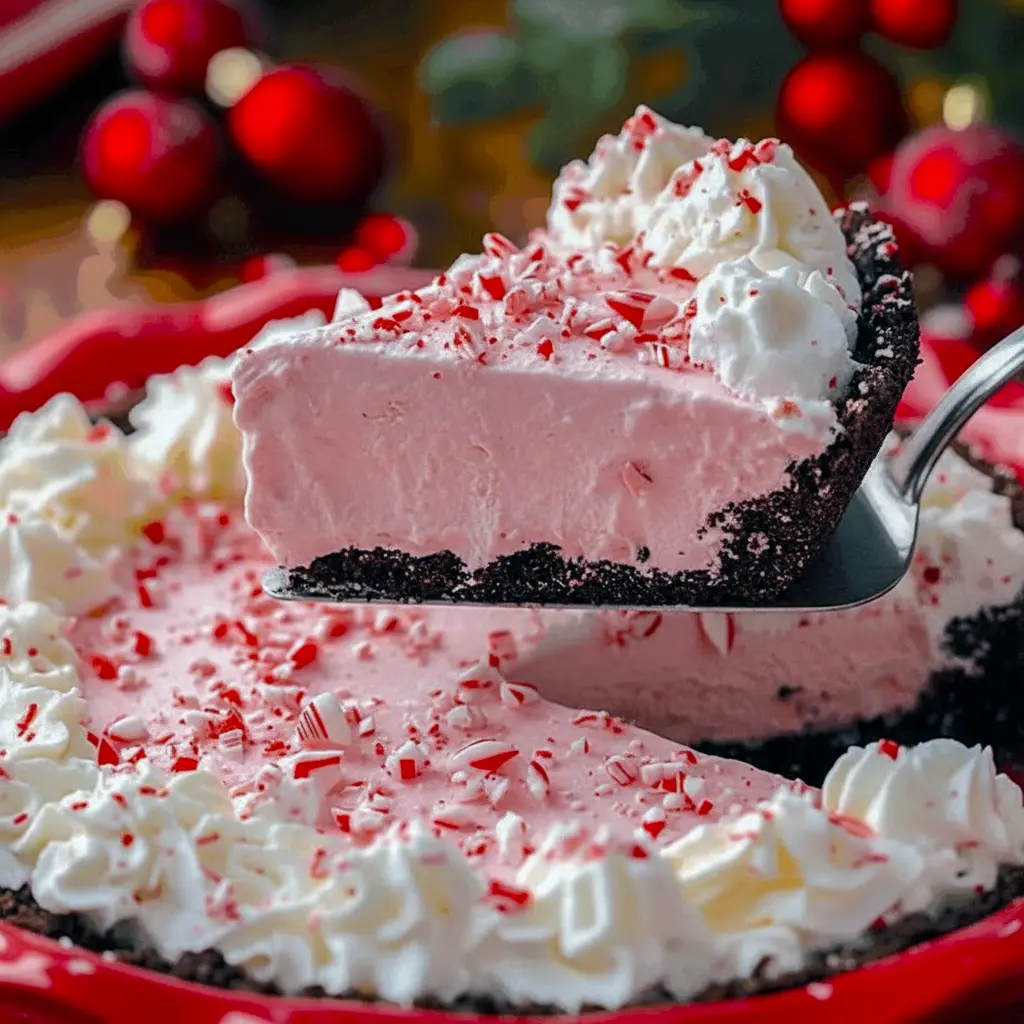
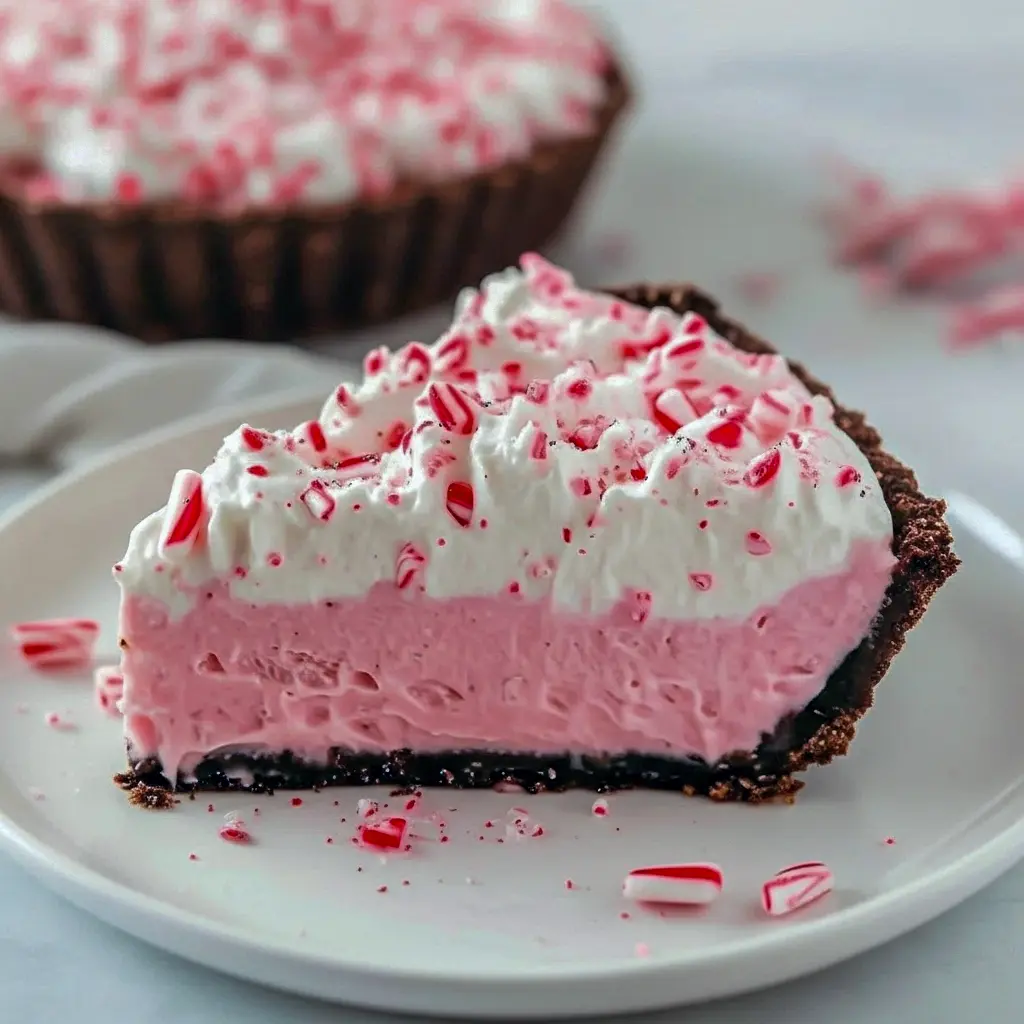
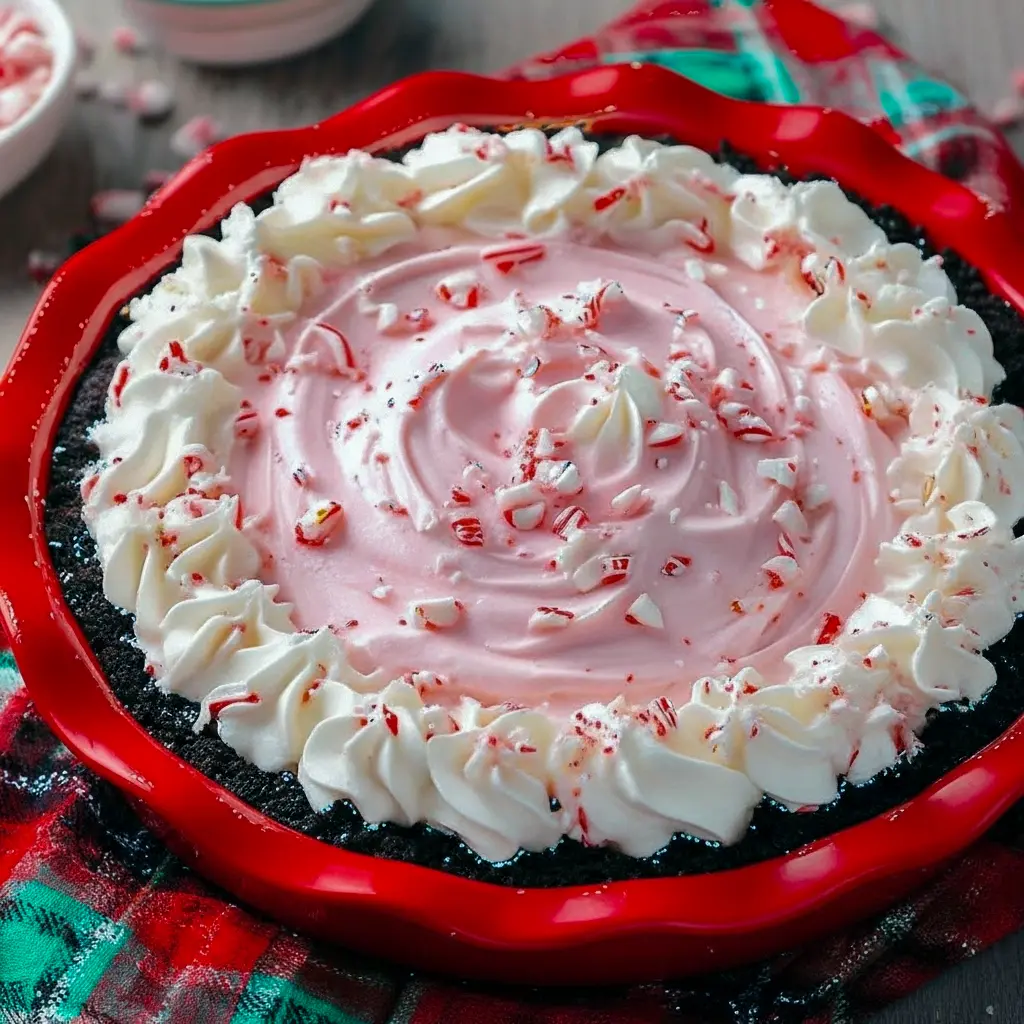
Those red-and-white swirls. The peppermint crunch. The creamy texture. It looks bakery-level fancy without bakery-level effort.
Crowd-approved flavor
Peppermint + cream cheese + chocolate crust = universal approval. It’s one of those Christmas Desserts With Peppermint that even non-mint fanatics usually love.
FYI: if you bring this to a party, expect recipe requests. It’s inevitable.
The story behind this pie (and why it stuck around)
This pie started as a problem-solver. One December, my oven was booked solid. Cookies, roasts, casseroles—you name it. I needed a dessert that didn’t ask for heat or babysitting.
I wanted something festive but not heavy. Something that felt like Christmas without screaming sugar overload. Enter peppermint pie.
After a few tweaks—less sweetness, better texture, stronger chill time—it became the dessert. The one my kids request by name. The one that vanishes before leftovers are even a question.
Now it’s a staple. It lives alongside cookies, bars, and other Fun Christmas Foods, but it always stands out. Cool, creamy, refreshing. A break from all the baked stuff.
Ingredients breakdown (what each part actually does)
The crust
Oreo pie crust
Chocolate and peppermint love each other. This crust adds crunch and balances the creamy filling. You can swap it, but IMO, Oreo is the MVP.
The filling
Cream cheese (full-fat, block style)
This is non-negotiable for texture. It gives the pie structure and that classic cheesecake vibe.
Powdered sugar
Smooth sweetness without graininess. It dissolves easily and keeps the filling silky.
Vanilla extract
Rounds out the flavor and softens the peppermint punch.
Peppermint extract
The star. Use it carefully. Too much and it turns toothpaste-y fast.
Heavy whipping cream
Whipped to stiff peaks, this lightens the filling and makes it cloud-like.
Crushed peppermint candy
Adds crunch, color, and unmistakable holiday energy.
The topping
Whipped topping (Cool Whip)
Optional, but it adds visual drama and extra creaminess.
Extra crushed peppermint
Classic Candy Toppings move. Pretty and crunchy.
Which cream cheese works best (don’t skip this)
Use full-fat block cream cheese. Always.
Tub-style spreads contain extra moisture and stabilizers that mess with texture. Low-fat versions won’t set the same way. If you want clean slices and a firm chill, stick with the blocks.
Key tip: Let it soften at room temperature for at least an hour. Cold cream cheese equals lumpy filling. Nobody wants that.
Short on time? Cut it into cubes and let it sit. Do not microwave it. Ever. That way lies sadness.
Smart substitutions if you need them
Life happens. Grocery stores run out. Here’s how to pivot without panic.
Crust swaps
Graham cracker crust works. Chocolate wafer crust works. Homemade Oreo crust works if you’re feeling ambitious.
Heavy cream alternative
Whipping cream works, but whip it longer to hit stiff peaks.
Cool Whip swap
Use an extra cup of freshly whipped cream with a little powdered sugar.
Cream cheese option
Neufchâtel works in a pinch. Slightly softer texture, still tasty.
Peppermint candy options
Candy canes, starlight mints, Andes mints (adds chocolate notes). Crush finely, but not into dust.
Food coloring
Optional. Skip it or use natural options if you prefer.
Watch out for these common mistakes
Let’s save you from holiday heartbreak.
Using cold cream cheese
This causes lumps. Softening is mandatory.
Overwhipping the cream
Stop at stiff peaks. Go further and you’ll get grainy, buttery texture.
Overdoing peppermint extract
Start small. Taste. Adjust. Different brands vary in strength.
Not chilling long enough
Four hours minimum. Overnight is better. Patience pays off.
Crushing candy too finely
You want crunch, not peppermint dust that melts away.
Step-by-step: how to make it (no stress edition)
Step 1: Whip the cream
Whip cold heavy cream until stiff peaks form. Set aside. Don’t overdo it.
Step 2: Mix the base
Beat softened cream cheese and powdered sugar until smooth. Add vanilla, peppermint extract, and food coloring. Mix until evenly colored.
Fold in crushed peppermint candy.
Step 3: Combine gently
Add the cream cheese mixture to the whipped cream. Mix on low speed just until combined. Keep it light and fluffy.
Step 4: Fill the crust
Spoon the filling into the Oreo crust. Smooth the top.
Step 5: Garnish and chill
Top with whipped topping and sprinkle with crushed peppermint. Chill for 1–2 hours minimum. Longer is better.
Done. You just made one of the easiest Christmas Eats Food wins of the season.
Pro tips for flawless results
Chill your bowl before whipping cream
It helps the cream whip faster and hold structure.
Taste before filling the crust
Peppermint intensity matters. Adjust early.
Use gel food coloring
Liquid can thin the filling.
Slice with a warm knife
Dip the knife in hot water, wipe dry, slice clean.
Variations to try if you’re feeling fancy
Chocolate drizzle version
Drizzle melted chocolate over the top before chilling.
Mini pies or jars
Turn this into Christmas Desserts Individual portions using mini crusts or jars.
Mint-chocolate chip
Fold in mini chocolate chips for extra texture.
Extra peppermint crunch
Add a second layer of candy topping right before serving.
What to serve with peppermint pie
Hot drinks are a must. Coffee, cocoa, peppermint mochas—pick your vibe.
Keep sides simple. This pie is rich. A little whipped cream goes a long way.
Hosting a dessert table? Pair with cookies and brownies for variety. This pie adds a cool contrast to warm baked treats.
Storage and leftovers (if there are any)
Refrigerate
Cover and chill up to 5 days.
Freeze
Wrap tightly and freeze up to 2 months. Add candy topping after thawing.
Serve
Thaw overnight in the fridge. Let sit at room temp 15–20 minutes before slicing.
FAQs you might be wondering about
Can I make this days ahead?
Yes. Two days is perfect.
Is this kid-friendly?
Absolutely. It’s sweet, creamy, and festive.
Can I skip the food coloring?
Yep. Purely cosmetic.
Does it travel well?
Yes. Keep it chilled until serving.
Final thoughts (and why this one’s a keeper)
This peppermint pie earns its place every single year. It’s easy. It’s festive. It’s reliable. It belongs in your rotation of Desserts To Make For Christmas and stands proud among your favorite Christmas Dessert Recipes No Bake.
If you want a dessert that feels special without stealing your time, this is it. Make it once, and it’ll quietly become tradition.
Now go clear fridge space. This pie’s coming through. 🎄🍰
Follow me on Pinterest for daily new recipes.

Easy No-Bake Peppermint Pie — Perfect For Easy Baking Christmas Hosting
- Prep Time: 15-30 minutes
- Total Time: 75-120 minutes
- Category: Dessert
Description
A chilled, minty pie tucked into a chocolate cookie shell — no oven needed and big on holiday cheer.
Ingredients
Crust
- 1 ready-made Oreo pie shell
Filling
- 2 teaspoons vanilla extract
- 2 (8-oz) blocks cream cheese, softened to room temperature
- ½ cup finely crushed peppermint candy
- 1½ cups confectioners’ sugar, sifted
- 1 teaspoon peppermint extract
- ~10 drops red gel coloring (optional, for festive swirls)
- 1 cup heavy cream, cold
Finish & garnish
- 1 container thawed whipped topping (like Cool Whip), optional
- Additional crushed peppermint for scattering on top
Instructions
Step 1 — Whip the cream
Chill a mixing bowl, then beat the cold heavy cream until it holds firm peaks. Put it aside while you make the base.
Step 2 — Make the sweet cream-cheese base
Beat the softened cream cheese with the powdered sugar until the mixture is silky and lump-free. Stir in vanilla and the peppermint extract. If you want the red streaks, fold in the gel color until the hue is even. Fold in ½ cup of the crushed candy.
Step 3 — Fold together
Carefully fold the sweetened cream-cheese mixture into the whipped cream using a spatula or a low mixer speed. Mix only until everything looks smooth and airy — you want it light, not dense.
Step 4 — Fill the crust
Spoon the filling into the Oreo shell and smooth the top with a spatula.
Step 5 — Top and chill
Spread a layer of whipped topping over the pie, if using, and sprinkle the remaining crushed peppermint on top. Refrigerate for at least 1–2 hours so the pie firms up nicely.
Slice and serve chilled. Enjoy the minty, creamy goodness!
Notes
- Use block cream cheese at room temp for a lump-free filling.
- Don’t overwhip the cream — stop at stiff peaks. Overwhipping can make it grainy.
- Start small with peppermint extract; it’s potent. Taste and adjust.
- Hold off on the garnish if freezing — add the candy just before serving to keep it crunchy.
Easy Baking Christmas, Christmas Eats Food, Christmas Dessert Recipes No Bake, No Bake Christmas Pie Recipes, Christmas Desserts With Peppermint, Fun Christmas Foods, Candy Toppings, Desserts To Make For Christmas, Christmas Desserts Individual


