Unique Cheesecake Recipes kick off this caffeinated love letter: an espresso chocolate cheesecake that’s dangerously good. If you adore bold coffee, glossy chocolate, and ultra-creamy texture, this dessert delivers all that drama without being intimidating. Want a showstopper for a party or a personal dessert to savor with an afternoon espresso? Read on.
Introduction — what this espresso cheesecake is all about
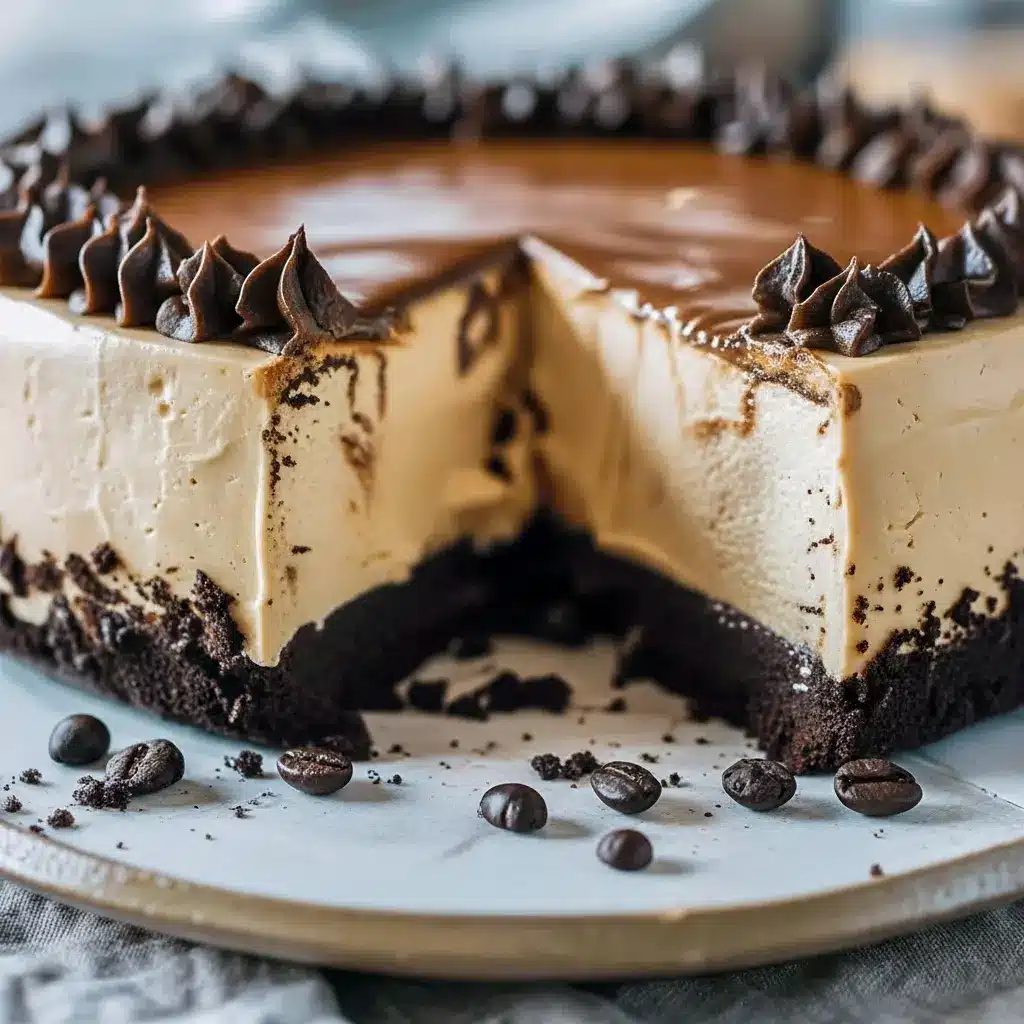
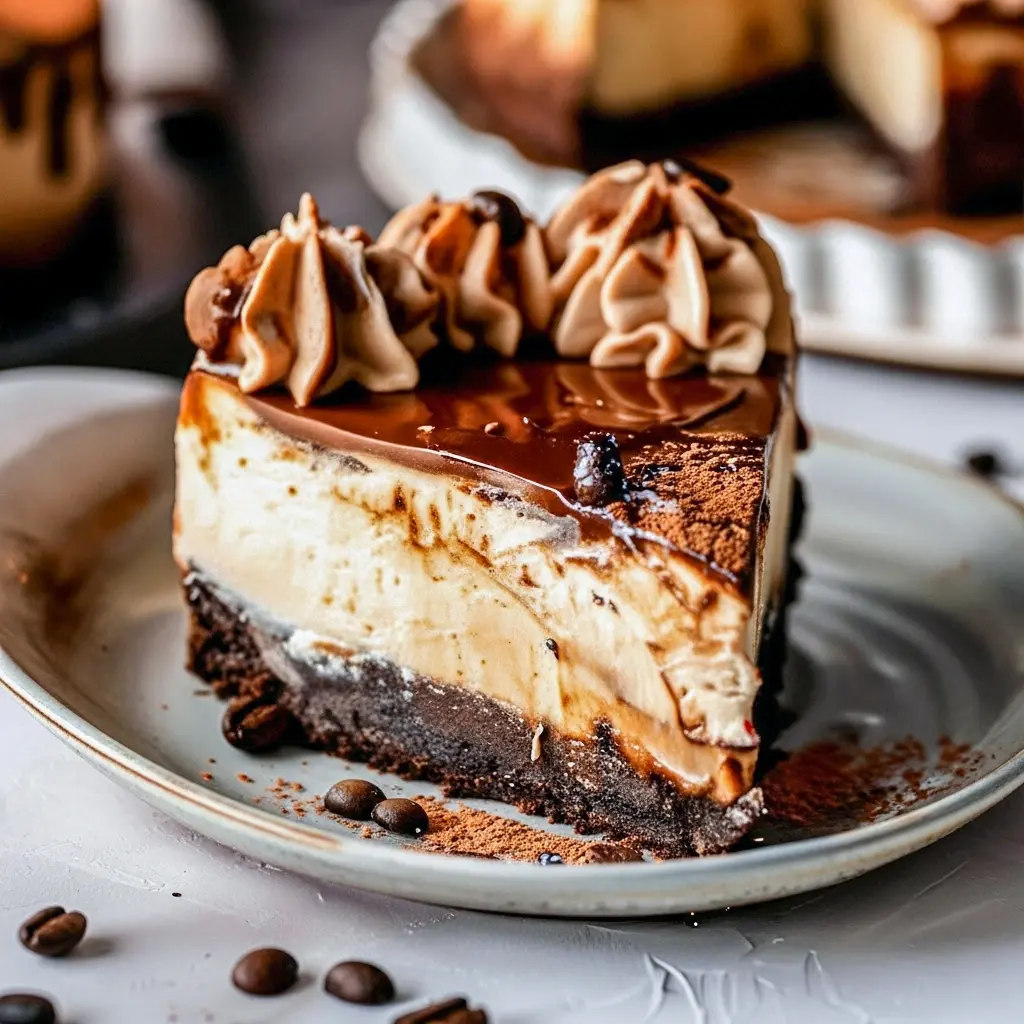
Think velvety cheesecake infused with real espresso, resting on an Oreo crumb base, crowned with a shiny chocolate ganache and a cloud of whipped cream. Add crushed espresso beans for crunch and you’ve got something both classic and adventurous. This is one of those Fun Cheesecake Recipes that feels fancy but plays nicely with home-kitchen skills. It’s decadent, slightly bitter from the coffee, and balanced by the sweetness of the ganache — total crowd-pleaser.
What makes this Unique Cheesecake Recipes so irresistible?
Texture, depth, and contrast. The filling stays silky because you handle the eggs gently. The Oreo crust adds a crunchy, chocolatey counterpoint. The espresso pulls the chocolate into darker territory, so every bite tastes like coffee and cake had a very sophisticated baby. Bold tip: use freshly brewed espresso (cooled) or a strong cold-brew concentrate — instant powder won’t give you the same depth. Also: the ganache seals the deal; it’s glossy, smooth, and adds that restaurant-level finish.
Ingredients — quick notes on each component
Crust (Oreo crumbs + butter): deep cocoa flavor and sturdy structure. Use a food processor to get a fine crumb.
Cream cheese (room temp): the backbone — three packages create a tall, creamy cake.
Sugar: straight granulated sugar keeps the texture clean; brown sugar muddies the flavor here.
Vanilla: rounds the coffee notes.
Espresso: brewed very strong — this is the flavor star.
Eggs: add richness and help the custard set. Add them one at a time and don’t overbeat.
Chocolate ganache (chips + cream): glossy, rich, and simple—heat the cream, pour over chocolate, stir.
Whipped cream & espresso beans: lightens the slice and gives lovely crunchy bites.
Each part plays a role: structure, moisture, bitterness, and showy finish. Want a Pretty Cheesecake for a party? This combo checks all the boxes.

Simple how-to: bake this espresso cheesecake (step-by-step)
- Prep: Preheat oven to 350°F (175°C). Grease a springform pan and line the base with parchment.
- Make the crust: Process Oreos until crumb-fine, stir in melted butter, press into the pan. Bake 8–10 minutes. Cool. Reduce oven to 325°F (160°C).
- Mix filling: Beat room-temp cream cheese until smooth. Add sugar, then the cooled espresso and vanilla. Mix gently. Add eggs one at a time, mixing only until incorporated. Scrape down the bowl. Fold, don’t whip.
- Bake carefully: Place the cheesecake pan in a larger roasting pan; add hot water about halfway up the springform (a makeshift water bath). Bake 65–85 minutes until the center jiggles slightly. Bold tip: this slow, moist bake prevents cracks and gives a silky interior.
- Cool slowly: Turn off the oven, crack the door, leave cheesecake inside 30 minutes. Remove, cool at room temp, then refrigerate at least 4 hours or overnight.
- Ganache: Heat cream until simmering, pour over chocolate chips, wait 1–2 minutes, stir until velvety. Cool slightly, pour over chilled cheesecake, smooth with a spatula. Garnish with whipped cream and espresso beans. Chill to set.
The story behind this cheesecake
I fell for espresso cheesecakes after tasting a tiny slice in a cramped café — bold coffee wrapped in creamy sweetness. I wanted to recreate that experience at home without fancy techniques. After testing crusts, espresso concentrations, and bake times, I landed on this Oreo-based version because it added a chocolatey contrast that plays well with coffee. People who taste it call it “dangerous” — mostly because they eat a second slice before they realize.
Pro tips for a flawless espresso cheesecake
- Room-temp ingredients make smoother batter. Cold cream cheese = lumps.
- Don’t overmix eggs. Overbeating incorporates air and causes cracks.
- Water bath matters. The steam and gentle heat prevent a dry, cracked top.
- Cool gradually. Sudden temp change = sinking center. Let it come down slowly.
- Sharp knife trick: Dip a knife in hot water, wipe dry, slice; repeat between cuts for clean slices.
Bold tip: if your ganache seems too runny, cool it 5–10 minutes on the counter — it will thicken slightly and still pour smooth.
Variations to try — play with the formula
- No-bake espresso chocolate cheesecake: swap the baked filling for a no-bake, gelatin-stabilized filling and set in the fridge. Great for hot days and still utterly decadent.
- Layered tiramisu-cheesecake: alternate thin layers of coffee-soaked ladyfingers with cheesecake filling for a hybrid masterpiece.
- White chocolate espresso cheesecake: fold white chocolate into the ganache or the filling for a sweeter contrast.
- Salted caramel latte cheesecake: swirl salted caramel into the top of the filling pre-bake for ribbons of salty-sweet.
These spins keep the core espresso vibe while branching into Spring Cheesecake Recipes, Birthday Cheesecake showpieces, or seasonal choices that make gorgeous centerpieces.
Best way to serve this espresso cheesecake
Serve chilled, sliced with a clean sharp knife. Pair with an espresso shot or dark roast coffee — that ups the drama and lets the flavors sing. For parties, assemble a small garnish station: cacao nibs, chocolate shavings, whipped cream rosettes, and extra crushed espresso beans. Want to dazzle a birthday table? Top with edible gold leaf or chocolate shards for a truly Pretty Cheesecake display that reads luxe.
Quick tips for storage and leftovers
- Refrigerate under plastic wrap or in an airtight container for up to 4–5 days. Cheesecake absorbs odors; keep it sealed.
- Freeze slices individually wrapped for up to 2 months. Thaw overnight in the fridge; pour fresh ganache after thawing if desired.
- Reheat? Nope — serve cold or room-temp. Warm cheesecake loses its structure and mouthfeel.
Bold note: add whipped cream only before serving; it won’t keep long on stored slices.
FAQs — quick answers to common baking questions
Can I use instant espresso powder instead of brewed espresso?
Yes — dissolve it in a tablespoon of hot water and add that concentrate. Use strong cold-brew or espresso for best results.
Why did my cheesecake crack?
Usually due to overmixing or a temperature shock. Use a water bath, avoid overbeating, and cool slowly with the oven door cracked.
Can I make this without chocolate ganache?
Absolutely. A dusting of cocoa powder, a swirl of caramel, or a crown of whipped cream keeps things elegant.
Is this a baked or no-bake cheesecake?
This is a Baked Cheesecake Recipe by default, but I’ve provided a no-bake idea above for hot weather or speed.
How long does it need to chill?
Ideally overnight (8–12 hours). That yields the creamiest texture.
Party ideas & pairing suggestions (Food For Birthday and more)
- This espresso cheesecake shines as a Food For Birthday alternative to traditional cake — rich and grown-up.
- Create a dessert table labeled Sweet Stuff: espresso cheesecake, mini fruit tarts, and a lemon bar for contrast.
- For a Birthday Cheesecake, add chocolate candles or a mini coffee bar beside it so guests can make espresso martinis.
- For spring events, riff on Spring Cheesecake Recipes by adding a light berry compote alongside the espresso slices.
Final thoughts — why you should make this cheesecake
This espresso chocolate cheesecake is a bridge between everyday baking and special-occasion indulgence. It’s luxurious without being fussy, bold without being sweet-overload, and it photographs beautifully — a genuine Pretty Cheesecake for your table. Whether you’re stamping “made with love” on a birthday spread or experimenting with Cheesecake Topping Ideas, this recipe rewards patience and simple technique.
So pull out the springform, brew up a bold espresso, and make something that will turn normal dessert time into a memorable, slightly dangerous feast. Want the printable recipe card with exact measurements, oven temps and a shopping list? I’ll draft it for you next — espresso in hand.
Follow me on Pinterest for daily new recipes.


Unique Cheesecake Recipes — Dangerously Delicious Espresso Cheesecake
- Prep Time: 25 minutes
- Cook Time: 1 hour 15 minutes
- Total Time: 5 hours 40 minutes (includes overnight chilling)
- Yield: 8 slices 1x
- Category: Dessert
Description
Rich, coffee-kissed cheesecake with a crunchy Oreo base and a silky chocolate ganache. This version keeps the same flavors but uses fresh wording and straightforward steps.
Ingredients
For the crust
- 2 cups Oreo cookie crumbs (about 24 Oreos, remove the filling)
- 4 tablespoons unsalted butter, melted
For the espresso cheesecake filling
- 3 (8-oz) packages cream cheese, softened to room temperature
- 1 cup granulated sugar
- 1 teaspoon vanilla extract
- 1/3 cup strong brewed espresso, cooled
- 3 large eggs
For the chocolate ganache
- 1/2 cup heavy cream
- 1 cup semi-sweet chocolate chips
Optional garnish
- Whole espresso beans or chocolate shavings
Instructions
-
Preheat and prep the pan
Preheat your oven to 350°F (175°C). Grease the bottom and sides of a 9-inch springform pan, or line the base with parchment for easy removal. -
Make the crust
Pulse the Oreo cookies in a food processor until they form fine crumbs. If you don’t have a processor, place cookies in a heavy-duty bag and crush them with a rolling pin. Stir the crumbs with the melted butter until the mixture looks evenly moistened. Press the crumbs firmly into the bottom of the prepared springform pan to form a compact layer. Bake the crust for 10 minutes, then remove it to cool while you lower the oven to 325°F (160°C). -
Prepare the filling
In a large bowl, beat the room-temperature cream cheese until smooth and lump-free. Add the granulated sugar and vanilla, mixing until combined. Pour in the cooled espresso and blend gently. Add the eggs one at a time, stirring just until each egg disappears into the batter — avoid whipping in air. Pour the cheesecake batter over the cooled crust and smooth the top with a spatula. -
Bake in a water bath
Place the springform pan inside a larger roasting pan. Carefully pour hot water into the outer pan until it reaches about halfway up the sides of the springform. Slide the pans into the oven and bake at 325°F (160°C) for about 65–85 minutes. The edges should look set while the center retains a slight wobble. -
Cool slowly
When baking finishes, switch the oven off and crack the door open. Let the cheesecake sit inside for 1 hour to cool gradually — this helps prevent cracks. After an hour, remove the cheesecake and let it reach room temperature, then chill in the refrigerator for at least 4 hours (overnight is best). -
Make the ganache
Warm the heavy cream until it begins to simmer (do not boil). Place the chocolate chips in a heatproof bowl and pour the hot cream over them. Let sit for a minute, then stir until the chocolate melts and the ganache becomes smooth and glossy. Allow the ganache to cool for 5–7 minutes so it thickens slightly, then pour it evenly over the chilled cheesecake. -
Finish and serve
Return the cheesecake to the fridge to let the ganache set. When ready to serve, run a thin knife around the pan edge to loosen, release the springform, and transfer slices to plates. Garnish with espresso beans or chocolate shavings if you like. Serve chilled.
Notes
- Storage & freezing
- Refrigerate: Cover the cheesecake tightly and store in the fridge for up to 4–5 days.
- Freeze: Wrap a whole cheesecake (without ganache) tightly in plastic wrap and foil, or pre-slice and wrap individual pieces. Freeze up to 2 months. Thaw in the refrigerator overnight. For best results, add the ganache after thawing rather than before freezing.
- Tips & troubleshooting
- Use room-temperature cream cheese for a silky, lump-free filling.
- If you want stronger coffee flavor, increase the espresso to 1/2 cup, but note the cheesecake may become slightly softer.
- Add the eggs slowly and mix minimally to reduce the chance of cracking.
- For clean slices, wipe your knife between each cut and dip it briefly in hot water before slicing.


